There is a particular moment of panic that I believe every home cook knows well. It is 5:45 PM on a Tuesday. You are tired, you are hungry, and you are staring at a package of boneless, skinless chicken breasts on the counter. You know you need to get dinner on the table fast, but those thick, bulky breasts look at you with defiance. You understand the story: by the time you cook them through without burning the outside, it will likely be 7:00 PM.
I used to live that story every single week. I would pound the chicken with a mallet, swearing under my breath while chasing plastic wrap around the kitchen. Alternatively, I would cut into a finished piece of chicken only to find it raw in the middle, which led to the dreaded microwave finish that inevitably ruins the texture.
Then, I discovered the secret weapon of the quick-service restaurant and the savvy home cook. Whether you buy them pre-sliced from the butcher counter or butterfly and flatten them yourself, these quick-cooking cutlets are the ultimate solution for busy weeknights. They cook in minutes, they soak up marinades like a sponge, and they are nearly impossible to overcook into that dry, chalky state we all fear.
In this comprehensive guide, we will dive deep into the world of thinly sliced chicken breast recipes. We will cover everything from the basic techniques to global flavor inspirations, ensuring you never have a boring, dry chicken dinner again. By the end, you will feel confident grabbing that package of cutlets, knowing that a delicious, fast, and healthy meal is less than 15 minutes away.
Why Thinly Sliced Chicken Breasts Are a Game Changer
Before we jump into the recipes, let us discuss why this specific cut deserves a permanent spot in your weekly rotation. It is not merely about saving time; it is about transforming your relationship with chicken.
- Speed: This is the most obvious benefit. A standard chicken breast might take 20-25 minutes to bake or 12-15 minutes to pan-sear. A cutlet will cook in 2-4 minutes per side. We are discussing dinner in the time it takes to boil pasta or steam some rice.
- Even Cooking: The bane of a regular chicken breast is its tapered shape, thick on one end, thin on the other. By the time the thick part is cooked, the thin “fillet” is dry and overcooked. Slicing the breast into uniform cutlets (approximately ½-inch thick) solves this problem entirely. Everything cooks at the same rate, guaranteeing a juicy result across the board.
- Versatility: Because they cook so fast, these recipes span the globe. They serve as the perfect canvas for the bright herbs of an Italian piccata, the sticky-sweet glaze of Korean bulgogi, or the warm spices of an Indian curry. They grill beautifully, they pan-fry to a golden crisp, and they even work well in the air fryer.
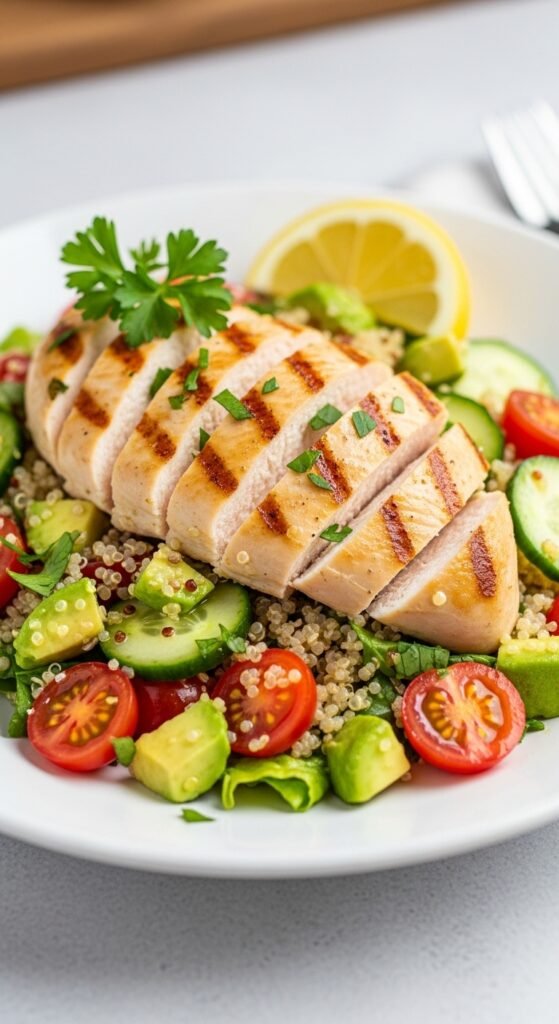
- Portion Control: A single large chicken breast can often weigh 8-10 ounces, which is double the recommended serving size for protein. When you slice a breast into cutlets, you naturally create more reasonably sized portions, making it easier to build a balanced plate with vegetables and starches.
- Budget-Friendly: Chicken breast is generally more affordable than pre-made convenience foods or takeout. By mastering these recipes, you are actively saving money while eating healthier, cleaner food.
Quick Chicken Dinner Ideas Using Cutlets
When time is of the essence, having a repertoire of quick chicken dinner ideas at your fingertips proves invaluable. Thinly sliced chicken breast recipes naturally lend themselves to speed, but here are some additional strategies to get dinner on the table even faster.
The 10-Minute Seared Cutlet Method
The simplest approach requires minimal ingredients yet delivers maximum flavor. Pat your cutlets dry, season generously with salt and pepper, and sear in a hot skillet with olive oil for 2-3 minutes per side. While the chicken rests, deglaze the pan with a splash of chicken broth or white wine, scrape up those browned bits, and swirl in a tablespoon of butter. Pour this simple pan sauce over the chicken, and dinner is served.
One-Pan Vegetable and Chicken Meals
Arrange seasoned cutlets on a baking sheet surrounded by chopped vegetables such as broccoli, bell peppers, and red onion. Drizzle everything with olive oil, sprinkle with Italian seasoning, and roast at 400°F for approximately 15-18 minutes. The vegetables roast perfectly while the chicken cooks through, and you have only one pan to wash afterward.
Sandwich and Wrap Creations
Grilled or pan-seared cutlets work beautifully for sandwiches and wraps. Cook the chicken with a simple seasoning, then slice or leave whole to place on crusty bread with lettuce, tomato, and your favorite spread. Consider a Caesar chicken wrap with romaine lettuce, Parmesan, and Caesar dressing, or a buffalo chicken sandwich with spicy sauce and cool ranch dressing.
Healthy Chicken Cutlet Meals for Nutritious Eating
Maintaining a balanced diet becomes significantly easier when you have access to healthy chicken cutlet meals. Chicken breast already provides lean protein, and the quick cooking methods require minimal added fats.
Building a Balanced Plate
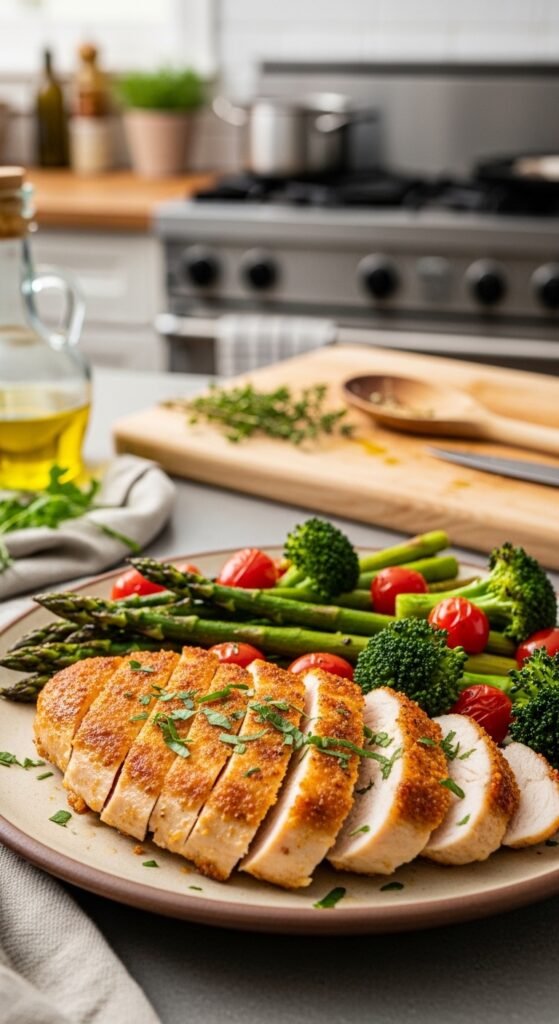
A nutritious meal typically includes three components: lean protein, complex carbohydrates, and vegetables. Your chicken cutlet serves as the protein foundation. Pair it with quinoa, brown rice, or sweet potatoes for complex carbohydrates, and fill half your plate with roasted or steamed vegetables for fiber, vitamins, and minerals.
Lighter Cooking Techniques
While pan-searing with oil produces delicious results, several other methods reduce added fats without sacrificing flavor. Poaching cutlets in simmering chicken broth keeps them exceptionally moist and tender. Grilling imparts smoky flavor without additional oil. Baking on a parchment-lined sheet requires only a light spritz of cooking spray.
Fresh Herb and Citrus Combinations
Bright, fresh flavors enhance chicken without adding calories or unhealthy ingredients. A mixture of chopped parsley, cilantro, mint, and chives sprinkled over cooked cutlets adds freshness and visual appeal. Lemon or lime juice squeezed over the chicken just before serving provides acidity that brightens the entire dish. These fresh flavor boosters transform simple chicken into something special while keeping meals light and healthy.
Easy Chicken Breast Recipes for Beginner Cooks

If you are new to cooking, mastering a few easy chicken breast recipes builds confidence and establishes a foundation for future culinary adventures. Thinly sliced chicken breast recipes prove particularly forgiving for beginners because they cook quickly and evenly.
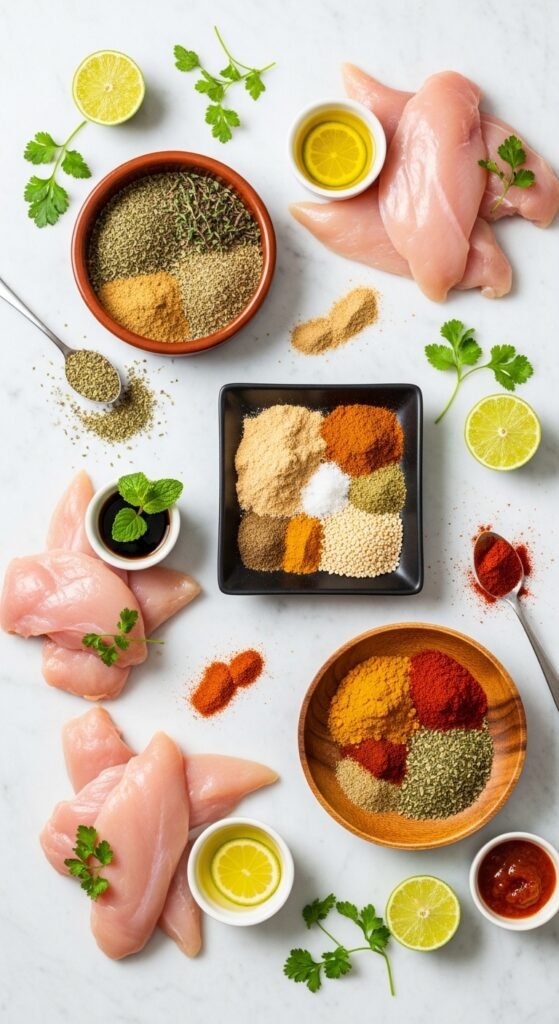
The No-Fail Seasoning Formula
Memorizing a simple seasoning formula eliminates guesswork. Combine 1 teaspoon salt, ½ teaspoon black pepper, 1 teaspoon garlic powder, and 1 teaspoon paprika. This mixture works with virtually any cooking method and provides a reliable flavor base. Store extra in a small jar for future use.
Understanding Doneness
New cooks often worry about undercooked chicken, leading to dry, overcooked results. An instant-read thermometer removes all uncertainty. Insert it into the thickest part of the cutlet; when it reads 165°F, the chicken is perfectly cooked and safe to eat. With practice, you will recognize visual cues, firm texture and clear juices, but the thermometer provides guaranteed success every time.
Simple Sauce Options
A beautiful sauce elevates chicken from ordinary to impressive with minimal effort. After removing cooked chicken from the pan, add ½ cup chicken broth and scrape up the browned bits. Simmer until reduced by half, then remove from heat and whisk in 2 tablespoons cold butter. This quick pan sauce requires only two ingredients yet tastes remarkably sophisticated.
Weeknight Chicken Dinner Solutions for Busy Families

Families face unique dinner challenges: differing tastes, busy schedules, and the need for meals that satisfy everyone. Weeknight chicken dinner planning becomes manageable with strategies designed for real-life situations.
Batch Cooking for Busy Weeks
Set aside one hour on Sunday to prepare multiple cutlets for the week ahead. Season and cook several pieces, then store them in the refrigerator. During the week, you can quickly transform this prepared chicken into various meals: slice over salads, warm with barbecue sauce for sandwiches, or chop into soups and casseroles.
Kid-Friendly Flavor Profiles
Children often prefer familiar, approachable flavors. A simple honey mustard glaze combining equal parts honey and Dijon mustard appeals to young palates. Parmesan-crusted cutlets offer crunchy texture that kids enjoy. For milder palates, reduce or omit spicy ingredients and let individuals add hot sauce at the table.
Make-Ahead Marinades
Preparing marinades in advance streamlines dinner preparation. Combine olive oil, lemon juice, minced garlic, and dried herbs in a jar and refrigerate for up to one week. When you arrive home, simply pour the marinade over cutlets, let them sit for 10-15 minutes while you attend to other tasks, and cook as directed.
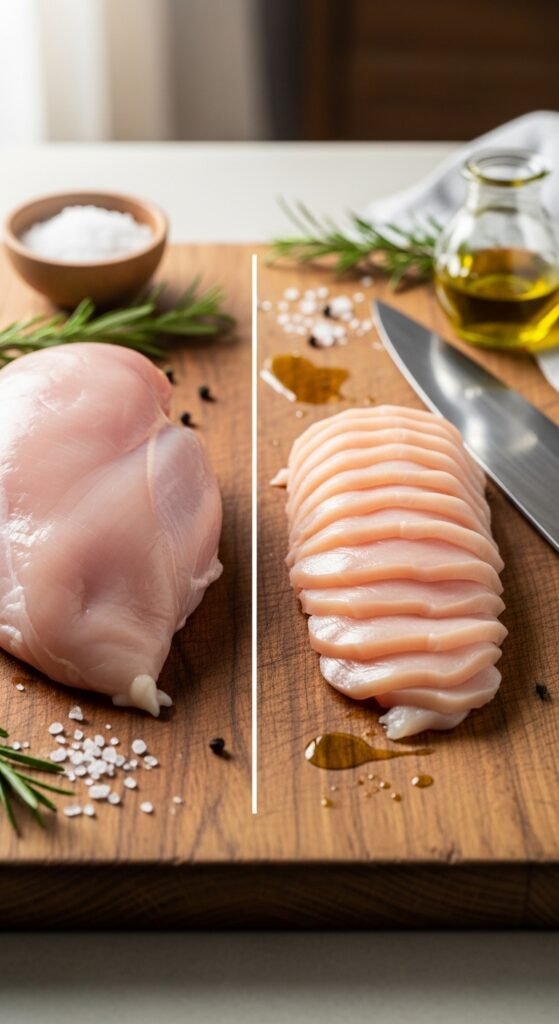
The Essential Guide to Preparing Your Chicken
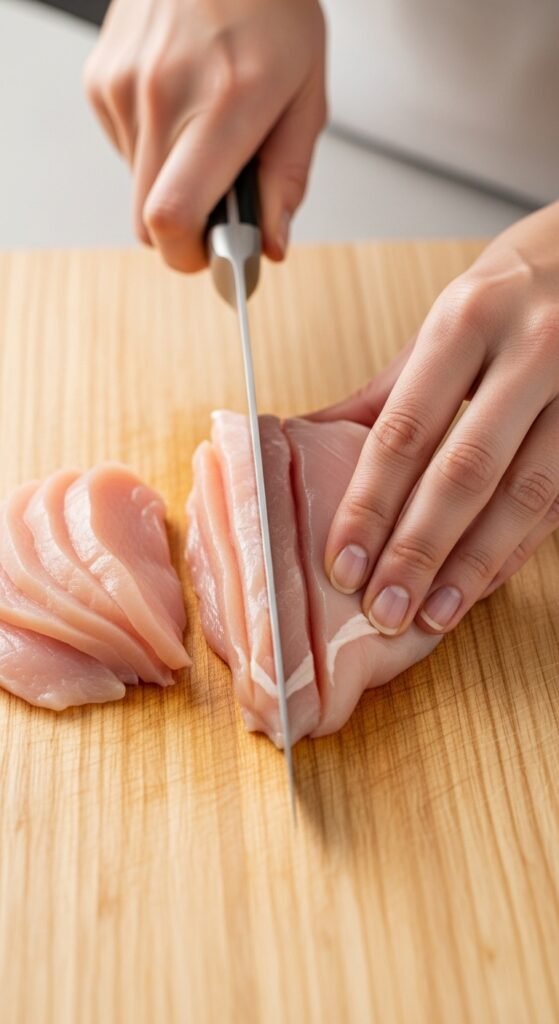
If your grocery store has a butcher counter or sells “chicken breast cutlets” or “chicken tenderloins,” you can skip this step. However, if you have a package of whole breasts, do not worry, transforming them is incredibly easy. Here is a quick anecdote: I remember the first time I tried to butterfly a chicken breast. I ended up with two pieces that resembled a map of Australia and Antarctica. It was functional but not pretty. With a little practice, you will become a pro.
Step-by-Step: How to Make Your Own Cutlets

- The Chill: Place your chicken breasts in the freezer for approximately 15-20 minutes before you start. A partially frozen breast is much firmer and easier to slice thinly and evenly than a floppy, room-temperature one.
- The Setup: You will need a large, sharp chef’s knife and a cutting board. Place your hand flat on top of the chicken breast to steady it.
- The Butterfly: Carefully slice the chicken breast horizontally, starting at the thickest side and moving toward the thin side. Stop about ½-inch before you cut all the way through, so you can open it like a book.
- The Split: Open the butterflied breast and lay it flat. You can now either cook it as is (it will remain connected in the middle) or cut it all the way through the fold to create two separate, thinner pieces.
- The Pound (Optional but Recommended): Place the butterflied pieces between two sheets of plastic wrap or parchment paper. Using a meat mallet, a rolling pin, or even a heavy skillet, gently pound them to an even thickness of approximately ¼ to ½ inch. This ensures they cook in that lightning-fast 2-3 minutes. Do not pulverize them; a few firm taps will suffice.
- The Pat-Down: This is the most important step for achieving a beautiful golden crust. Use paper towels to pat the chicken completely dry. Moisture is the enemy of browning. Dry chicken equals crispy, delicious exterior. Wet chicken equals steamed, pale, rubbery exterior.
5 Foolproof Thinly Sliced Chicken Breast Recipes
Now, let us proceed to the main event. These recipes are designed to be simple, packed with flavor, and on your table in under 30 minutes.
1. The Weeknight Hero: Lemon Garlic Butter Chicken Cutlets
This is my go-to recipe when I need a guaranteed win. It is elegant enough for a company but simple enough for a Tuesday. The first time I made this for my family, my son, who usually pushes chicken around his plate, asked for seconds. That is when I knew I had stumbled onto something special.
Why it works: The quick sear creates a flavorful crust, and the pan sauce, made in the same skillet, comes together in the time it takes the chicken to rest. It is the perfect introduction to cooking with cutlets.
Ingredients:
- 1.5 lbs thinly sliced chicken breast cutlets (approximately 4-6 pieces)
- Salt and freshly ground black pepper, to taste
- 2 tablespoons olive oil
- 3 tablespoons unsalted butter, divided
- 3 cloves garlic, minced
- ½ cup low-sodium chicken broth
- ¼ cup fresh lemon juice (from approximately 1 large lemon)
- 2 tablespoons capers, drained (optional, but highly recommended)
- 2 tablespoons fresh parsley, chopped
- Lemon slices, for serving
Step-by-Step Instructions:
- Prep the Chicken: Pat the chicken cutlets completely dry with paper towels. Season both sides generously with salt and pepper. This represents the only seasoning they receive before the pan, so do not hold back.
- Sear the Chicken: Heat the olive oil and 1 tablespoon of the butter in a large skillet (preferably stainless steel or cast iron) over medium-high heat. Once the oil is shimmering and the butter is foaming, carefully place the chicken in the skillet in a single layer. Work in batches if necessary to avoid crowding the pan. Crowding will steam the chicken, not sear it.
- Cook: Allow the chicken to cook undisturbed for 2-3 minutes, until the underside is golden brown and releases easily from the pan. Flip and cook for another 2 minutes, until cooked through. The chicken is done when it feels firm to the touch or registers 165°F (74°C) on an instant-read thermometer. Transfer the cooked chicken to a plate and tent loosely with foil to keep warm.
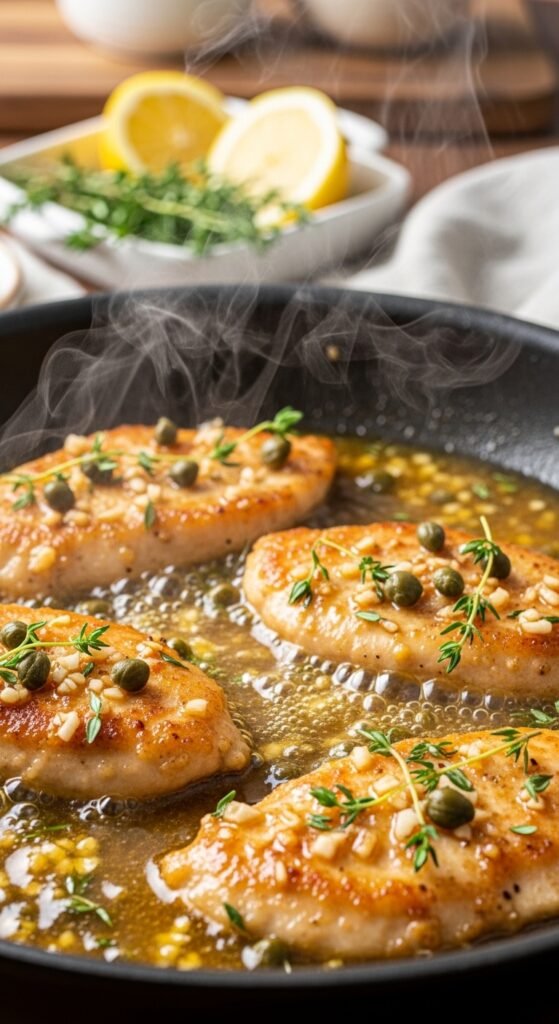
- Make the Sauce: Reduce the heat to medium. Add the minced garlic to the pan and sauté for approximately 30 seconds until fragrant, scraping up any browned bits from the bottom of the pan, that is flavor.
- Deglaze: Pour in the chicken broth and lemon juice. Bring to a simmer, scraping up any remaining browned bits. Allow it to bubble away for 2-3 minutes until it reduces slightly.
- Finish: Remove the pan from the heat. Whisk in the remaining 2 tablespoons of butter until it melts and creates a silky, emulsified sauce. Stir in the capers and most of the parsley.
- Serve: Return the chicken to the skillet to coat in the sauce, or serve the chicken on a platter with the sauce spooned over the top. Garnish with fresh parsley and lemon slices.
2. Crispy, Crunchy: Ultimate Parmesan Crusted Chicken
We all crave that crispy, fried chicken texture, but the thought of deep-frying at home can feel daunting. This recipe delivers all the crunch with considerably less fuss and oil. The key lies in the combination of panko breadcrumbs and Parmesan cheese, which creates an incredibly crispy, nutty, and golden crust.
Ingredients:
- 1.5 lbs thinly sliced chicken breast cutlets
- ½ cup all-purpose flour
- 2 large eggs, beaten
- 1 cup panko breadcrumbs
- ½ cup finely grated Parmesan cheese
- 1 teaspoon garlic powder
- 1 teaspoon paprika
- Salt and black pepper, to taste
- ¼ cup olive oil or avocado oil, for frying
- Lemon wedges, for serving
Instructions:
- Set Up Your Dredging Station: Gather three shallow bowls. In the first bowl, place the flour seasoned with a pinch of salt and pepper. In the second bowl, beat the eggs with a tablespoon of water. In the third bowl, combine the panko, Parmesan, garlic powder, and paprika.
- Dredge the Chicken: Pat the chicken dry and season with salt and pepper. Take a cutlet and dredge it first in the flour, shaking off the excess. Next, dip it into the egg wash, allowing any excess to drip off. Finally, press it firmly into the panko-Parmesan mixture, ensuring it becomes completely coated. Place the breaded cutlet on a plate and repeat with the remaining chicken.
- Pan-Fry: Heat the oil in a large skillet over medium heat. The oil is ready when a pinch of panko sizzles immediately. Carefully place the breaded chicken in the skillet, working in batches to avoid overcrowding.
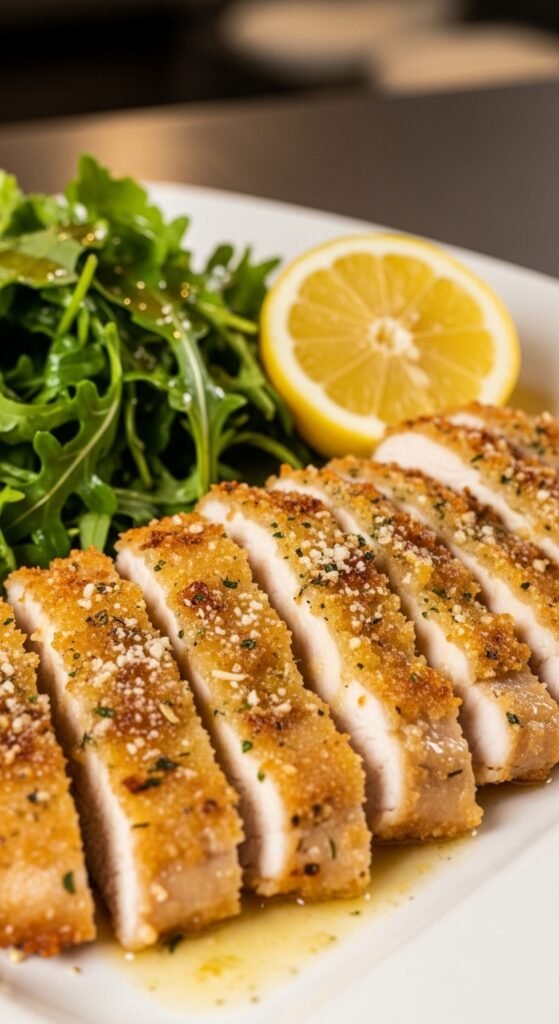
- Cook to Golden Perfection: Fry for 3-4 minutes per side, until the crust is deep golden brown and the chicken is cooked through. The thinness of the cutlets guarantees the inside cooks perfectly by the time the outside achieves crunchiness.
- Drain and Serve: Transfer the cooked chicken to a wire rack set over a baking sheet—this method keeps it crispier than paper towels. Sprinkle immediately with a little flaky sea salt. Serve hot with lemon wedges, over a bed of spaghetti with marinara sauce, or alongside a simple green salad.
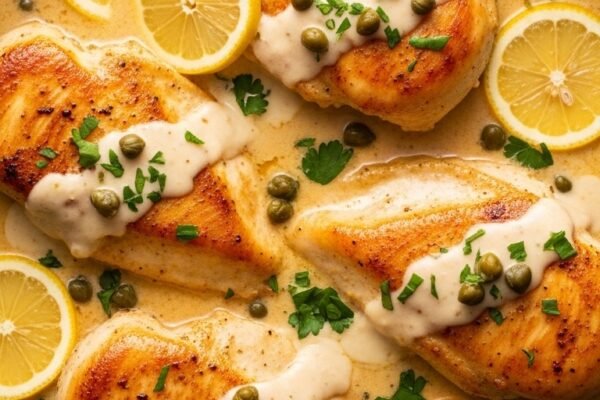
3. A Taste of Italy: Chicken Saltimbocca

Saltimbocca translates to “jumps in the mouth,” referring to the explosion of flavor you experience from this simple Roman dish. It sounds fancy, yet it ranks among the easiest recipes you can prepare. The combination of salty prosciutto, fragrant sage, and a light wine sauce creates pure magic.
Ingredients:
- 1.5 lbs thinly sliced chicken breast cutlets
- 4-6 thin slices of prosciutto (one per cutlet)
- 8-12 fresh sage leaves (2 per cutlet)
- Salt and freshly ground black pepper
- 2 tablespoons olive oil
- ½ cup dry white wine (or chicken broth)
- 2 tablespoons butter
- Toothpicks
Instructions:
- Assemble the Saltimbocca: Place a chicken cutlet on your work surface. Lay one slice of prosciutto on top of the chicken. (The prosciutto provides saltiness, so use a very light hand with additional salt for the chicken.) Position two sage leaves on top of the prosciutto. Use a toothpick to secure the sage, prosciutto, and chicken together, threading it through all the layers. Repeat for all cutlets.
- Sear: Heat the olive oil in a large skillet over medium-high heat. Place the chicken in the pan, prosciutto-side down first. Cook for 3 minutes, until the prosciutto turns crisp and the chicken becomes golden. Flip and cook for another 2-3 minutes.
- Make the Pan Sauce: Transfer the chicken to a plate and remove the toothpicks. Pour the white wine into the hot pan, scraping up the delicious browned bits from the bottom. Allow the wine to bubble and reduce by half, approximately 2 minutes.
- Finish and Serve: Remove the pan from the heat and swirl in the butter until it melts into a glossy sauce. Pour the sauce over the chicken and serve immediately.
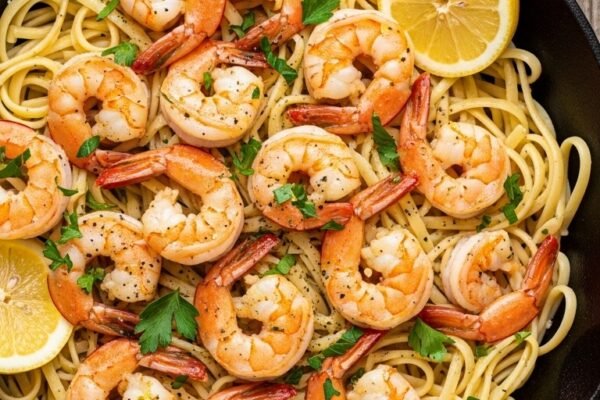
4. Global Flair: 15-Minute Chicken Bulgogi
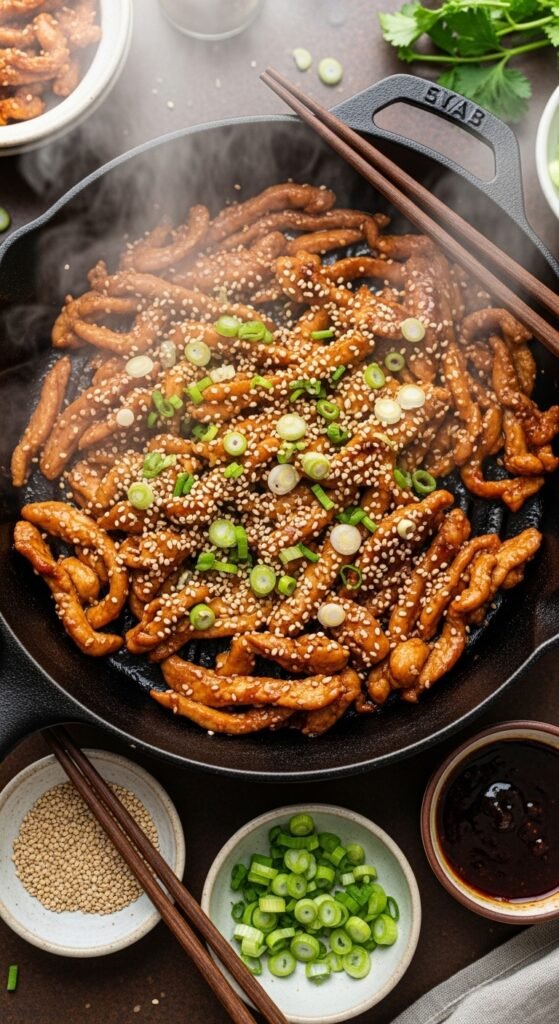
Bulgogi is a classic Korean dish featuring thinly sliced beef marinated in a sweet and savory soy sauce. Using chicken offers a fantastic, lighter twist that comes together in a flash. The key element is the high-heat cooking, which caramelizes the marinade beautifully.
Ingredients:
- 1.5 lbs thinly sliced chicken breast cutlets, cut into bite-sized strips
- For the Marinade/Sauce:
- ¼ cup soy sauce (or tamari for gluten-free)
- 2 tablespoons brown sugar
- 1 tablespoon sesame oil
- 2 cloves garlic, minced
- 1 teaspoon grated fresh ginger
- 1 tablespoon gochujang (Korean chili paste) or 1 teaspoon red pepper flakes (optional for heat)
- 2 green onions, thinly sliced
Instructions:
- Marinate: In a medium bowl, whisk together the soy sauce, brown sugar, sesame oil, garlic, ginger, and gochujang (if using). Add the chicken strips and toss to coat. Allow it to marinate for just 10-15 minutes while you prepare your rice and vegetables. Because the chicken is thin, it does not require extended time to absorb the flavor.
- Cook: Heat a large skillet, wok, or cast-iron pan over high heat. Add a splash of neutral oil. Add the chicken in a single layer—work in batches if needed. Allow it to sear undisturbed for 2 minutes to develop a nice char.
- Finish: Stir-fry for another 2-3 minutes until the chicken is cooked through and the sauce has thickened slightly, creating a glaze on the chicken.
- Serve: Garnish with the remaining green onions and sesame seeds. Serve immediately over steamed rice with quick-pickled cucumbers or a side of kimchi.
5. The “Set It and Forget It” Method: Baked Lemon Herb Chicken
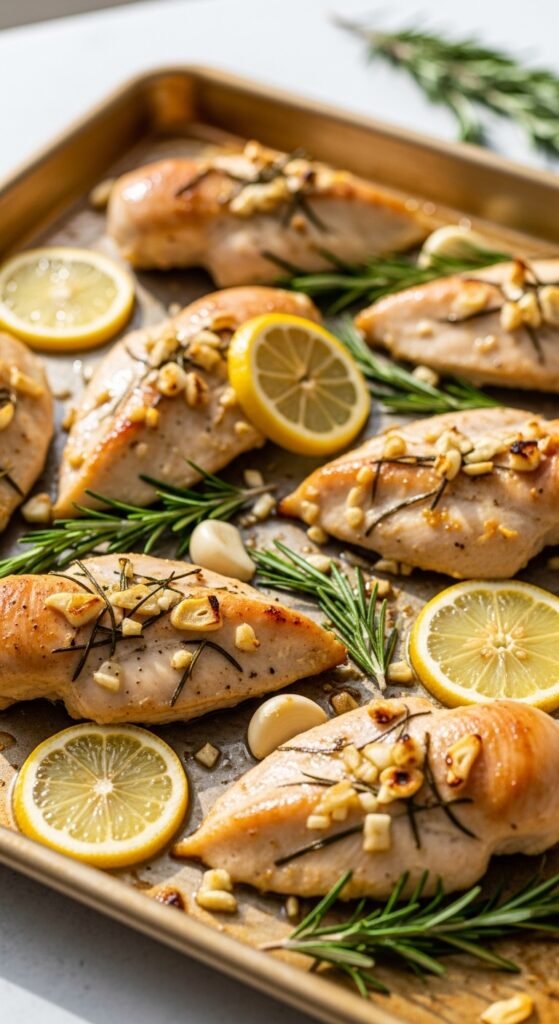
While pan-searing offers the fastest method, sometimes you prefer using your oven. This baked recipe proves perfect for moments when you are multi-tasking. It represents a hands-off approach that still yields incredibly moist and flavorful chicken. The keys are a hot oven and a simple, vibrant topping.
Ingredients:
- 1.5 lbs thinly sliced chicken breast cutlets
- 3 tablespoons olive oil
- Zest and juice of 1 lemon
- 2 cloves garlic, minced
- 1 teaspoon dried oregano
- 1 teaspoon dried thyme
- ½ teaspoon salt
- ¼ teaspoon black pepper
- Cherry tomatoes, halved (optional)
- Feta cheese, crumbled (optional)
Instructions:
- Preheat and Prep: Preheat your oven to 400°F (200°C) . Lightly grease a baking dish large enough to accommodate the chicken in a single layer.
- Make the Marinade: In a small bowl, whisk together the olive oil, lemon zest, lemon juice, garlic, oregano, thyme, salt, and pepper.
- Assemble: Place the chicken cutlets in the prepared baking dish. Pour the marinade over the chicken and turn to coat evenly. If using, scatter the cherry tomato halves around the chicken.
- Bake: Bake for 15-20 minutes, or until the chicken is cooked through and no longer pink in the center. Baking time will prove significantly shorter than with whole breasts, so monitor it closely.
- Serve: If using, sprinkle with crumbled feta cheese and fresh parsley. The tomatoes will have softened and released their juices, creating a simple, rustic sauce in the pan. Serve with crusty bread to soak it all up.
Pro-Tips for Perfect Chicken Cutlets Every Time

Over the years, I have learned several tricks that distinguish good chicken from great chicken. Keep these principles in mind whenever you work with cutlets.
- Do Not Crowd the Pan: This stands as the number one rule of pan-searing. If you place too many pieces of chicken in the pan simultaneously, the temperature of the pan drops drastically. Instead of searing, the chicken will steam and release its juices, leaving you with a sad, grey piece of meat. Cook in batches when necessary. This adds a few extra minutes but makes a world of difference.
- Use a Thermometer: While the thinness of the cutlets makes them forgiving, employing an instant-read thermometer remains the best way to guarantee perfection. Chicken is safe to eat at 165°F (74°C) . Due to carryover cooking, you can remove them from heat at 160°F (71°C) and let them rest; the temperature will rise the final few degrees.
- Let It Rest: Similar to a steak, chicken benefits from a short rest. Transfer the cooked cutlets to a plate and allow them to sit for 5 minutes before slicing or serving. This permits the juices, which have been driven to the center by the heat, to redistribute throughout the meat, ensuring every bite remains moist.
- Flavor Infusions: Because they cook so quickly, cutlets do not have hours for marinating. However, you can infuse them with flavor through alternative methods. A dry brine (salting them 30 minutes before cooking) works wonders. You can also stuff them! Given their thinness, you can place a small amount of cheese, spinach, or sun-dried tomatoes on one half and fold the other over, securing with toothpicks, to create a quick and easy stuffed chicken.
How to Buy with Confidence: Choosing the Best Thinly Sliced Chicken Breast

Now that you possess these delicious recipes, let us discuss the most important step: selecting the star ingredient. I want you to walk into the grocery store with the confidence to choose the absolute best product for your family. Here is what you should look for:
- Where to Find Them:
- The Butcher Counter: This represents your best option. Ask the butcher to slice chicken breasts horizontally for you. They can execute this perfectly in seconds, and you can request your desired thickness (½ inch works ideally). You may also ask for “chicken cutlets.”
- Pre-packaged: Examine the fresh poultry section for packages labeled “thin sliced chicken breasts,” “chicken breast cutlets,” or “chicken sandwich cutlets.”
- DIY: As we covered earlier, you can easily purchase whole breasts and slice them yourself. This often proves the most economical choice.
- What to Look For:
- Uniformity: Whether pre-sliced or whole, search for pieces that display relatively even thickness. If purchasing a package of pre-sliced cutlets, attempt to find ones that appear similar in size so they cook at the same rate.
- Color: Fresh chicken should exhibit a pinkish color. Avoid any packages where the chicken appears grey or possesses a dull appearance.
- Packaging: Inspect the package for any leaks or tears. It should be tightly sealed and cold to the touch. Avoid packages containing excessive liquid inside, which can indicate age or improper freezing/thawing.
- Smell: If you can obtain a sniff (easier at the butcher counter), fresh chicken should emit very little to no odor. An off or sour smell signals a red flag.
- Labels: Look for labels indicating quality, such as “Air-Chilled.” Air-chilled chicken undergoes cooling with cold air instead of soaking in a chlorinated water bath. This process means the chicken retains its natural flavor and does not absorb extra water—which can otherwise leak out as liquid in the pan and prevent browning.
My Personal Recommendation:
I consistently seek organic, air-chilled chicken breasts. I find the texture to be firmer and the flavor cleaner. Subsequently, I either request my butcher to slice them or dedicate 10 minutes at home performing the task myself. The slight premium in price balances against the superior taste and the fact that I never discard dry, leftover chicken. When you begin with a high-quality product, your final dish will truly sing.
Chicken Cutlet Meal Prep Strategies for the Week Ahead
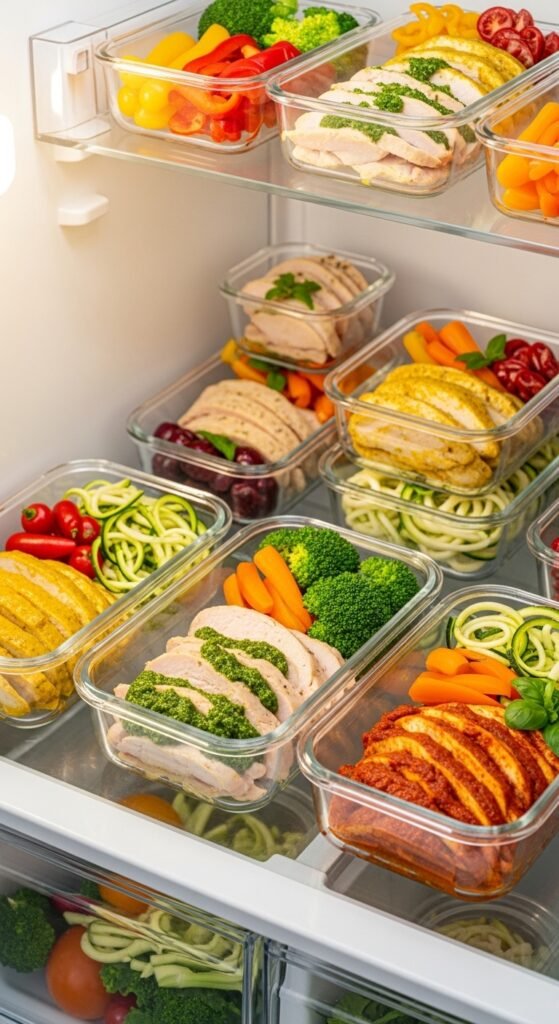
Incorporating chicken cutlet meal prep into your routine transforms hectic weeknights into manageable, stress-free experiences. Spending a small amount of time on Sunday sets you up for success throughout the week.
Cooking in Bulk
Prepare a large batch of cutlets using a simple seasoning blend. Cook them using your preferred method, grilling, baking, or pan-searing all work well. Allow the cooked chicken to cool completely, then store in an airtight container in the refrigerator for up to four days.
Portioning for Versatility
Consider portioning your cooked cutlets based on intended uses. Leave some whole for sandwiches and main dishes. Slice others into strips for salads, stir-fries, and wraps. Chop some into bite-sized pieces for soups, casseroles, and quick pasta dishes. This strategic portioning saves time during the week when you need specific preparations.
Freezing for Later
Cooked cutlets freeze beautifully for longer-term storage. Place parchment paper between individual pieces to prevent sticking, then transfer to freezer-safe bags. Label with the date and contents. Frozen cooked chicken maintains quality for up to three months and thaws quickly in the refrigerator or microwave.
Flavor Variations to Keep Things Interesting
Even the most beloved recipes benefit from occasional variation. These flavor variations ensure you never grow tired of your go-to chicken dishes.
Mediterranean Inspiration
Marinate cutlets in olive oil, lemon juice, minced garlic, dried oregano, and a pinch of cinnamon. After cooking, top with crumbled feta cheese, kalamata olives, and fresh chopped parsley. Serve with couscous and roasted vegetables for a complete Mediterranean meal.
Asian-Inspired Glazes
Combine soy sauce, honey, rice vinegar, grated ginger, and a touch of sesame oil. Brush this mixture onto cutlets during the last few minutes of cooking, allowing it to caramelize slightly. Garnish with sliced green onions and sesame seeds before serving over rice with steamed bok choy.
Southwest Favorites
Create a spice blend with chili powder, cumin, garlic powder, onion powder, and smoked paprika. Rub this mixture onto cutlets before cooking. Serve with black beans, corn salsa, avocado slices, and a squeeze of fresh lime juice. Consider slicing the cooked chicken for tacos or burrito bowls.
Creamy Mushroom Sauce
After cooking cutlets, sauté sliced mushrooms in the same pan until golden brown. Add minced garlic, then pour in heavy cream and a splash of chicken broth. Simmer until thickened slightly, then return the chicken to the pan to warm through. Fresh thyme adds an elegant finishing touch.
Frequently Asked Questions
Q: Can I freeze thinly sliced chicken breast?
A: Absolutely. In fact, maintaining a stash of cutlets in the freezer serves as a fantastic meal prep strategy. Place parchment paper between each cutlet to prevent them from freezing together in one solid block, then position them in a freezer-safe bag. They will defrost in the refrigerator within a few hours or in a bowl of cold water in approximately 30 minutes.
Q: How do I prevent the chicken from sticking to the pan?
A: Two factors matter: heat and patience. Ensure your pan is sufficiently hot and that you have used enough oil. When you place the chicken in the pan, leave it alone. It will naturally release from the pan once a good sear has developed. If you attempt to flip it and encounter sticking, grant it another 30 seconds. It will release when ready.
Q: My chicken consistently turns out dry, even when thin. What am I doing wrong?
A: The most common culprit is overcooking. Because they cook so rapidly, transitioning from perfect to dry can happen within a minute. Utilize a timer and consider employing a meat thermometer. Additionally, verify that you are not skipping the resting step!
Q: Can I grill thinly sliced chicken breast?
A: Yes, and the result is wonderful. The key involves watching them carefully, as flare-ups can occur quickly due to the high heat of a grill. Grill them over medium-high heat for just 2-3 minutes per side. They prove ideal for topping salads or creating quick grilled chicken sandwiches.
Q: How long do cooked chicken cutlets last in the refrigerator?
A: Properly stored in an airtight container, cooked cutlets remain safe and flavorful for 3-4 days. Use them within this timeframe for best quality, and always reheat to an internal temperature of 165°F before serving.
Conclusion: Your New Weeknight Savior Awaits
Cooking dinner should not generate stress. It should represent a time to unwind, nourish your family, and enjoy delicious food. Mastering the art of cooking with cutlets ranks among the simplest, most effective methods for removing pressure from those busy weeknights.
From the zesty brightness of the Lemon Garlic Butter Chicken to the satisfying crunch of the Parmesan Crusted version, these recipes offer more than mere meals, they provide solutions. They demonstrate that you need neither hours in the kitchen nor a list of obscure ingredients to create something truly special.
Therefore, the next time you visit the grocery store, I encourage you to approach the poultry section with a new sense of purpose. Reach for that package of cutlets, or head to the butcher counter and request them by name. Stock your freezer, prepare your pantry, and get ready to revolutionize your dinner routine.
You now possess the knowledge, the techniques, and the recipes. All that remains is to start cooking. I promise you this: the first time you sit down to a perfectly cooked, golden-brown chicken cutlet that you prepared in under 15 minutes, you will question why you ever approached it differently. Happy cooking!