Peach cobbler recipe – just hearing those words conjures up memories of warm summer evenings, the sweet aroma of bubbling fruit filling, and that perfect golden-brown crust that shatters delicately under your spoon. If you have been searching for the perfect homemade dessert that delivers both nostalgia and incredible flavor, you have finally found it.
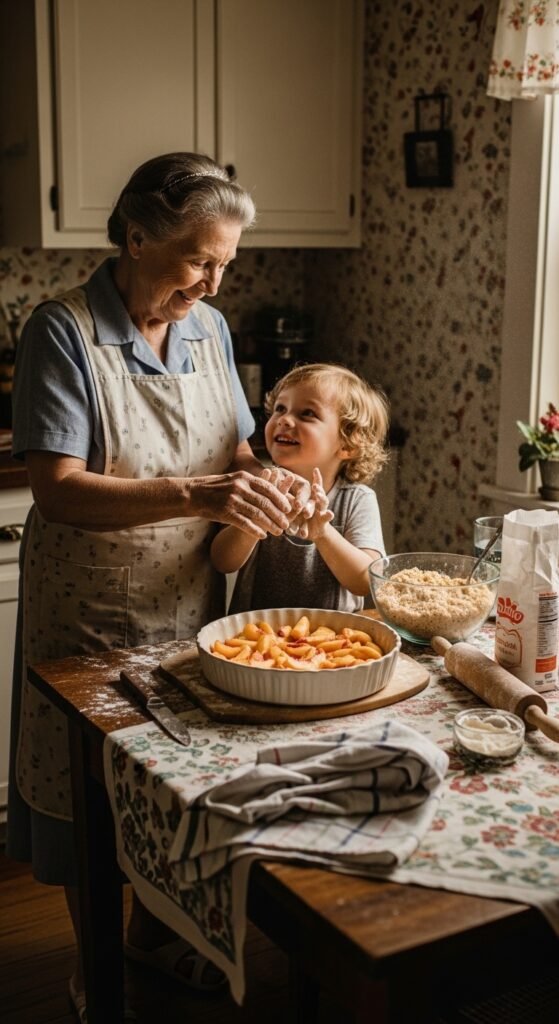
Let me take you on a journey through my grandmother’s kitchen, where I first discovered the magic of a truly exceptional peach cobbler. I can still see her flour-dusted apron, hear the gentle bubbling of fruit on the stove, and taste that first glorious spoonful – warm peaches swimming in sweet syrup, topped with a buttery, flaky crust that seemed almost too good to be real. After years of experimenting, failing, and finally perfecting her techniques, I am thrilled to share everything I have learned about creating the most memorable peach cobbler recipe you will ever try.
Why This Peach Cobbler Recipe Will Change Your Dessert Game
Before we dive into the details, let me explain what makes this particular peach cobbler recipe so special. Unlike complicated French pastries that require culinary school degrees or boxed cake mixes that taste artificial and disappointing, this recipe strikes the perfect balance between impressive and approachable.
Furthermore, this dessert showcases fresh peaches at their absolute peak. When those stone fruits are in season during the glorious summer months, nothing beats a homemade cobbler. However – and this is crucial – I will also teach you how to create an incredible version using canned peaches or frozen peaches during the off-season. Consequently, you can enjoy this masterpiece 365 days a year.
Additionally, this peach cobbler recipe requires no special equipment, no exotic ingredients, and no professional baking skills. If you can stir, measure, and operate an oven, you can create dessert magic. Honestly, if my ten-year-old nephew mastered this recipe on his second attempt, you absolutely can too.
The Heartwarming Story Behind This Recipe
Let me share a quick anecdote that perfectly illustrates why I am so passionate about this peach cobbler recipe. Three years ago, my friend Sarah called me in a panic. Her in-laws were arriving in two hours for an unexpected visit, and she had nothing to serve for dessert. She had never made a cobbler before, but she remembered how much I raved about this recipe.
Over the phone, I walked her through every step. She was nervous, skeptical, and honestly a bit terrified. The peach filling seemed too runny. The biscuit topping looked lumpy. She almost threw everything in the trash twice. Nevertheless, she trusted the process and popped that baking dish into the oven.
When her mother-in-law took the first bite, she actually teared up. It reminded her of her own grandmother’s peach cobbler – a recipe lost decades ago in a house fire. Sarah called me crying happy tears, saying she had never felt so accomplished in her life. That is the power of a truly great peach cobbler recipe – it connects us to memories, loved ones, and traditions that transcend time.
Essential Ingredients for the Perfect Peach Cobbler
Before we start cooking, let’s gather everything you will need. Remember, using quality ingredients directly impacts your final result. Therefore, I strongly recommend buying the best possible components your budget allows.
For the Peach Filling:
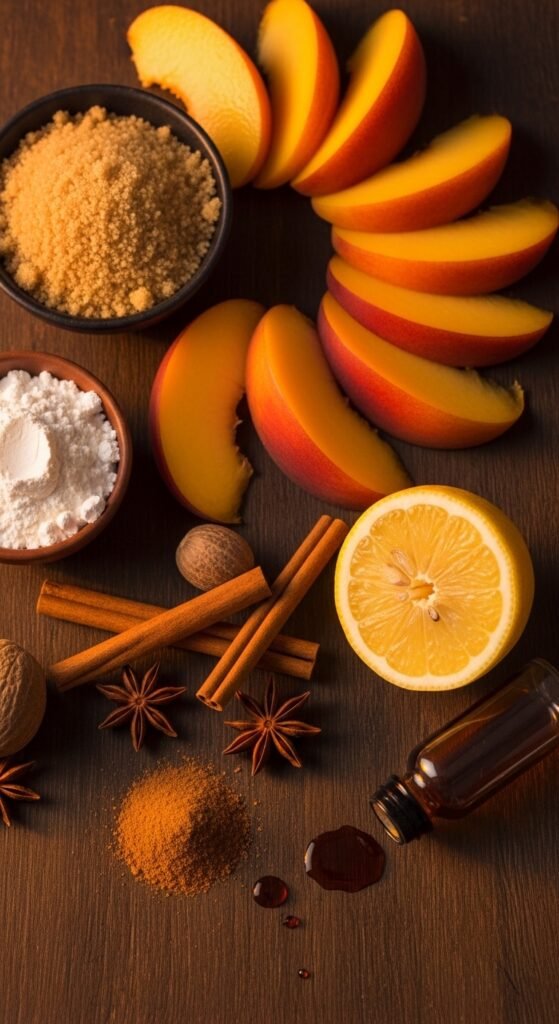
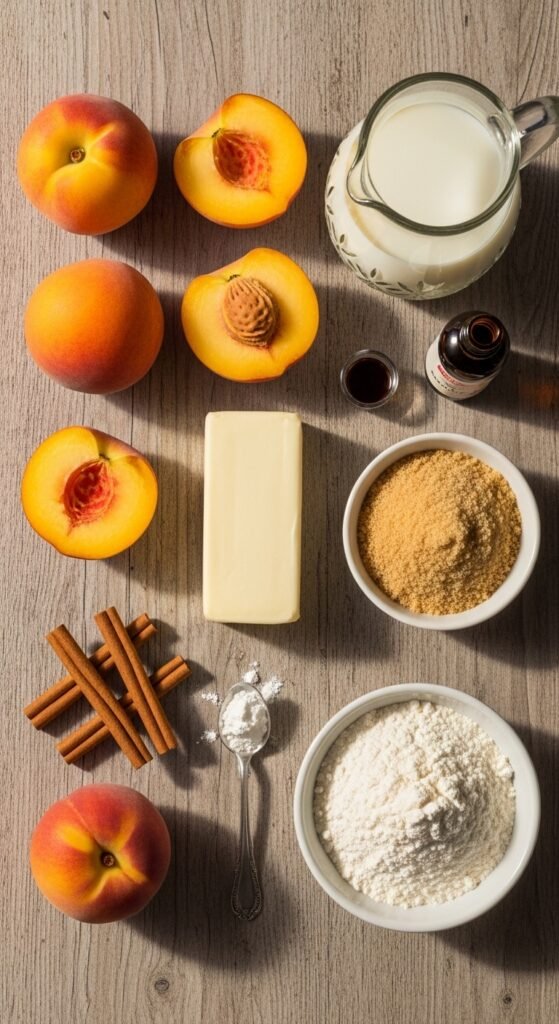
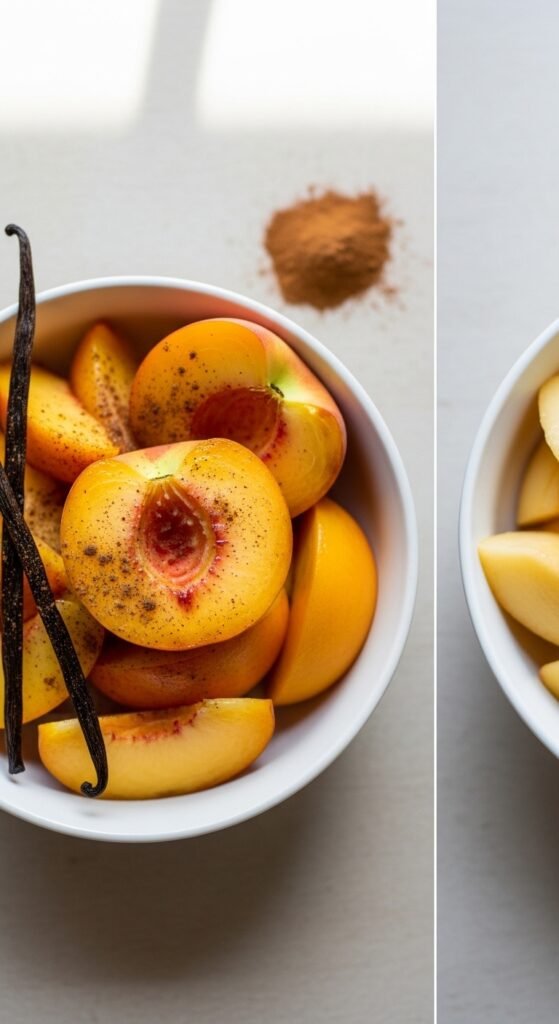
- 8 cups fresh peaches (approximately 8–10 medium peaches) – Look for ripe peaches that yield slightly to gentle pressure. They should smell fragrant and feel heavy for their size.
- 1 cup granulated sugar – This creates that beautiful sweet syrup that makes cobbler so irresistible.
- 1/4 cup brown sugar – Adds depth and a subtle molasses note that complements the stone fruit perfectly.
- 2 tablespoons fresh lemon juice – Brightens the flavors and prevents the peach filling from becoming cloyingly sweet.
- 1 teaspoon vanilla extract – Use pure vanilla extract, not imitation. Trust me on this one.
- 1/2 teaspoon ground cinnamon – That classic warm spice that screams comfort food.
- 1/4 teaspoon ground nutmeg – A little goes a long way, but it adds incredible complexity.
- 2 tablespoons cornstarch mixed with 2 tablespoons cold water – This thickening agent ensures your filling isn’t runny.
- Pinch of salt – Enhances all the other flavors.
Also Read: The Ultimate Guide to Bundt Cake Recipes: Bake, Share, and Savor with Confidence
For the Biscuit Topping:
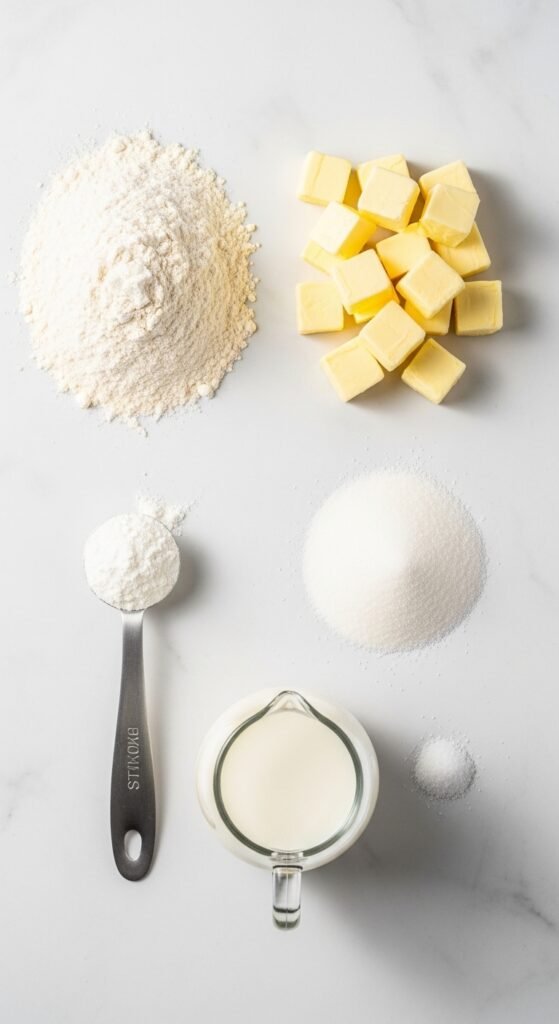
- 2 cups all-purpose flour – Provides structure for that golden cobbler crust.
- 1/4 cup granulated sugar – Adds sweetness and helps with browning.
- 1 tablespoon baking powder – The leavening agent that creates a light, tender topping.
- 1/2 teaspoon salt – Balances the sweetness throughout.
- 1/2 cup cold unsalted butter – Cut into small cubes. Cold butter is absolutely non-negotiable for flaky layers.
- 3/4 cup whole milk – Creates a tender crumb. You can substitute with buttermilk for extra tang.
- 1 teaspoon vanilla extract – Because we want flavor in every component.
For Assembly and Serving:
- 2 tablespoons cold butter – Cut into small pieces to dot over the peach filling.
- 2 tablespoons turbinado sugar – Also called raw sugar – this creates a sparkly, crunchy top.
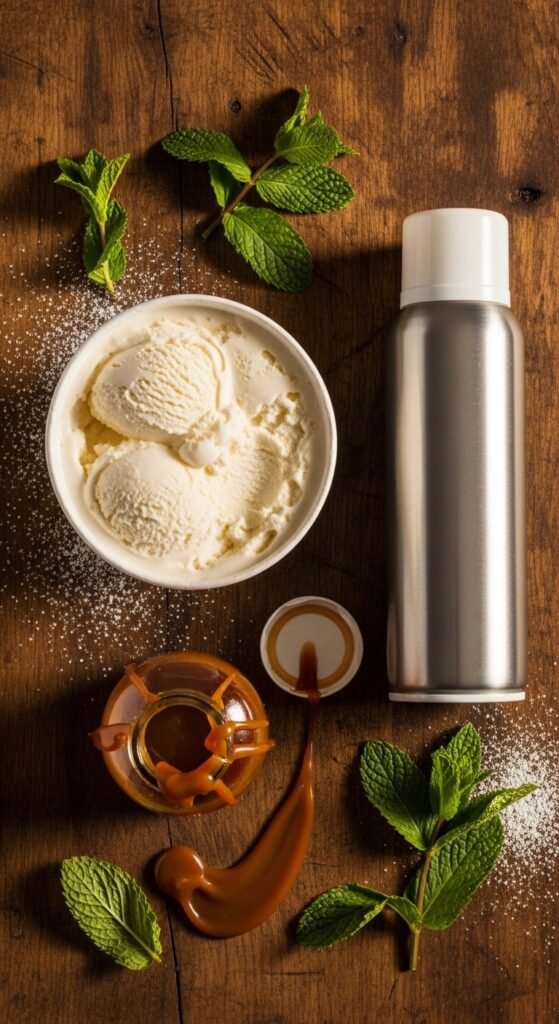
- Vanilla ice cream – Not technically part of the recipe, but is it really a peach cobbler without a scoop of melty, creamy ice cream on top?
Equipment You’ll Need
Fortunately, this peach cobbler recipe does not demand anything fancy:
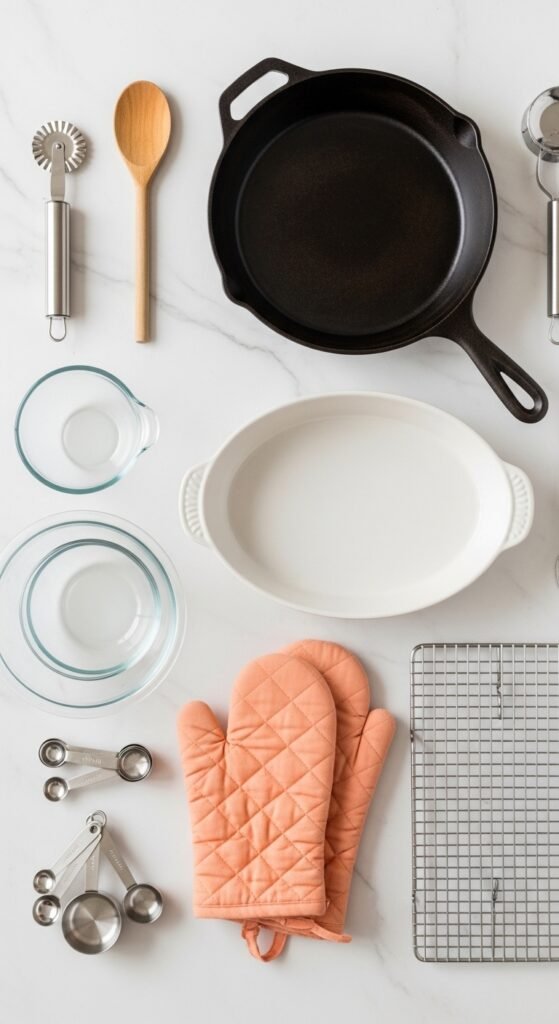
- 9×13 inch baking dish – Glass, ceramic, or metal all work beautifully.
- Large mixing bowls – At least two: one for the filling and one for the topping.
- Medium saucepan – For cooking the peach filling before baking.
- Pastry cutter or two forks – To cut butter into the flour mixture.
- Wooden spoon or silicone spatula – For stirring and folding.
- Measuring cups and spoons – Accuracy matters in baking.
- Vegetable peeler – For peeling those fresh peaches.
- Sharp knife and cutting board – For slicing fruit.
Step‑by‑Step Guide to Peach Cobbler Perfection
Now, let’s get to the heart of this peach cobbler recipe. Follow these steps carefully, and I promise you will be rewarded with dessert nirvana.
Step 1: Preheat and Prepare
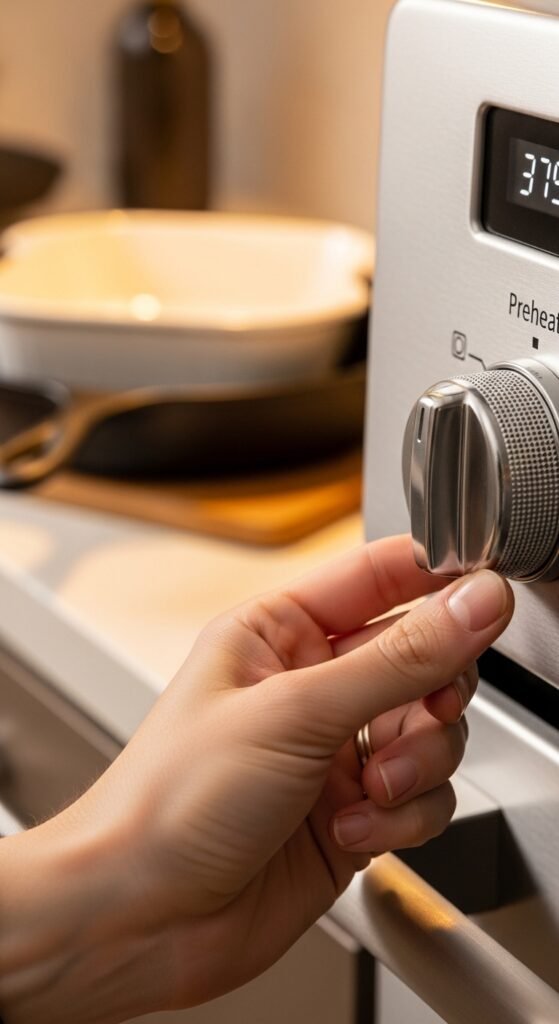
First, preheat your oven to 375°F (190°C). Position the rack in the middle. Meanwhile, lightly grease your 9×13 inch baking dish with butter or non‑stick spray. This prevents sticking and makes serving much easier.
Step 2: Prepare Your Peaches

If you are using fresh peaches, here is where the real work begins. Bring a large pot of water to a boil. While waiting, fill a large bowl with ice water. Score an “X” on the bottom of each peach using a sharp knife.
Working in batches, drop 3–4 peaches into the boiling water for 30–45 seconds. Using a slotted spoon, immediately transfer them to the ice bath. After they are cool enough to handle, the skins will slip right off. This process, called blanching, is a game‑changer for peach preparation.
Next, slice each peach in half, remove the pit, and cut into ½‑inch thick slices. Do not make them too thin – they will break down during cooking. You want substantial peach slices that hold their shape.
Here is an important tip from my early cobbler failures: taste your peaches before adding sugar. If they are already incredibly sweet, reduce the granulated sugar to ¾ cup. Conversely, if they are slightly tart (which happens with early‑season peaches), keep the full cup or even add an extra two tablespoons.
Step 3: Create the Peach Filling
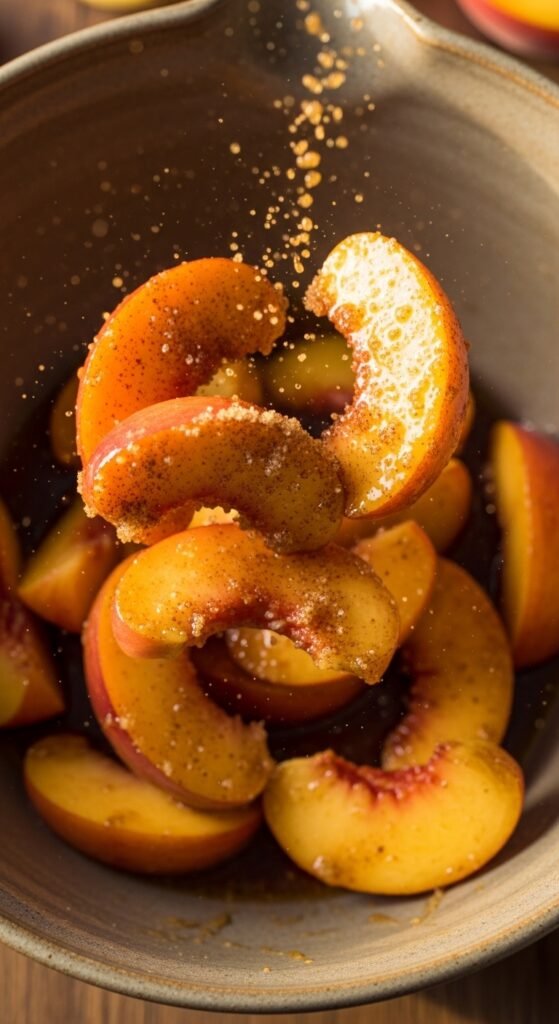
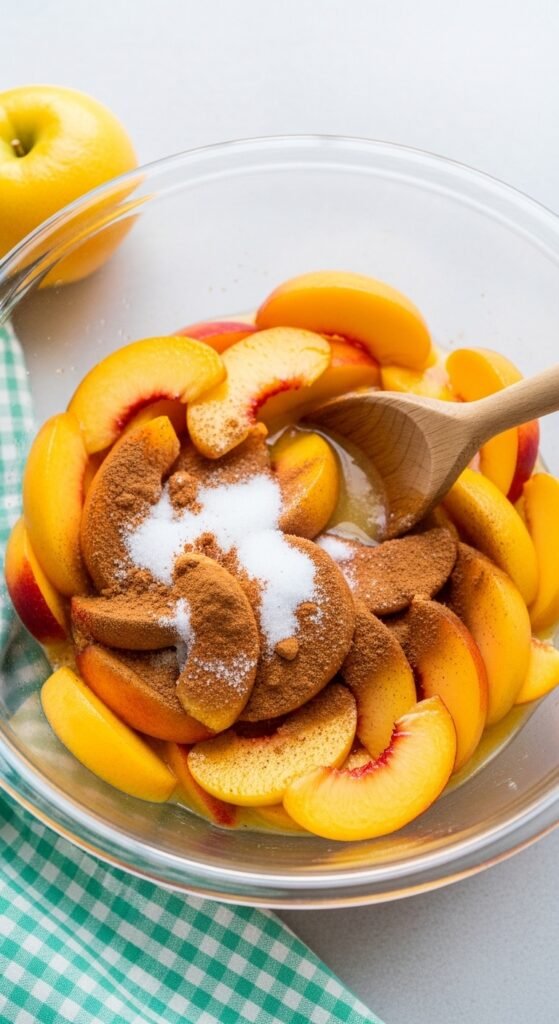
In a medium saucepan over medium heat, combine your prepared peach slices, granulated sugar, brown sugar, lemon juice, cinnamon, nutmeg, and salt. Stir gently to combine.
Cook this mixture for 8–10 minutes, stirring occasionally. You will notice the peaches releasing their juices, creating a beautiful sweet syrup. The sugars will dissolve completely, and the mixture will start to bubble around the edges.
Meanwhile, prepare your cornstarch slurry by whisking the cornstarch with cold water until completely smooth. Pour this into the bubbling peach filling and stir continuously. The mixture will thicken noticeably within 1–2 minutes. Do not worry if it seems slightly thick – it will thin out a bit during baking.
Remove the saucepan from heat and stir in the vanilla extract. Set aside while you prepare the biscuit topping.
Step 4: Make the Biscuit Topping
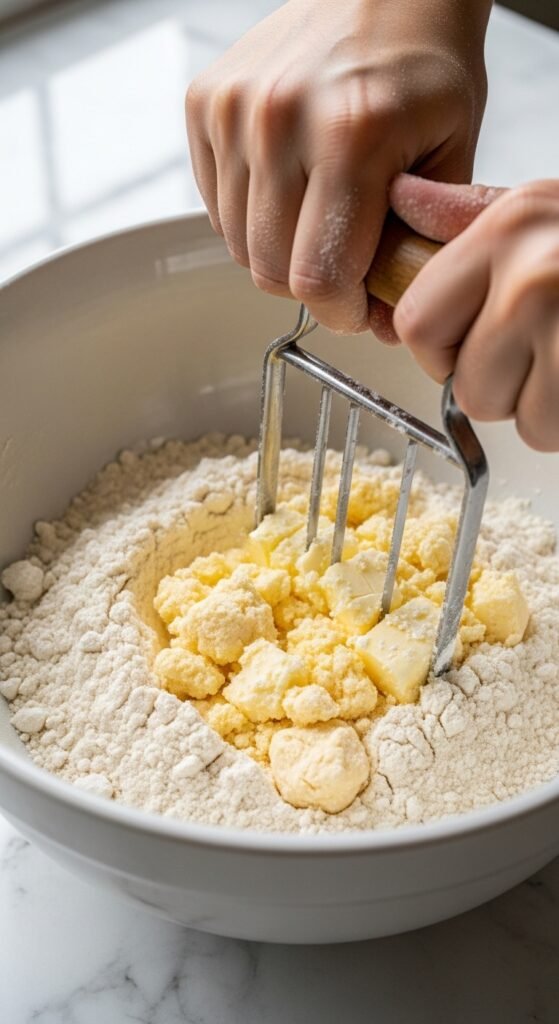
This step separates good cobblers from great ones. In a large mixing bowl, whisk together the flour, ¼ cup granulated sugar, baking powder, and salt. Make sure these dry ingredients are thoroughly combined before adding the butter.
Now, add your cold butter cubes to the flour mixture. Using a pastry cutter or two forks, cut the butter into the flour until the mixture resembles coarse meal. You are looking for pea‑sized butter pieces distributed throughout. Some larger pieces are fine – they create those desirable flaky pockets in your cobbler crust.
Here is where many people go wrong: do not overwork the dough. The butter MUST stay cold. If your kitchen is warm, pop the bowl in the refrigerator for 10 minutes before proceeding. This simple step dramatically improves your final texture.
Pour in the milk and vanilla extract. Using a fork or your hands (I prefer hands for better control), gently mix just until the dough comes together. The dough will be sticky and slightly shaggy – that is exactly what you want. Do not knead this dough. Overmixing develops gluten, which leads to a tough, bread‑like topping instead of a tender biscuit topping.
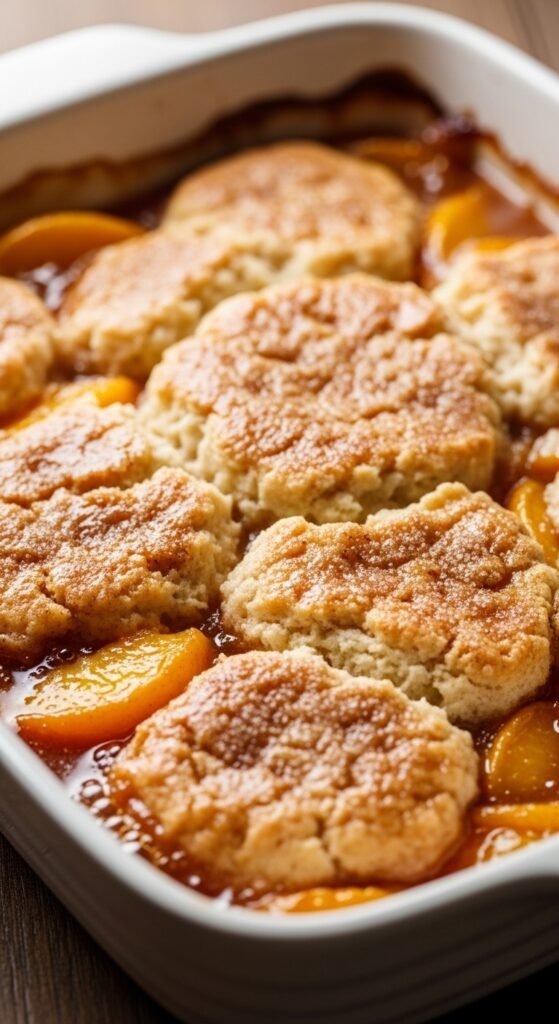
Step 5: Assemble Your Peach Cobbler
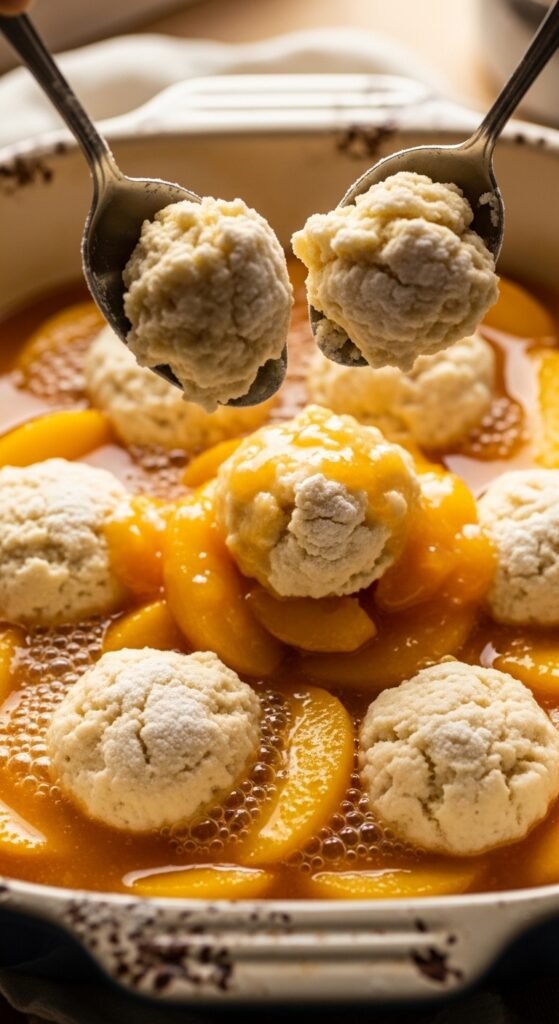
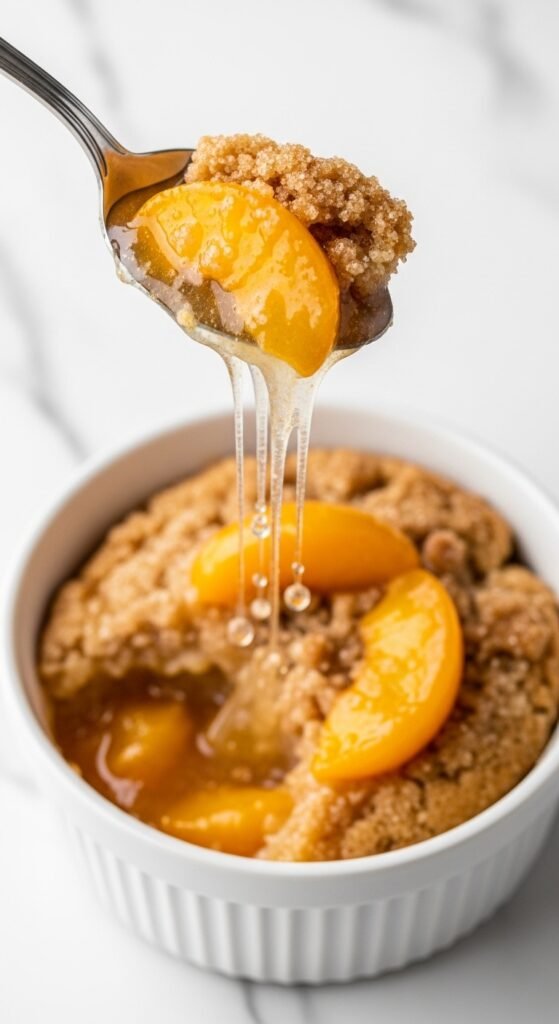
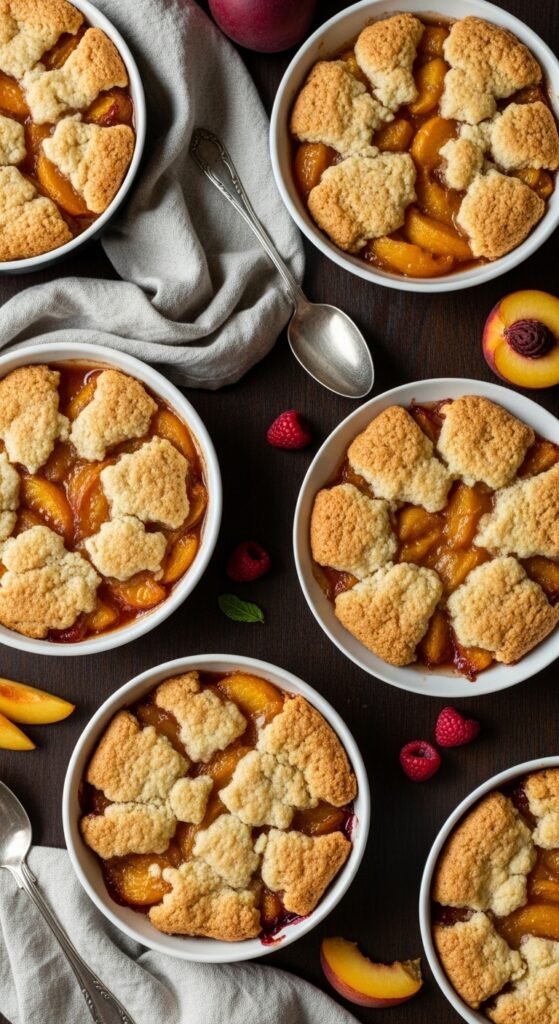
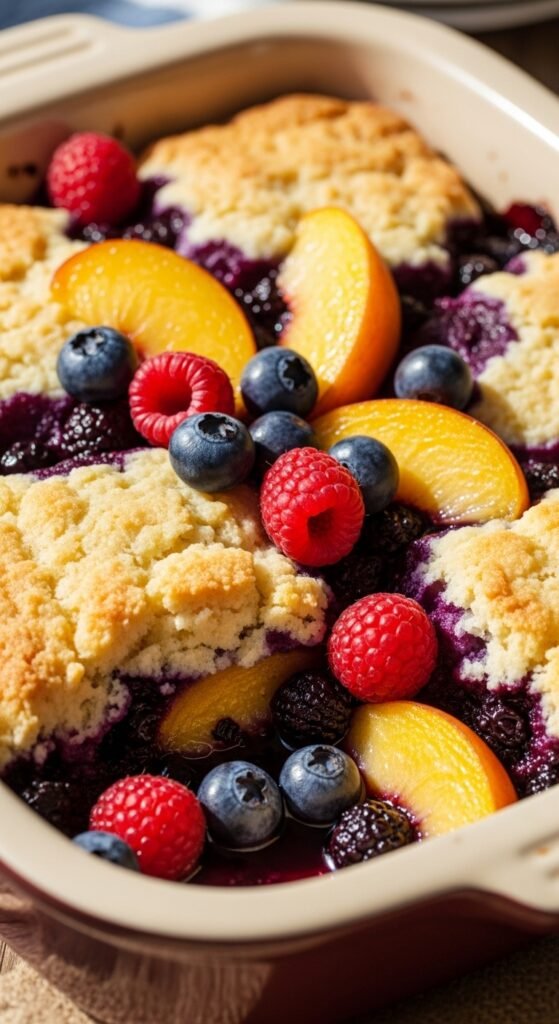
Pour your warm peach filling into the prepared baking dish, spreading it into an even layer. Dot the top with those 2 tablespoons of cold butter pieces. This extra butter melts into the filling, adding richness and helping create those crispy, caramelized edges that cobbler lovers crave.
Now for the biscuit topping. Using a spoon or cookie scoop, drop spoonfuls of the dough over the peach filling. Do not spread or smooth the dough – you want rustic, irregular clumps. These nooks and crannies will become wonderfully crispy during baking.
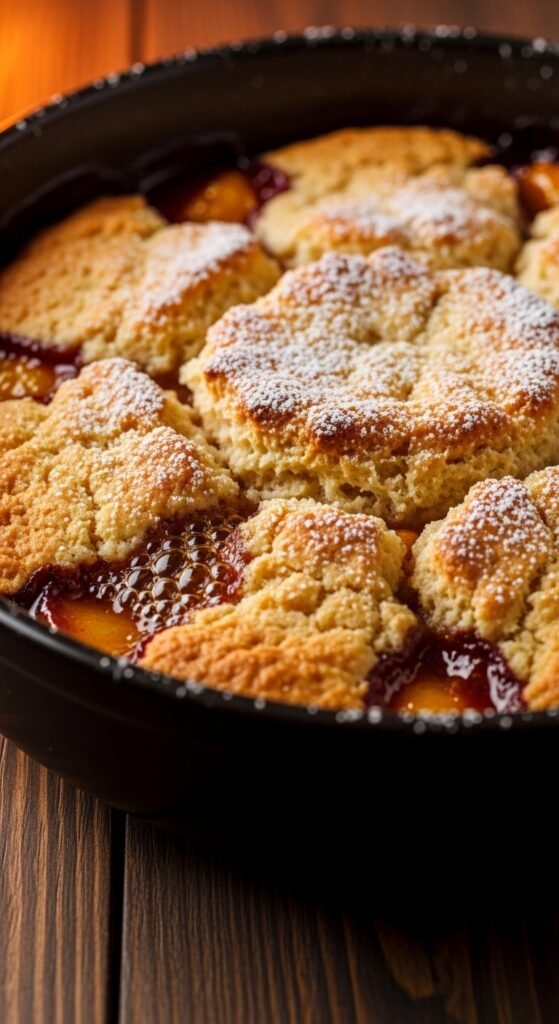
Sprinkle the entire surface with turbinado sugar. This creates that gorgeous sparkly crust and adds a pleasant crunch that contrasts beautifully with the soft fruit beneath.
Step 6: Bake to Golden Perfection
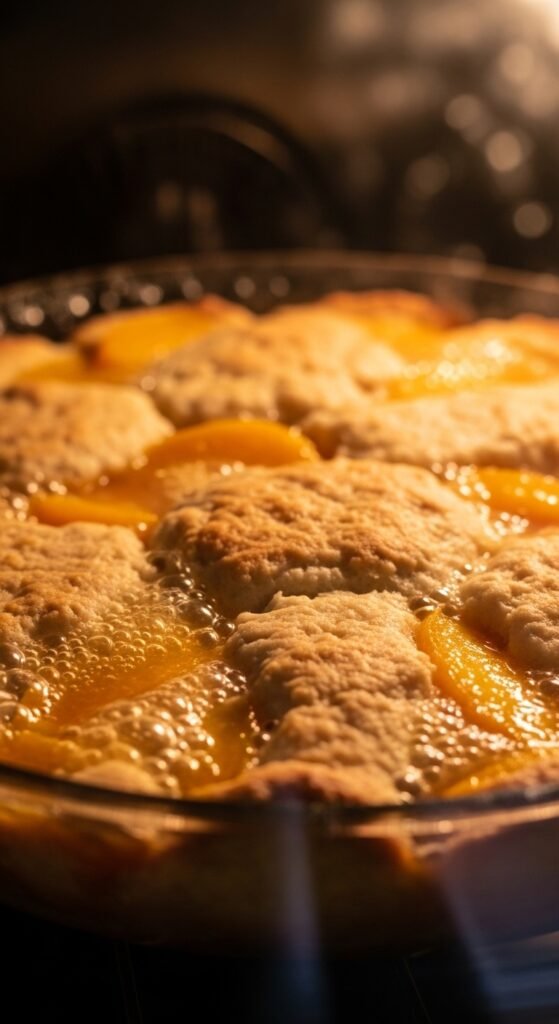
Place your assembled peach cobbler on a baking sheet (this catches any potential overflow) and transfer to your preheated oven.
Bake for 40–45 minutes, or until the cobbler crust is deep golden brown and the peach filling is bubbling vigorously around the edges. The bubbles are important – they indicate the cornstarch has activated and thickened the syrup properly.
If the topping browns too quickly (ovens vary), loosely tent a piece of aluminum foil over the top for the final 10–15 minutes of baking. However, resist the urge to open the oven door repeatedly – each opening releases heat and extends your baking time.
Step 7: The Most Important Step – Resting
I know – you want to dive in immediately. The aroma filling your kitchen is absolutely intoxicating. Nevertheless, let your peach cobbler rest for at least 15–20 minutes before serving.
This resting period serves two crucial purposes. First, it allows the filling to set properly. If you serve it immediately, the syrup will be too thin and runny. Second, it prevents third‑degree burns on your tongue. Those bubbles are dangerously hot, even after coming out of the oven.
Serving Your Masterpiece
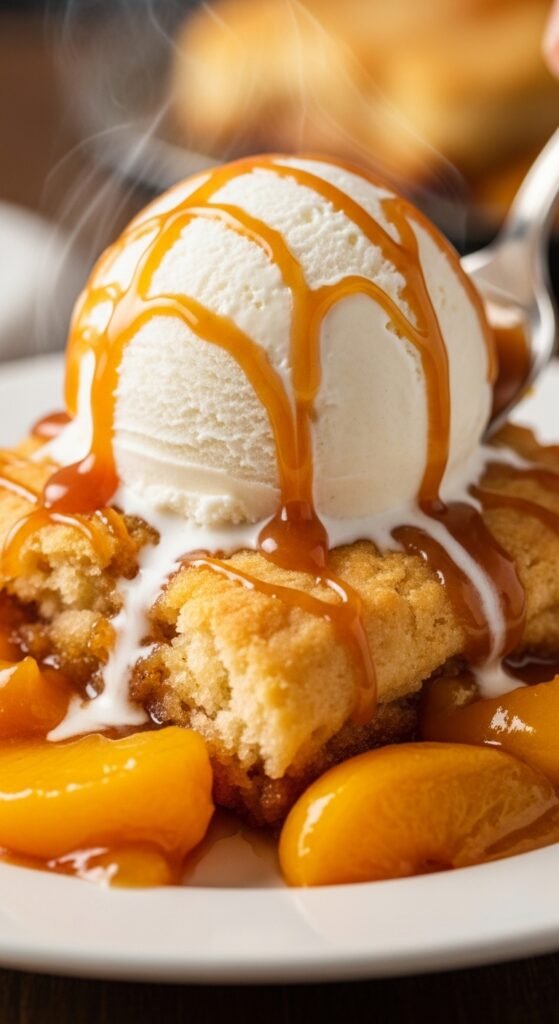
Finally, the moment you have been waiting for. Scoop a generous portion of warm peach cobbler into a bowl. Top with a generous scoop of vanilla ice cream – the contrast between hot cobbler and cold ice cream creates pure magic.
For a truly decadent experience, try these variations:
- Whipped cream instead of ice cream for a lighter option
- Caramel sauce drizzled over the top
- Toasted pecans sprinkled on for crunch
- Cinnamon whipped cream for extra warm spice flavor
Troubleshooting Common Peach Cobbler Problems
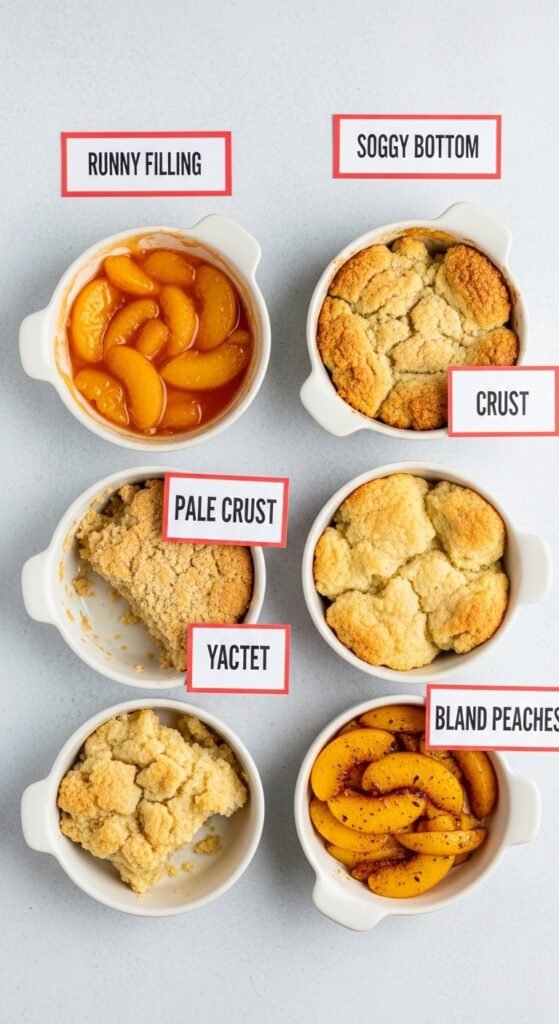
Over my years of making this peach cobbler recipe, I have encountered (and solved) every possible issue. Let me save you the same headaches.
My filling is too runny!
This common problem usually stems from undercooking the filling before baking or using peaches that are extremely juicy. Next time, cook your peach filling for an extra 2–3 minutes on the stove. Additionally, increase the cornstarch to 3 tablespoons. Remember that the filling will continue to thicken as it cools.
My topping is soggy on the bottom!
This happens when the biscuit topping absorbs too much moisture from the peach filling. Try baking your cobbler on the lowest oven rack for the first 20 minutes, then move it to the middle rack. The extra bottom heat helps set the dough more quickly. Also, make sure your filling is warm (not cold) when adding the topping – cold filling requires longer baking time, which can make the topping over‑brown before the bottom cooks through.
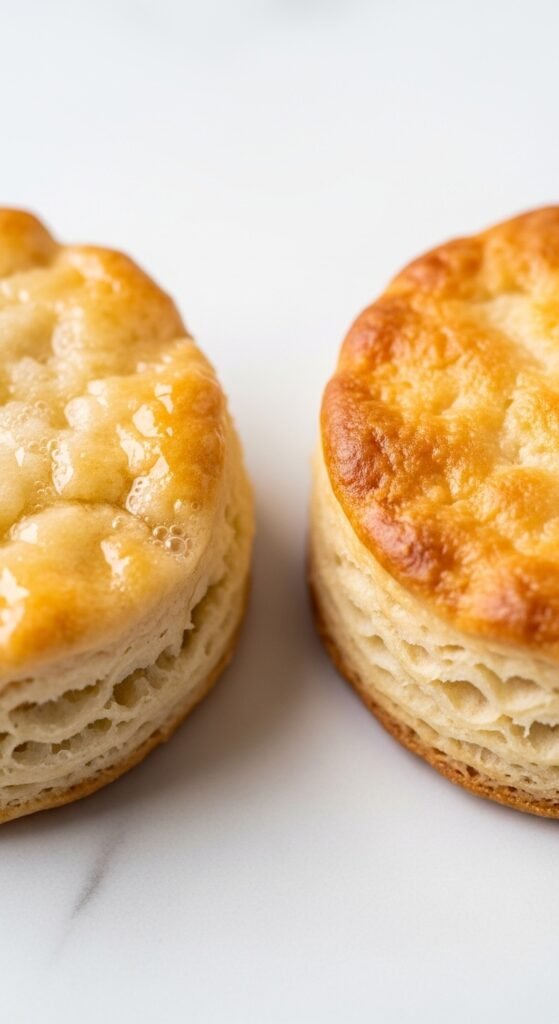
My crust isn’t golden brown!
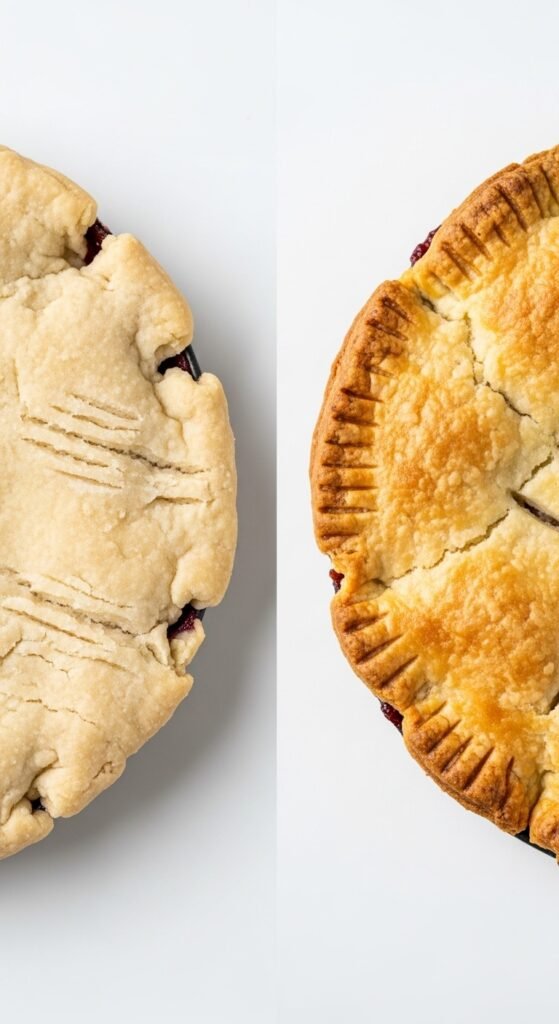
Your oven temperature might be inaccurate – many home ovens run cool. Invest in an inexpensive oven thermometer. Alternatively, increase the temperature to 400°F for the final 10 minutes of baking. You can also brush the cobbler crust with an egg wash (one egg beaten with one tablespoon of milk) before baking for extra browning.
My peaches taste bland!
This almost always means your fresh peaches were not ripe enough. A ripe peach should smell sweet, yield slightly to pressure, and have a golden‑orange background color (not green). Next time, let underripe peaches sit on your counter for 2–3 days before using them. Also, never refrigerate unripe peaches – the cold permanently halts the ripening process.
Variations on This Classic Peach Cobbler Recipe
Once you have mastered the basic peach cobbler recipe, feel free to experiment. Here are some of my favorite variations:
Southern‑Style Peach Cobbler
For a true Southern experience, use a batter topping instead of biscuit dough. Melt ½ cup butter in your baking dish while the oven preheats. Mix 1 cup flour, 1 cup sugar, 1 cup milk, and 2 teaspoons baking powder. Pour this batter over the melted butter (do not stir), then spoon your peach filling on top. As it bakes, the batter rises through the fruit, creating a cake‑like topping that is absolutely divine.
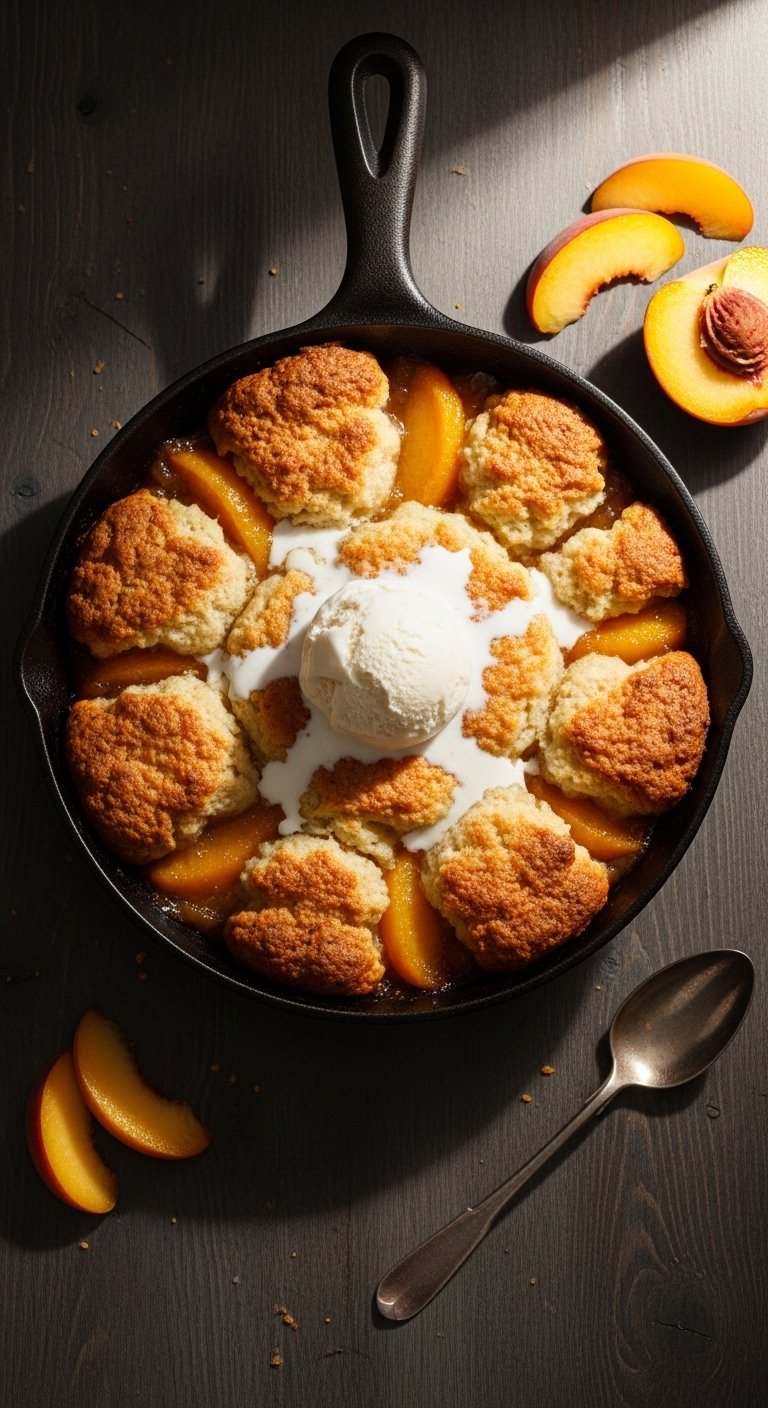
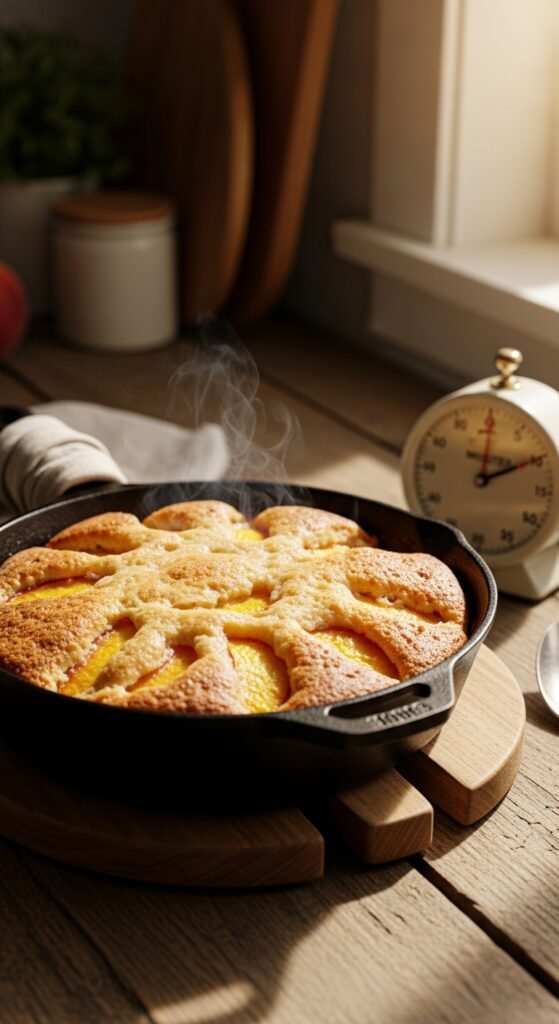
Skillet Peach Cobbler
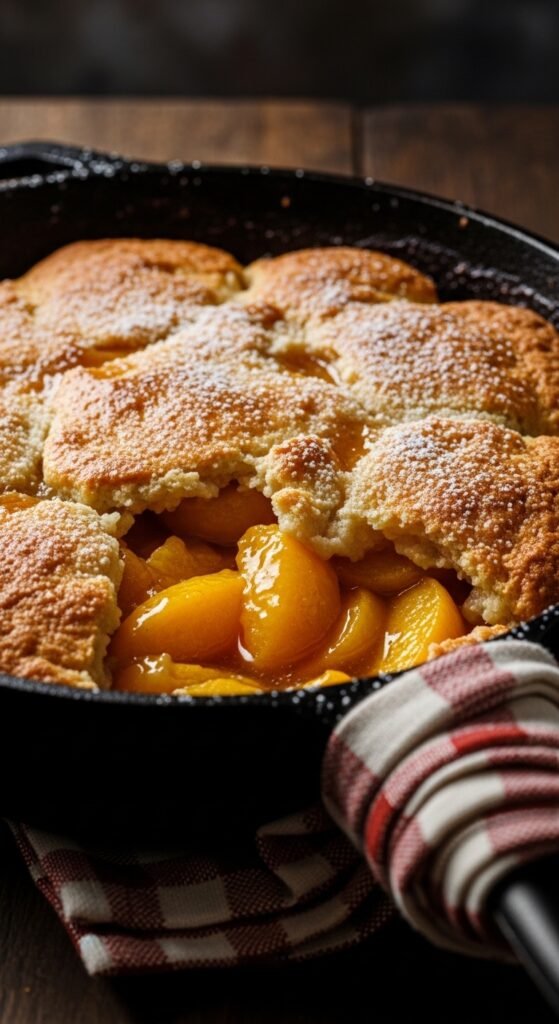
For rustic charm and extra crispy edges, make your peach cobbler in a 10‑inch cast iron skillet. The metal conducts heat beautifully, creating caramelized edges that glass or ceramic dishes cannot match. Simply prepare the recipe as written, but cook the filling in the same skillet before adding the topping and transferring to the oven.
Gluten‑Free Peach Cobbler

Substitute the all‑purpose flour with a high‑quality gluten‑free flour blend that contains xanthan gum. Cup4Cup and King Arthur Measure for Measure both work beautifully. No other adjustments are needed – this gluten‑free cobbler tastes remarkably similar to the original.
Peach and Berry Cobbler
Replace 2 cups of peaches with mixed berries – blueberries, raspberries, and blackberries all work wonderfully. The berries add tartness that beautifully complements the sweet peach filling. Reduce the sugar by 2 tablespoons if using particularly sweet berries.
Bourbon Peach Cobbler

For adults only, add ¼ cup of good bourbon to your peach filling along with the lemon juice. Cook as directed – the alcohol will mostly cook off, leaving behind incredible vanilla‑oak notes. This version pairs perfectly with vanilla ice cream and a drizzle of caramel sauce.
Why You Should Buy Quality Ingredients with Confidence

Now, let me address something important. When you are shopping for this peach cobbler recipe, you might be tempted to buy the cheapest ingredients available. I completely understand – budgets matter, and grocery costs have risen significantly.
However, let me explain why spending a little more on certain ingredients transforms your results dramatically:
- Real vanilla extract versus imitation – In a simple recipe like peach cobbler where vanilla plays a supporting role, the difference is noticeable. Real vanilla adds warmth, complexity, and depth that artificial versions cannot replicate.
- European‑style butter (like Kerrygold or Plugrà) versus standard butter – These butters have a higher butterfat content (82–86% versus 80%) and less water. Consequently, your cobbler crust becomes flakier, more flavorful, and develops better browning.
- Fresh, ripe peaches versus whatever is cheapest – Paying a premium for ripe peaches from a farmers market or quality grocery store transforms your cobbler from “fine” to “unforgettable.”
- High‑quality baking powder – Old or cheap baking powder loses potency over time. Your biscuit topping depends entirely on fresh, active baking powder for proper rise. Opt for aluminum‑free varieties (like Rumford or Bob’s Red Mill) to avoid metallic aftertastes.
When you purchase these quality ingredients, you are not wasting money – you are investing in a dessert experience that will create lasting memories. Furthermore, this peach cobbler recipe makes enough to serve 8–10 people, so the per‑serving cost remains remarkably reasonable even with premium ingredients.
Storing and Reheating Your Peach Cobbler
If you have leftovers (which rarely happens in my house), here is how to store and reheat them properly:
- Refrigeration: Cover your peach cobbler tightly with plastic wrap or transfer to an airtight container. It will keep in the refrigerator for up to 5 days. The biscuit topping will soften somewhat, but the flavor remains excellent.
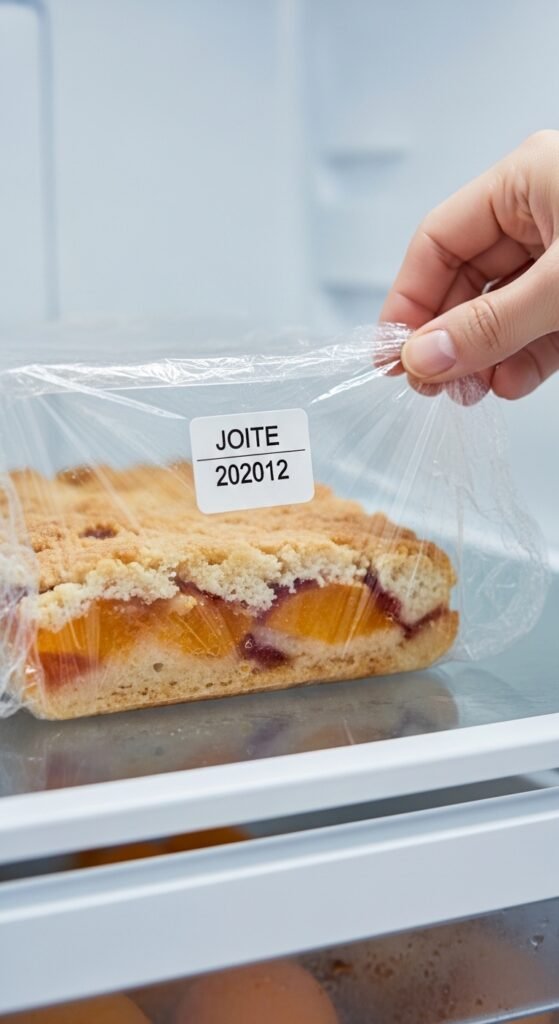
- Freezing: Yes, you can freeze peach cobbler! Allow it to cool completely, then wrap the entire dish tightly with plastic wrap followed by aluminum foil. Alternatively, portion individual servings into freezer‑safe containers. Frozen cobbler maintains quality for up to 3 months.
- Reheating (the right way): Avoid the microwave if possible – it turns the cobbler crust into a rubbery mess. Instead, reheat in a 350°F oven for 10–15 minutes, covering loosely with foil if the topping browns too quickly. For individual servings, an air fryer at 325°F for 5–7 minutes works beautifully.
Frequently Asked Questions About Peach Cobbler
Can I use canned peaches for this recipe?
Absolutely. Drain two 29‑ounce cans of sliced peaches in juice (not heavy syrup – too sweet). Reduce the granulated sugar to ½ cup since canned peaches are already sweetened. Skip the initial cooking step – just combine everything in the saucepan and heat through before thickening with cornstarch.
What about frozen peaches?
Frozen peaches work wonderfully, especially when fresh peaches are not in season. Use two 16‑ounce bags, do not thaw them first (thawing makes them mushy), and increase the cornstarch to 3 tablespoons to account for extra liquid. Add 5 minutes to the stovetop cooking time since you are starting from frozen.
Why is my cobbler crust so hard?
You overworked the dough, developing too much gluten. Remember – mix just until the dough comes together, and use cold butter. Also, check your oven temperature – baking at too low a temperature can dry out the topping before it properly rises.
Can I make this peach cobbler recipe ahead of time?
You can prepare the peach filling up to 2 days in advance and store it in the refrigerator. However, prepare the biscuit topping just before baking – the baking powder starts reacting as soon as it hits liquid, and delayed baking produces less rise. If you need to prep completely in advance, assemble the cobbler but do not bake it. Cover and refrigerate for up to 24 hours, then add 10–15 minutes to the baking time.
Is peach cobbler the same as peach crisp or peach crumble?
Great question! Cobbler has a biscuit topping (like this recipe) or a batter topping. Crisp features a topping made with oats, flour, butter, and sugar that becomes, well, crisp. Crumble uses a streusel‑like topping without oats. All are delicious – this is simply my favorite version.
Nutritional Information
For those tracking their intake, here is approximate nutritional information per serving (based on 10 servings, including vanilla ice cream):
- Calories: 485
- Total Fat: 18g
- Saturated Fat: 11g
- Cholesterol: 45mg
- Sodium: 320mg
- Total Carbohydrates: 78g
- Dietary Fiber: 3g
- Sugar: 52g
- Protein: 6g
Can you make this peach cobbler recipe healthier? Certainly. Reduce the sugar by ¼ cup, use half whole wheat flour, substitute coconut sugar for brown sugar, and serve with Greek yogurt instead of ice cream. However, let us be honest – this is a dessert, meant for enjoyment, not everyday eating. Make the full‑fat, full‑sugar version for special occasions and savor every single bite.
Final Tips for Peach Cobbler Success
After thousands of words and countless batches, here are my most important parting tips for this peach cobbler recipe:
- Do not skip the lemon juice. Without it, your peach filling tastes flat and one‑dimensional.
- Embrace imperfection. Your biscuit topping does not need to look perfect. Those rustic, irregular spoonfuls create varied textures – some crispy edges, some soft centers. That is the beauty of homemade cobbler.
- Serve it warm. Peach cobbler is at its absolute peak within an hour of coming out of the oven. The biscuit topping is crispiest, the peach filling is most flavorful, and the vanilla ice cream melts into those perfect little pools.
- Make extra. Seriously. This recipe doubles beautifully, and frozen peach cobbler makes you look like a hero when unexpected guests arrive.
- Share it. The best part of this peach cobbler recipe is not the eating – it is the sharing. Bring it to potlucks, deliver it to new neighbors, surprise coworkers on their birthdays. Food connects us, and this particular dessert has a magical way of making people feel loved.
Conclusion: Your Peach Cobbler Journey Starts Now
There you have it – everything I have learned about creating the perfect peach cobbler recipe. From selecting ripe peaches at the market to achieving that golden, flaky biscuit topping, from understanding the science of thickening agents to mastering the art of serving, you are now equipped to create dessert magic in your own kitchen.
Remember my friend Sarah from earlier? The one who almost gave up on her first attempt? She is now famous among her family and friends for her peach cobbler. Her mother‑in‑law requests it for every holiday. Her coworkers beg her to bring it to office parties. All because she trusted the process and practiced until she perfected it.
You can do the same. Your first peach cobbler might not be picture‑perfect. Your biscuit topping might be a little lumpy. Your peach filling might be slightly runny. That is okay – it will still taste incredible, and each time you make it, you will get better.
So preheat that oven. Gather your ingredients. Put on some music that makes you happy. And create something wonderful. Your kitchen is about to smell like summer, love, and tradition – all thanks to this peach cobbler recipe.
Now go make some memories. And save me a piece with extra ice cream.