Let me tell you a quick story. Last Tuesday, I was running late for a doctor’s appointment. I had one shoe on—a black loafer—and I needed its partner. I searched under the couch, behind the curtains, and even inside the oven mitt drawer (don’t ask). After five frantic minutes, I found it buried under a pile of winter boots in the hall closet. Worse, I tripped over three other pairs just trying to get out the door.
That was the breaking point.
If you are reading this, you probably know the chaos. You walk in the door after a long day, kick off your sneakers, and suddenly your entryway looks like a shoe bomb went off. You aren’t messy; you just don’t have the right system. The good news? Shoe storage doesn’t have to be boring, expensive, or complicated.
In this guide, I will walk you through 16 brilliant shoe storage ideas that work for tiny apartments, busy families, and even serious shoe collectors. By the end, you won’t just have a tidy floor—you will have peace of mind. And yes, I’ll help you shop for the right products with confidence.
Let’s dive in.
Why Shoe Storage Matters More Than You Think
Before we get to the list, let’s talk psychology. A messy floor creates a cluttered mind. When you see shoes scattered everywhere, your brain registers “clutter” and releases low-level stress hormones. Over time, that daily annoyance wears you down.
Furthermore, proper shoe storage protects your financial investment. A $150 pair of leather boots ruined by moisture or a crushed heel is a tragedy. Good storage extends the life of your footwear by years.
So, whether you have 5 pairs or 50, these 16 shoe storage ideas will transform your home.
1. The Over-the-Door Shoe Organizer (The Classic Hero)
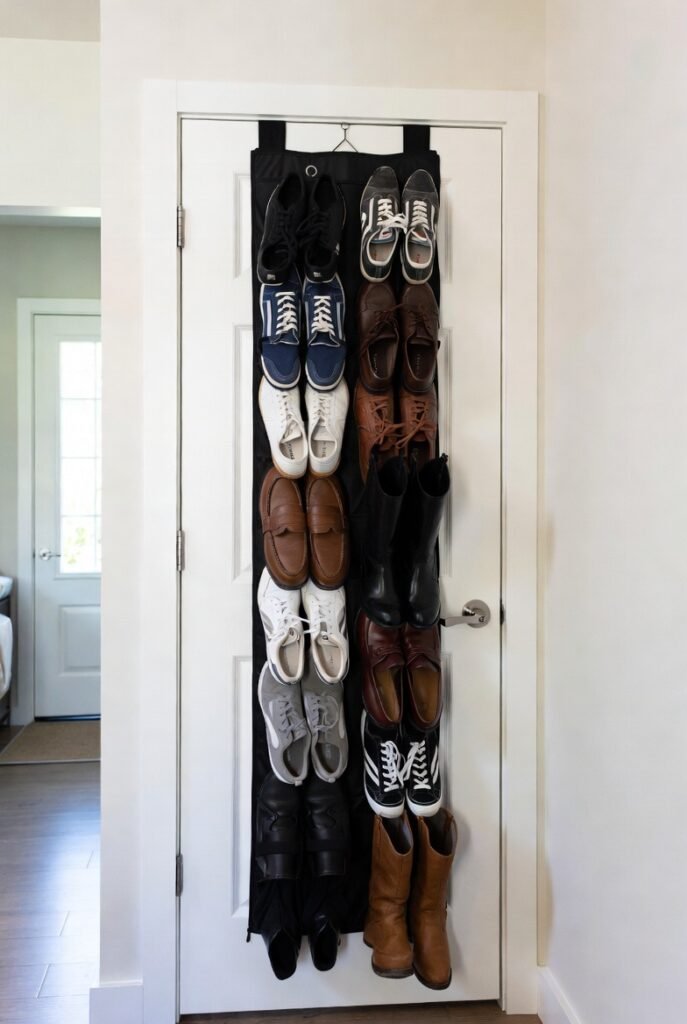
This is where my journey began. After the “oven mitt incident,” I bought a simple over-the-door shoe organizer for my bedroom closet. It cost less than a pizza.
Step-by-Step Guide:
- Measure your door. Make sure the organizer won’t scrape the floor.
- Choose clear plastic pockets so you can see every pair at a glance.
- Hook it over the top of the door. No tools required.
- Place one pair per pocket. Flip-flops, flats, and kids’ shoes work best.
Why it works: It uses vertical space that is otherwise wasted. For apartment dwellers, this is a game-changer. I keep my summer sandals in mine, and I haven’t lost a single one since.
Pro Tip: Use the bottom pockets for shoe care items like polish, laces, and a small brush.
2. The Bench with Hidden Storage (For the Busy Family)

My sister has three kids under ten. Their entryway shoe storage was a nightmare until she bought a storage bench. Now, the kids sit down to remove muddy boots and drop them straight into the bench.
Why you need this: It solves two problems at once. First, you have a comfortable seat. Second, the shoes disappear inside. Look for benches with flip-up lids or pull-out drawers.
What to look for:
- Wooden frames (more durable than particle board).
- Ventilation holes so sweaty sneakers don’t stink.
- A cushion on top for comfort.
Honestly, if you have a family of four or more, this is the single best investment you can make.
Also Read: How to Build the Ultimate Space Themed Bedroom That Will Launch Your Child’s Imagination Into Orbit
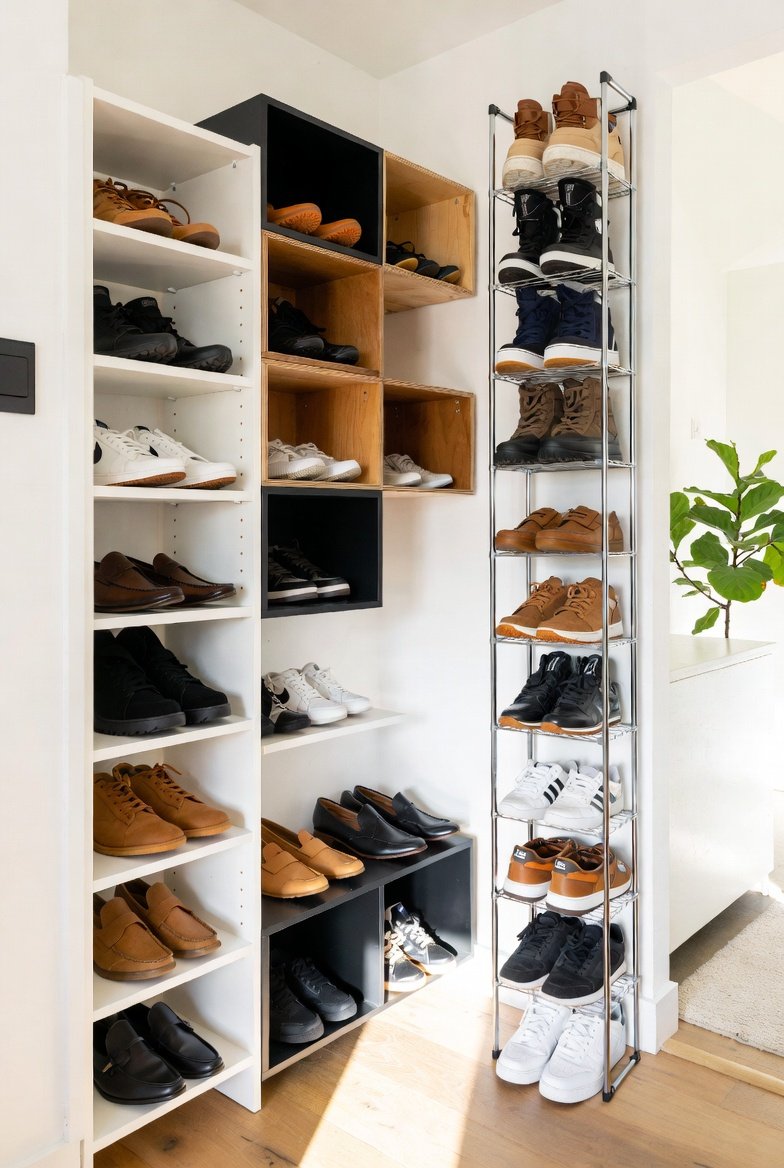
3. Floating Shelves (The Display for Sneakerheads)
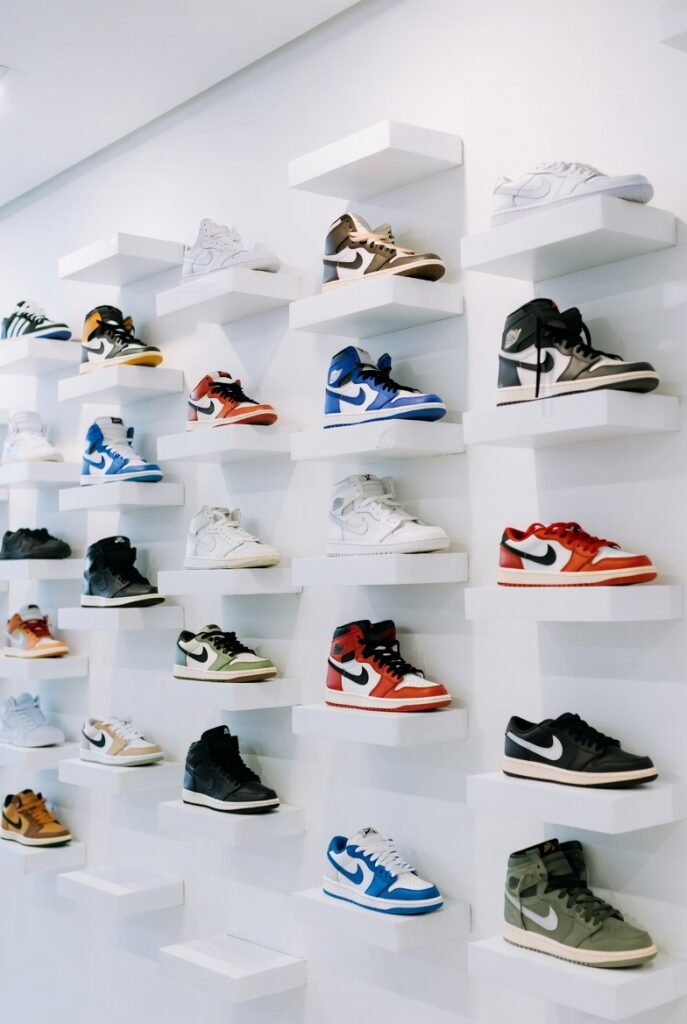
Do you love your shoes? I mean, really love them? Then stop hiding them. Floating shelves turn your shoe storage into wall art.
I visited a friend’s apartment last month. He had 20 pairs of rare Air Jordans lined up on black floating shelves above his desk. It looked like a museum. He told me, “I used to keep them in boxes. Now I feel proud every time I walk in.”
Step-by-Step Guide:
- Buy sturdy floating shelves (at least 10 inches deep).
- Install them at staggered heights for visual interest.
- Arrange shoes by color or style.
- Add a small LED strip under each shelf for drama.
This works best for clean shoes only. Don’t put muddy work boots on display.
4. Under-Bed Storage Rollers (The Space Saver)
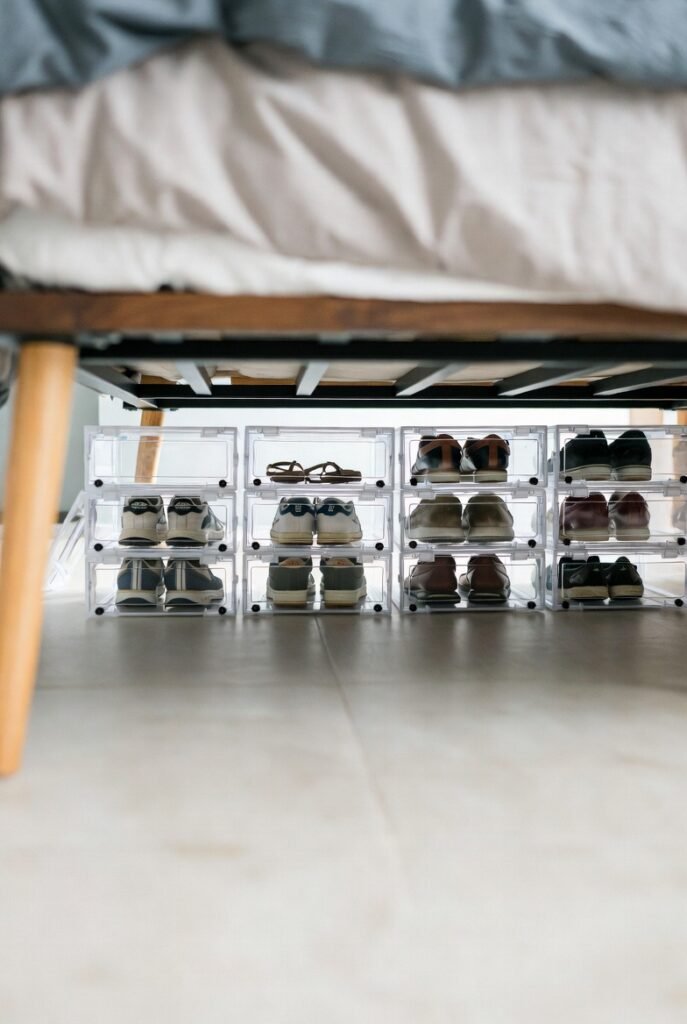
Did you know the average bed has 200 liters of unused space? That’s like having an extra closet. Under-bed shoe storage is perfect for out-of-season footwear.
I keep my winter boots under the bed from April to October. When fall comes, I simply roll out the container and swap them with my sandals.
What to buy:
- Low-profile plastic bins with wheels.
- Zippered fabric organizers (great for dust protection).
- Vacuum-sealed bags for bulky boots (just don’t crush them).
Pro Tip: Place a cedar block inside each bin to absorb moisture and repel moths.
5. The Ladder Leaner (Rustic and Trendy)
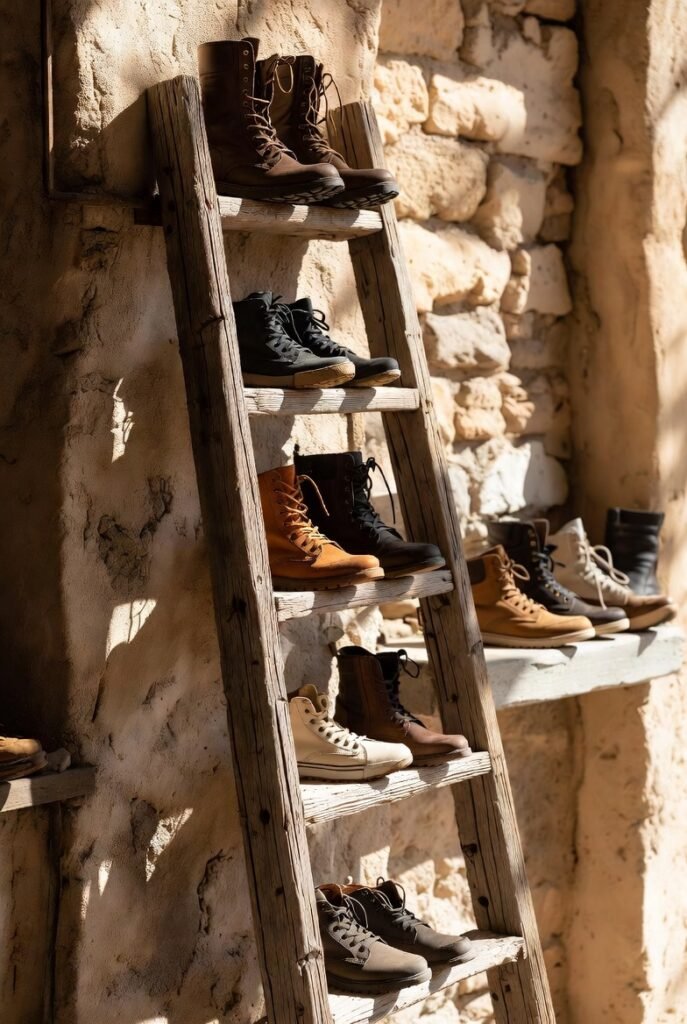
You’ve seen those wooden ladders leaning against walls in home decor magazines. Turns out, they make incredible shoe storage. A ladder shoe rack takes up almost zero floor space but holds 6 to 8 pairs.
How to DIY or buy:
- Buy: Search for “leaning shoe ladder” online. Prices range from $30 to $100.
- DIY: Sand an old wooden ladder. Prop it against the wall. Rest shoes on the rungs.
I used this in my first studio apartment. It held my everyday sneakers, work heels, and even my rain boots. Plus, it looked so stylish that guests always complimented it.
Best for: Heels, sneakers, and flats. Not great for heavy work boots.
6. Stackable Clear Boxes (The Collector’s Dream)

Here is a hard truth: Original shoeboxes are terrible for storage. You can’t see inside, they collapse over time, and they attract bugs.
Switch to stackable clear shoe boxes. These changed my life. I can see every pair instantly. I can stack them 6 boxes high. And they lock together so they don’t topple over.
Step-by-Step Guide to Organizing:
- Take every shoe out of its original box.
- Clean each pair thoroughly.
- Place one pair per clear box (or two pairs of sandals).
- Stack them in your closet by category: boots, heels, sneakers, etc.
- Take a photo of the stack so you remember which box is where.
Why buy these? They are dust-proof, moisture-proof, and perfectly stackable. For serious collectors, this is non-negotiable.
7. The Cabinet with Pull-Out Trays (Luxury on a Budget)
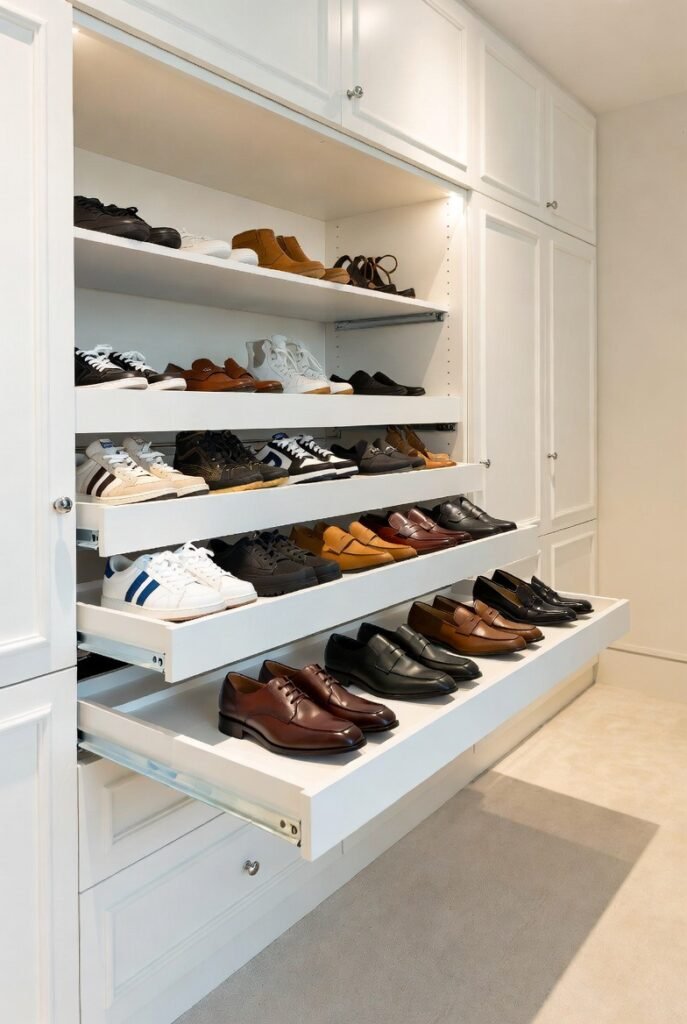
If you are remodeling or have an empty wall, install a tall shoe cabinet with pull-out trays. IKEA and Wayfair sell models for under $200. The trays tilt outward so you can see every shoe without bending down.
Why I love this: My elderly mother visited and nearly fell over trying to reach shoes in a deep closet. I bought her a pull-out cabinet for her birthday. Now, she sits in her walker, pulls a tray, and picks her shoes with zero strain.
Installation tips:
- Mount the cabinet to the wall (safety first).
- Leave 2 inches of clearance in front so trays open fully.
- Use the top shelf for hats or bags.
8. Hanging Pocket Organizers for Closet Rods
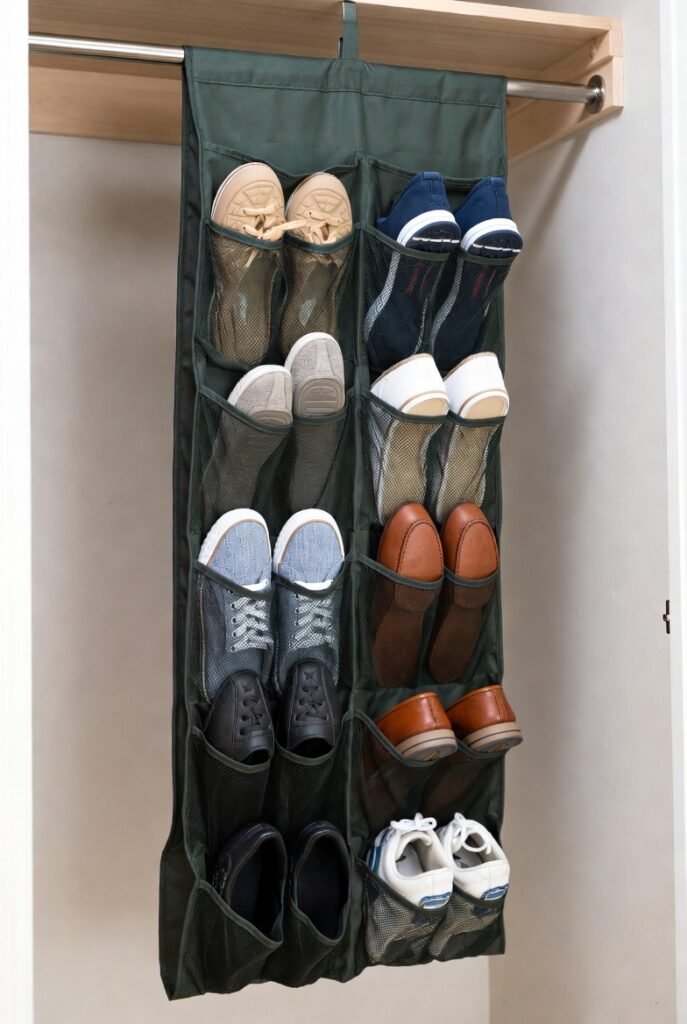
You already have a closet rod. Why not use the space beneath your hanging shirts? A hanging shoe organizer drops down from the rod and creates 10 to 20 pockets.
Real-life use: My husband has 12 identical-looking brown dress shoes. (Don’t ask me why.) He used to spend 10 minutes every morning searching. Now, he has a hanging organizer labeled: “Monday meetings,” “Date night,” “Casual Friday.” He gets dressed in 3 minutes flat.
Pro Tip: Use fabric organizers instead of plastic. Fabric breathes better and won’t crack in cold weather.
9. The Repurposed Bookshelf (Budget DIY)
Before you throw away that old bookshelf from college, look at it differently. A bookshelf turned shoe rack is one of the cheapest shoe storage ideas on this list.
I found a beat-up bookshelf on the curb. I sanded it, painted it white, and angled the shelves slightly downward. Now it holds 24 pairs of shoes in my garage. Total cost: $12 for paint and sandpaper.
Step-by-Step:
- Remove the back panel so air flows through.
- Adjust shelves to 6-8 inches apart (taller for boots).
- Place the bookshelf against a wall in your mudroom or closet.
- Arrange shoes with toes facing out.
Best for: Mudrooms, basements, and large walk-in closets.
10. Wall-Mounted Pegs (The Minimalist Choice)
Sometimes, less is more. Wall-mounted wooden pegs hold one or two pairs each. They are perfect for the “in-between” shoes—the ones you wear daily but don’t want on the floor.
How to install:
- Buy a coat rack peg board or individual pegs.
- Mount them at waist height.
- Hang shoes by the heel or loop a lace over the peg.
I use this behind my front door. My daily walking shoes hang there. When I come home, they go on the peg. When I leave, they come off. No bending. No searching. It takes 2 seconds.
Anecdote: My neighbor saw my peg rack and copied it. She told me last week, “I used to leave my shoes by the door like a teenager. Now I feel like an actual adult.”
11. Rotating Shoe Tower (For Tight Corners)
Do you have an awkward corner that nothing fits in? A rotating shoe tower is your answer. It spins 360 degrees, holds 20-30 pairs, and fits in a 1-foot square of floor space.
Why this works: I recommended this to a friend who lives in a 400-square-foot New York studio. She has zero closets. She put a rotating tower next to her fridge. Now she spins it, picks her shoes, and spins it back. No clutter.
What to look for:
- Metal construction (plastic towers wobble).
- Removable shelves for tall boots.
- A smooth ball-bearing rotation mechanism.
12. The Staircase Drawers (Genius Renovation)
Okay, this one requires some handyman skills, but it is brilliant. If you have a staircase, the space under each step is completely wasted. Staircase drawers turn that dead space into pull-out shoe storage.
Real-life example: My cousin renovated his 1920s house. Instead of leaving the staircase closed, he converted the front of each step into a tiny drawer. Now, every step holds two pairs of shoes. His entryway has zero visible shoes.
If you can’t renovate: Buy “staircase shoe storage inserts” that slide under the bottom three steps. These are pre-made and cost around $150.
13. Wire Cube Grids (The Flexible Student Solution)
Remember those wire cube grids from college dorms? They are actually amazing for shoe storage. You can configure them into a tower, a bench, or a long row.
How I used this: After college, I had no money. I bought a 6-cube wire grid for $25. I zip-tied the cubes into a 3×2 grid. Then I added small plastic bins inside each cube. It held 18 pairs of shoes and looked surprisingly modern.
Step-by-Step:
- Assemble the cubes according to the manual.
- Add zip ties at every joint for extra stability.
- Place a thin piece of cardboard or plastic at the bottom of each cube so shoes don’t fall through.
- Stack them horizontally for a long bench or vertically for a tower.
Best for: Renters, students, and anyone on a tight budget.
14. Boot Hangers with Clips (For Tall Boots)
Tall boots are the worst to store. They flop over. They take up massive space. And they get creased at the ankles. Enter boot hangers—plastic or wooden clips that hold boots upside down by the cuff.
Why you need these: I ruined a $200 pair of riding boots because I stored them folded over. The leather cracked. Now I hang all my tall boots upside down using clip hangers. They look brand new years later.
How to use:
- Clip the hanger to the boot cuff (the top edge).
- Hang the hanger on a closet rod.
- The boot dangles upside down, completely straight.
Pro Tip: Use a pants hanger with clips if you can’t find boot-specific hangers.
15. The Mudroom Locker System (For Large Families)
If you have more than three people in your house, individual shoe lockers are a lifesaver. Each family member gets a vertical locker with a shelf for shoes, a hook for coats, and a basket for gloves.
Real-life story: The Johnsons next door have five kids. Their mudroom used to look like a disaster zone. They installed a 4-cubby locker system from a home improvement store. Each kid has their own labeled cubby. The rule is simple: shoes in the cubby before dinner. It’s been six months, and the floor is spotless.
What to buy:
- Ready-to-assemble locker systems (around $300).
- DIY using plywood and 2x4s (around $100 in materials).
16. The Ultimate Closet Makeover (Custom Solution)
Finally, if you have the budget and the space, invest in a custom closet system designed specifically for shoe storage. Companies like The Container Store or California Closets will design a layout just for your collection.
Why go custom: You get slanted shelves for high heels, deep drawers for sneakers, pull-out racks for flats, and even a rotating carousel for boots. It costs more upfront ($500 to $2,000), but it adds value to your home and saves you years of frustration.
My experience: I saved for two years and finally got a custom closet. The designer asked, “How many pairs do you own?” I said, “Forty-two.” She laughed. A week later, I had a wall of slanted shelves, a tower of clear drawers, and a bench with hidden storage. I open that closet every morning and smile.
How to Choose the Right Shoe Storage for YOU
Now that you have 16 shoe storage ideas, how do you pick? Here is a simple decision guide:
- Measure your space. Grab a tape measure. Write down the width, depth, and height.
- Count your shoes. Be honest. Don’t forget the ones under the bed.
- Identify your pain point. Is it the entryway? The bedroom closet? The garage?
- Match your lifestyle:
- Renter? Over-the-door organizers, ladders, and peg racks.
- Family? Benches and mudroom lockers.
- Collector? Clear stackable boxes and floating shelves.
- Small apartment? Rotating towers and under-bed rollers.
- Set a budget. You can solve your problem for $20 or $2,000. Both work.
Step-by-Step: One Weekend Declutter Plan
Ready to take action? Here is a weekend plan to implement your new shoe storage system.
Saturday Morning:
- Pull out every single pair of shoes.
- Sort into three piles: Keep, Donate, Trash.
- Be ruthless. If you haven’t worn it in a year, donate it.
Saturday Afternoon:
- Clean all the “Keep” shoes. Wipe, polish, and deodorize.
- Measure your chosen storage area again.
- Order or buy your shoe storage solution from the list above.
Sunday Morning:
- Assemble and install your storage (benches, shelves, boxes, etc.).
- Place shoes into the new system. Organize by color, season, or frequency of use.
Sunday Afternoon:
- Take a photo of your beautiful new setup.
- Pat yourself on the back. You did it.
Why You Should Buy a Quality Shoe Storage Product Today
Look, I get it. You might be thinking, “I’ll just pile them in the corner for now.” But here is the truth: Temporary solutions become permanent problems.
When you invest in proper shoe storage, you are buying:
- Time. No more searching for missing shoes.
- Money. Your shoes last longer without damage.
- Peace. A clutter-free entryway means a calmer mind.
- Safety. No tripping hazards for kids or elderly parents.
The products I’ve mentioned—from clear stackable boxes to storage benches—are available online right now. Read the reviews. Compare the prices. But don’t wait another month.
I waited two years to fix my shoe chaos. That’s 730 days of frustration. Don’t be like me.
Final Thoughts: Your Floor Deserves Better
We started with a frantic search for a lost loafer. We end with a calm, organized home where every shoe has a home. Whether you choose a rotating shoe tower, a ladder leaner, or a full custom closet, the important thing is to start.
Remember: You don’t need to do all 16 ideas. Pick one. Just one. Install it this week. Feel the difference.
Your shoes have carried you through job interviews, first dates, and lazy Sundays. Don’t they deserve a proper place to rest?
Now go ahead—buy that shoe storage solution you’ve been eyeing. Your future self will thank you. And trust me, you’ll never lose a shoe in the oven mitt drawer again.