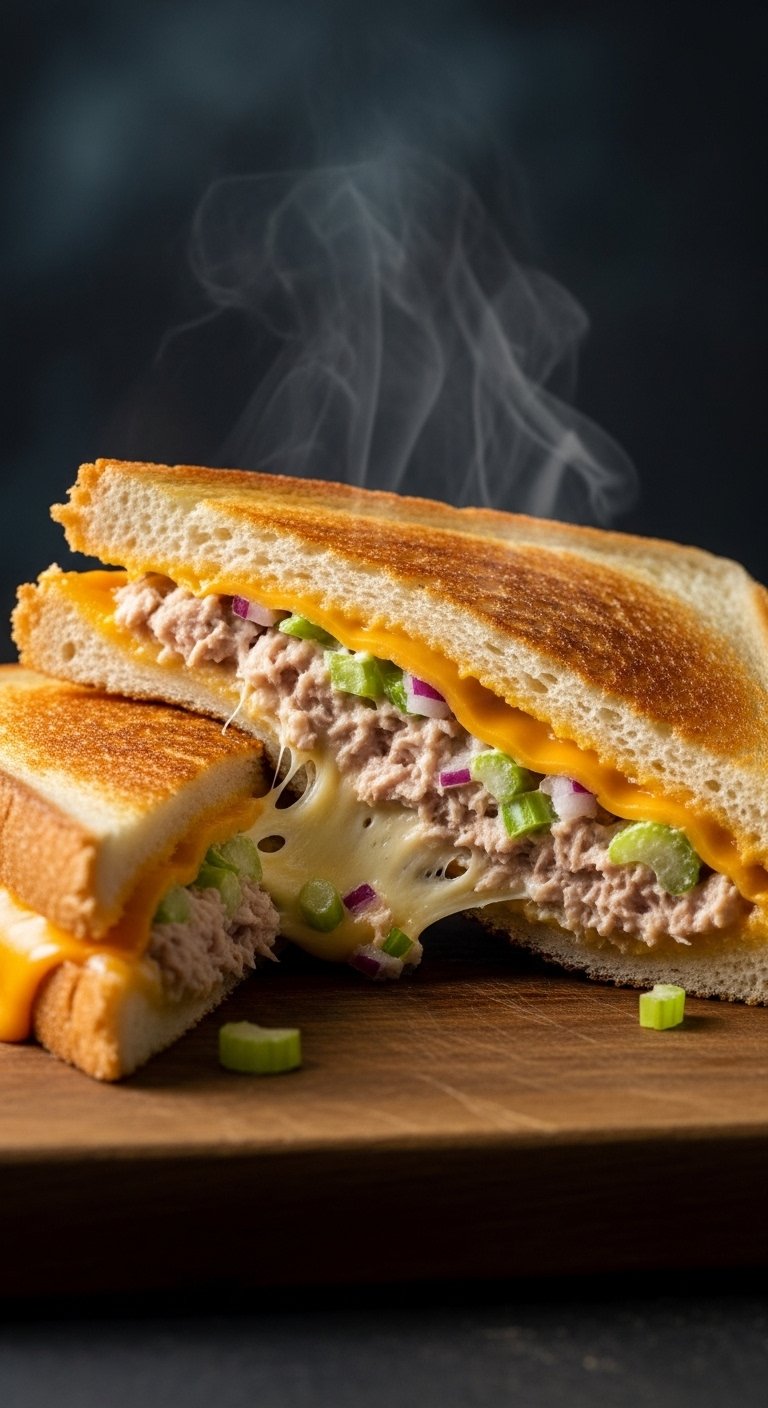
There are certain foods that feel like a warm hug. You know the ones I’m talking about. Mac and cheese on a rainy day. Tomato soup with a grilled cheese on the side. And then, there is the best tuna melt sandwich a beautiful, golden-brown, crispy, buttery, melty masterpiece that sits somewhere between a childhood memory and a grown-up craving.
I still remember my first real tuna melt. I was maybe ten years old, sitting in a dingy diner off a highway somewhere in upstate New York. My dad ordered for me because the menu was the size of a newspaper. When the plate arrived, I stared at it. Toasted bread, oozing orange cheddar, and a warm, creamy filling spilling out the sides. I took one bite, and the world stopped. The crunch gave way to a soft, savory, slightly tangy explosion of flavor. From that day on, I became obsessed. I have spent years searching for, cooking, and perfecting what I truly believe is the best tuna melt sandwich recipe on planet Earth.
And guess what? Today, I am going to share every single secret with you.
Whether you are a college student living on instant ramen, a busy parent needing a quick dinner, or a foodie who thinks they have tried it all, this article is for you. By the time you finish reading, you will not only understand what makes a tuna melt great, but you will also have the confidence to buy the right ingredients and make one that will blow any restaurant version out of the water.
Let’s dive in, shall we?
What Exactly is a Best Tuna Melt Sandwich? (And Why Do We Love It?)
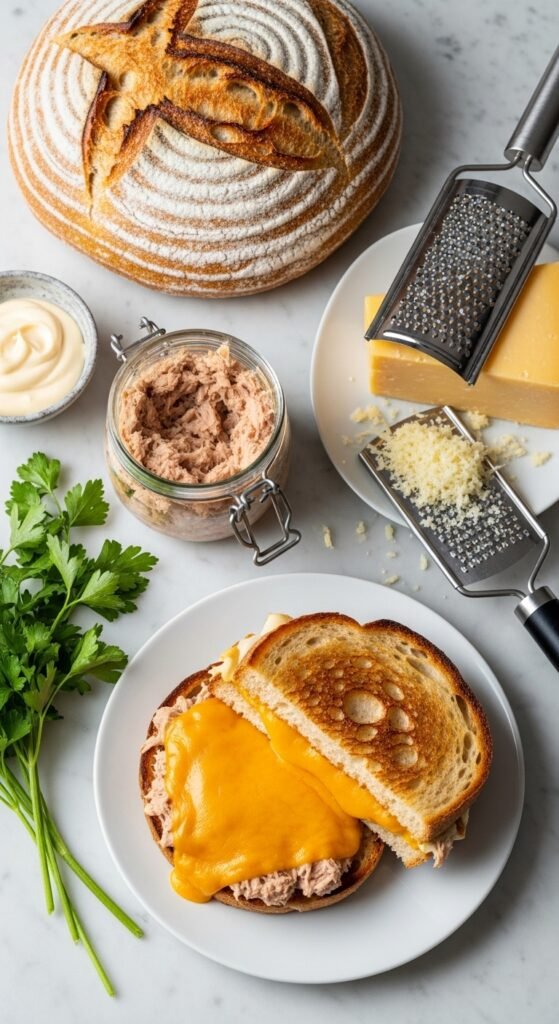
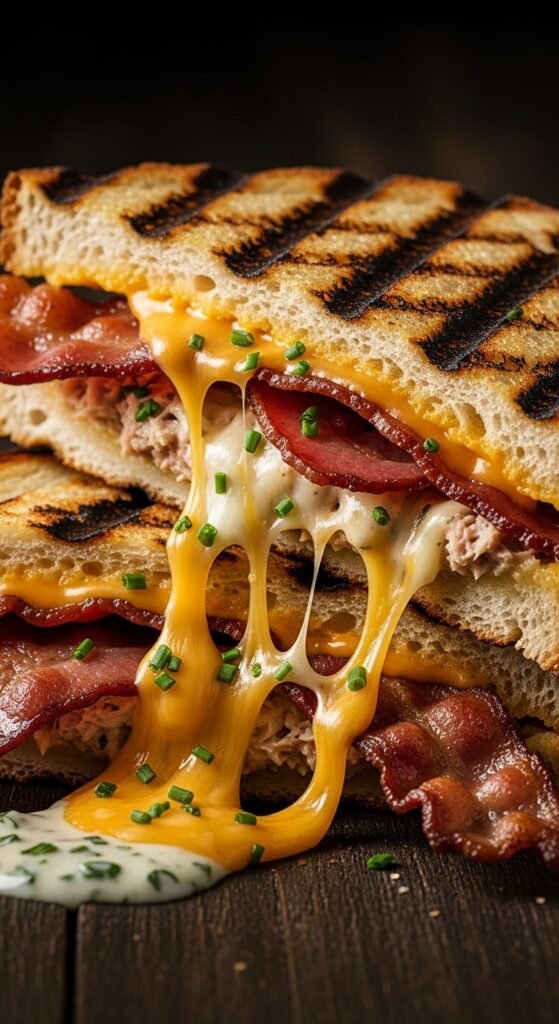
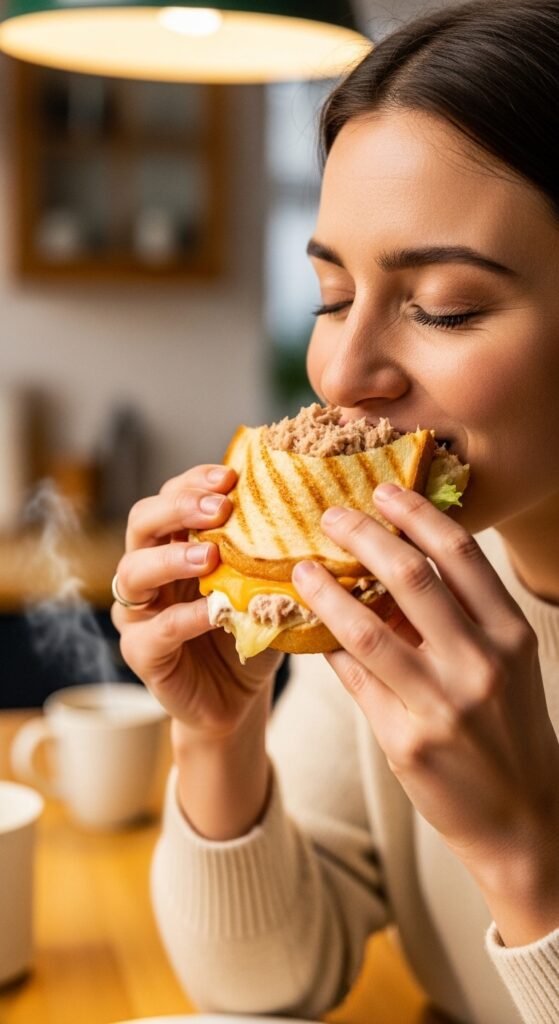
Before we start cooking, let us take a moment to appreciate the beauty of this dish. Simply put, a tuna melt is a grilled cheese sandwich that decided to grow up and get a real job. Instead of just plain cheese, you have a creamy tuna salad filling. That tuna salad is typically made with canned tuna, mayonnaise, celery, onion, and a few spices. Then, you slap that mixture between two slices of bread, top it with a generous amount of melty cheese, and grill it until the outside is crispy and golden while the inside is warm and gooey.
But here is the thing. A bad tuna melt is a tragedy. It is soggy. It is cold in the middle. The bread is burnt, or worse, the tuna is dry and fishy. However, the best tuna melt sandwich is a symphony of textures and temperatures. You get the crunch of the toast, the creaminess of the tuna, the sharpness of the cheese, and a hint of umami that makes your taste buds dance.
Why do we love it so much? Because it is comforting. It is affordable. It takes less than fifteen minutes to make. And yet, when done right, it feels fancy enough to serve to guests. That is the magic of this recipe.
The Great Debate: What Makes One Tuna Melt Better Than Another?
Over the years, I have eaten tuna melts in dive bars, five-star hotels, and my own messy kitchen at 11 PM. I have had terrible ones that tasted like wet socks. I have had heavenly ones that I still dream about. Through trial and error, I have realized that the difference between a mediocre sandwich and the best tuna melt sandwich comes down to five specific things.
Let me break them down for you.
1. The Quality of the Tuna
You cannot make a masterpiece with bad paint. The same goes for tuna. If you buy the cheapest, greyest, most mushy canned tuna, your sandwich will taste like it. Trust me on this. I tried to save money once by buying a no-name brand. The result was a sad, mushy, overly fishy disaster. Never again.
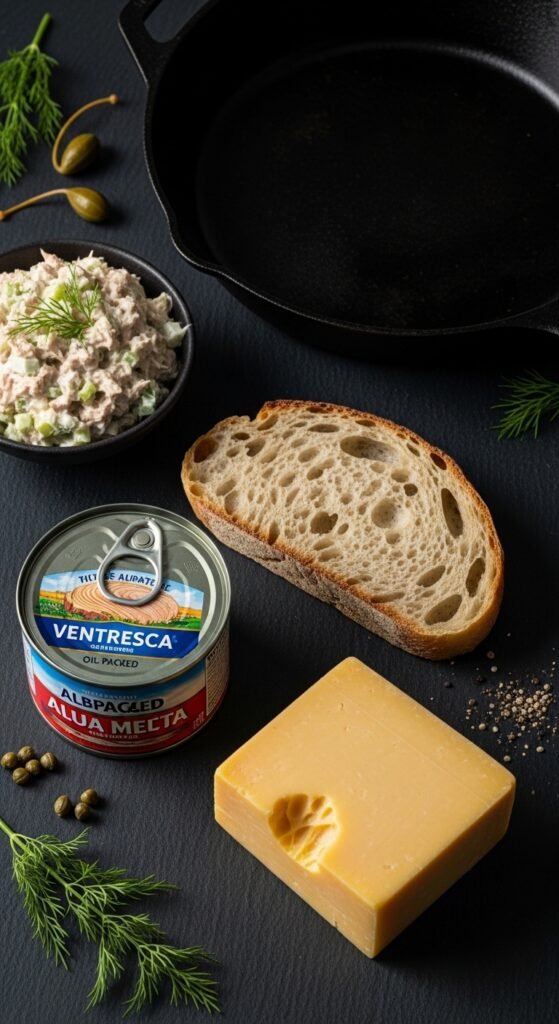
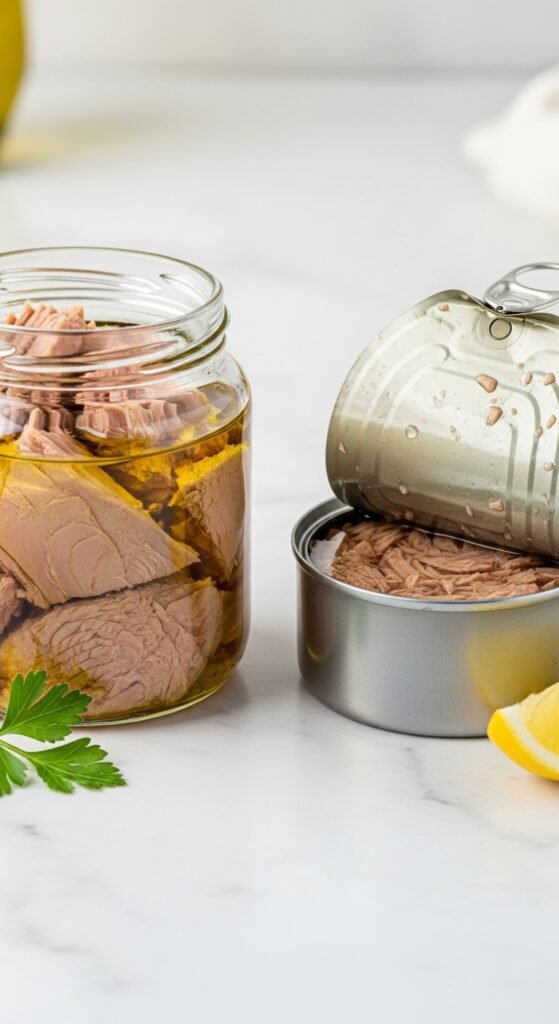
For the best tuna melt sandwich, you want solid white albacore tuna packed in water, not oil. Oil can make the salad too greasy. You also want tuna that comes in chunks, not shredded mush. Look for brands that say “pole caught” or “sustainable.” Not only is it better for the ocean, but the flavor is cleaner and sweeter.
2. The Bread Choice
I cannot stress this enough. Your bread is the foundation of the house. If the foundation is weak, the whole thing collapses. For a tuna melt, you need a bread that is sturdy enough to hold the filling without getting soggy, but soft enough to bite through easily.
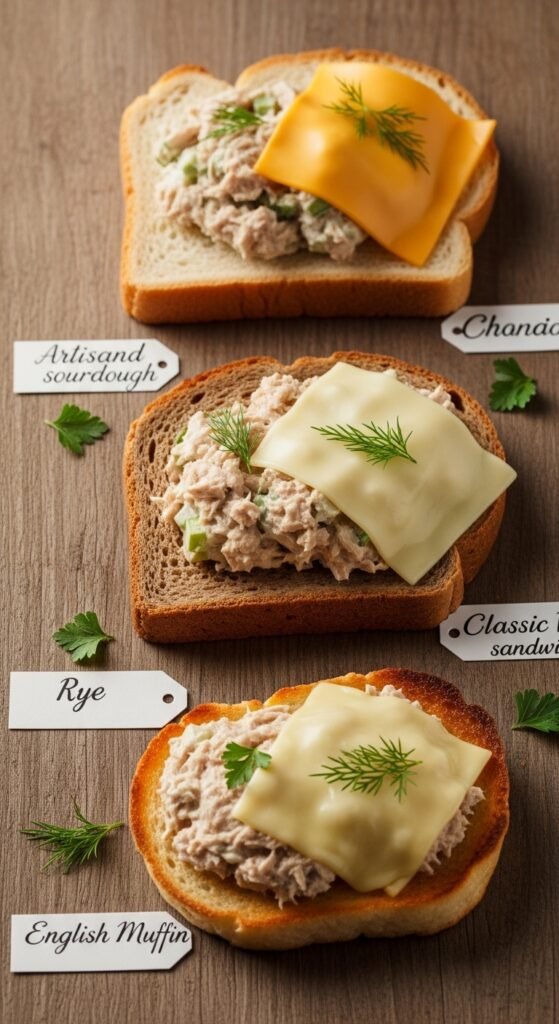
The classic choice is sourdough. Sourdough has a tangy flavor that pairs beautifully with tuna. It toasts up incredibly crispy. My second favorite is rye bread, which adds a nutty, earthy note. If you do not have those, a thick-cut Texas toast or a good ciabatta roll works. Please, for the love of all that is holy, avoid flimsy white bread. It will turn into a sponge.
3. The Cheese Situation
Here is where most people get it wrong. They just grab any yellow slice from the fridge. But cheese is the glue of the universe, and you need the right glue.
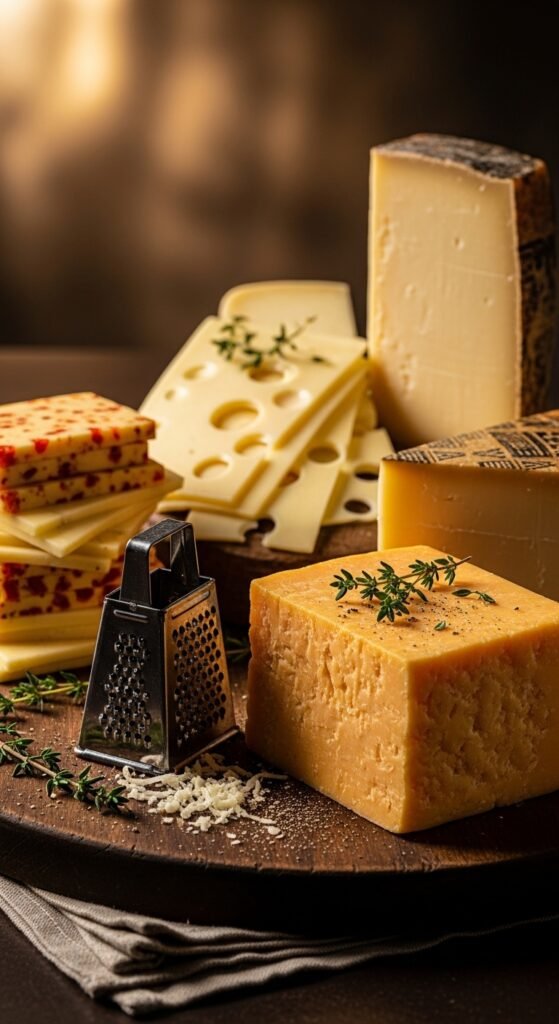
The traditional choice is sharp cheddar. The sharper, the better. Why? Because tuna is mild. You need a cheese with personality to stand up to it. Cheddar melts beautifully and gives that classic orange color we all love. However, if you want to get fancy, try Swiss cheese for a nutty flavor, provolone for a mild creaminess, or even pepper jack if you like a little kick.
But here is my secret trick for the best tuna melt sandwich: use two cheeses. I use sharp cheddar for flavor and mozzarella for that incredible, stretchy, Instagram-worthy cheese pull. When you bite into a mozzarella and cheddar melt, your soul leaves your body. I promise.
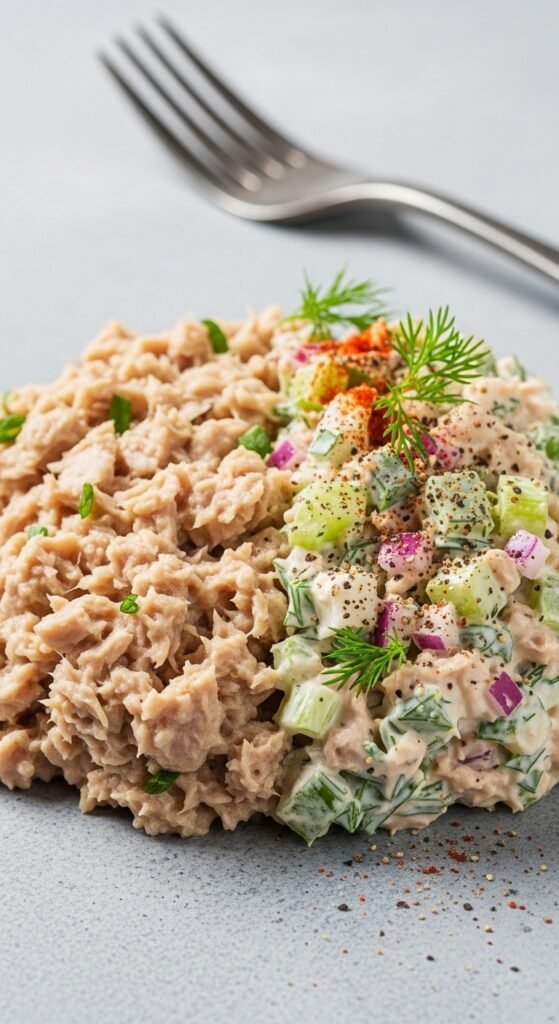
4. The Tuna Salad Recipe
Do not just dump tuna and mayo into a bowl and call it a day. That is boring. That is lazy. That is not the best tuna melt sandwich. You need layers of flavor.
You need crunch. That means finely diced celery and red onion. You need acid to cut through the fat. That means a squeeze of fresh lemon juice or a splash of white vinegar. You need herbs. Fresh dill or parsley brightens everything up. And finally, you need a secret weapon: a tiny splash of soy sauce or Worcestershire sauce. It sounds weird, I know. But it adds umami, which is that savory depth that makes people ask, “What did you put in this?”
5. The Cooking Method

You cannot just throw this sandwich in a cold pan. You cannot use low heat and hope for the best. You need technique. You need to understand the dance between heat, butter, and time.
The perfect tuna melt is cooked on medium-low heat. Why? Because you need time to melt the cheese all the way through without burning the bread. If the heat is too high, you will have black toast and cold, lumpy tuna in the middle. Nobody wants that.
Also, you must use real butter. Not margarine. Not cooking spray. Butter. Salted butter. Spread it generously on the outside of the bread. That is what gives you that golden, crispy, crispy crust that shatters when you bite it.
My Personal Anecdote: The Quest for the Best Tuna Melt Sandwich
Let me take a quick detour to tell you a story. About five years ago, I was traveling through Portland, Oregon. I had heard rumors of a food cart that served the best tuna melt sandwich in the entire Pacific Northwest. I am not exaggerating when I say I walked two miles in the rain to find this cart.
When I got there, the line was around the block. I waited forty-five minutes. Finally, I got my sandwich. It was wrapped in wax paper, and it was heavy. I took it to a nearby bench, unwrapped it, and…
It was perfect.
The bread was griddled to a perfect golden brown. The cheese was bubbling over the sides. When I bit into it, the tuna was warm, creamy, and studded with crunchy bits of pickled jalapeños and candied bacon. Yes, candied bacon. I sat there in the rain, not caring that I was getting wet, because that sandwich was a religious experience.
I went back the next day and asked the owner his secret. He was a grizzled old man with a beard that probably had its own zip code. He just laughed and said, “Kid, the secret is to never rush. Respect the ingredients. And always toast the bread twice.”
That last part stuck with me. Toast the bread twice. I will explain what that means in the step-by-step guide below. But that moment taught me that a simple sandwich can be art. And that is why I am so passionate about helping you make the best tuna melt sandwich in your own kitchen.
Step-by-Step Guide to the Best Tuna Melt Sandwich
Alright, enough stories. Let us get to work. Put on your apron, wash your hands, and get ready to cook something beautiful. I am going to walk you through every single step. Follow these instructions carefully, and I promise you will end up with a sandwich that rivals any diner or food cart.
Step 1: Gather Your Ingredients
First things first. You need to get your tools and ingredients ready. This is called mise en place, which is a fancy French term for “don’t forget the pickles.”
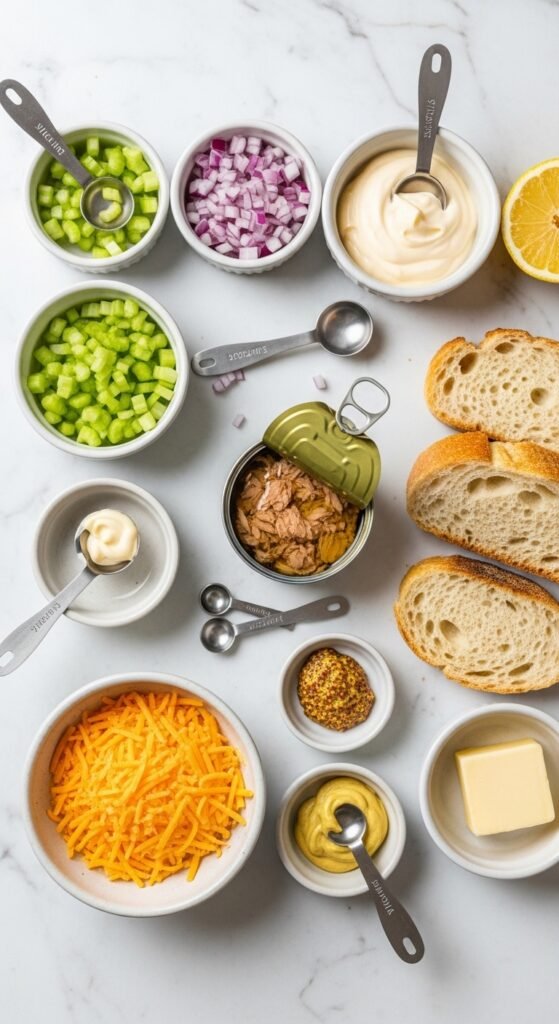
Here is your shopping list for two sandwiches:
For the Tuna Salad:
- 2 cans (5 ounces each) of solid white albacore tuna in water
- 1/3 cup of good quality mayonnaise (Hellmann’s or Duke’s are my favorites)
- 1/4 cup of finely diced celery (about one small stalk)
- 2 tablespoons of finely diced red onion
- 1 tablespoon of fresh lemon juice
- 1 tablespoon of chopped fresh dill (or 1 teaspoon dried)
- 1 teaspoon of Dijon mustard (this adds a tangy kick)
- 1/2 teaspoon of Worcestershire sauce or soy sauce
- Salt and black pepper to taste
For the Sandwich Assembly:
- 4 slices of thick-cut sourdough bread or rye bread
- 4 tablespoons of salted butter, softened (this is crucial for spreading)
- 4 ounces of sharp cheddar cheese, grated (grate it yourself; pre-shredded has anti-caking agents that ruin melting)
- 2 ounces of mozzarella cheese, grated (for the stretch)
- Optional add-ins: pickled jalapeños, bacon bits, sliced tomatoes, or avocado
Step 2: Drain the Tuna Like a Pro
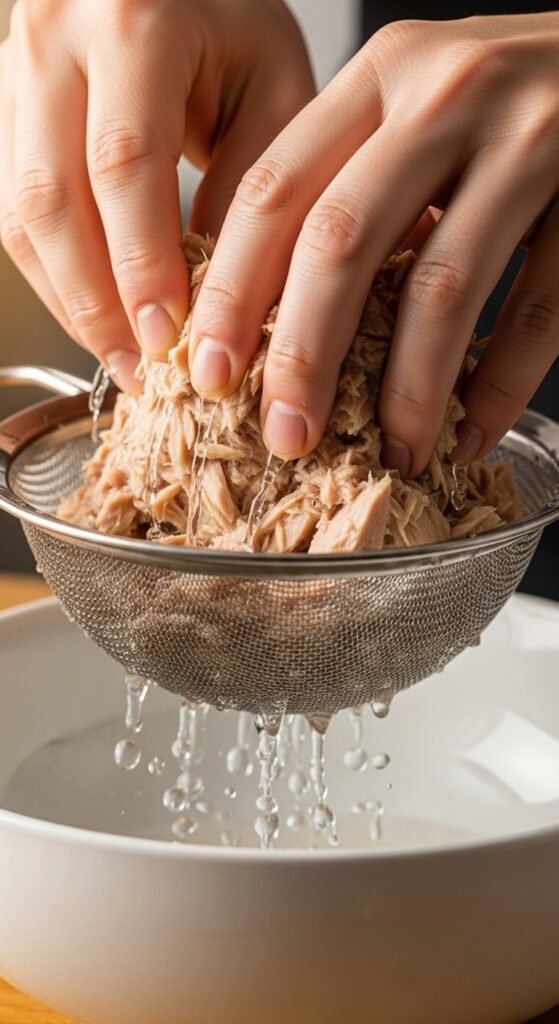
This is a step that people mess up constantly. Open your cans of tuna. You will see water inside. Do not just dump the whole can into a bowl. That water will make your tuna salad watery and sad.
Instead, press the lid of the can down firmly onto the tuna to squeeze out as much liquid as possible. Then, turn the tuna into a fine-mesh strainer and use the back of a spoon to press down even more. You want that tuna to be dry. Dry tuna absorbs the mayonnaise and flavors much better.
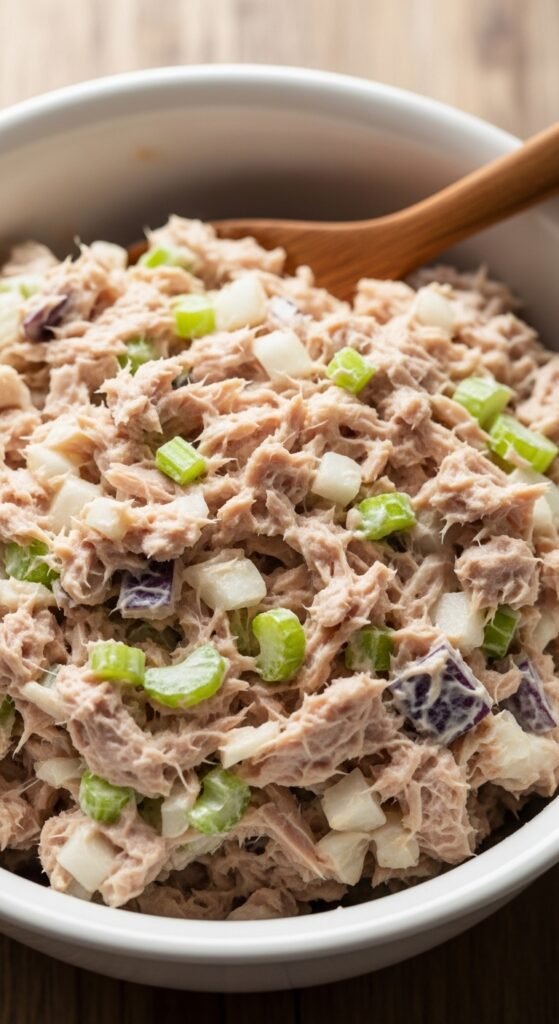
Once drained, transfer the tuna to a medium-sized mixing bowl. Use a fork to flake it apart. Do not mash it into a paste. You want small, distinct chunks. Texture is your friend.
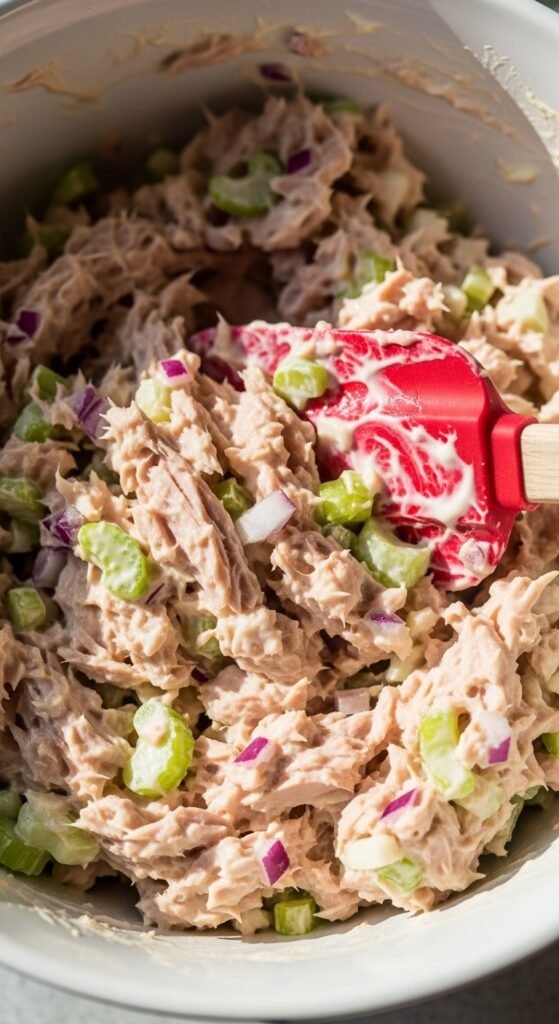
Step 3: Build the Perfect Tuna Salad
Now, the fun part. Add your mayonnaise, Dijon mustard, Worcestershire sauce, and lemon juice to the bowl. Stir gently to combine. Then, add your diced celery, red onion, and fresh dill. Stir again.
Taste it. This is important. Dip a clean spoon in and taste. Does it need salt? Probably. Tuna is naturally low in sodium. Add a pinch of sea salt and a generous crack of black pepper. Taste again. Does it need more lemon for brightness? More mayo for creaminess? Adjust it until it makes you smile.
Here is a pro tip: Cover the bowl and put the tuna salad in the refrigerator for ten minutes. This allows the flavors to marry. The best tuna melt sandwich comes from tuna salad that has rested. I know you are hungry, but patience is a virtue.
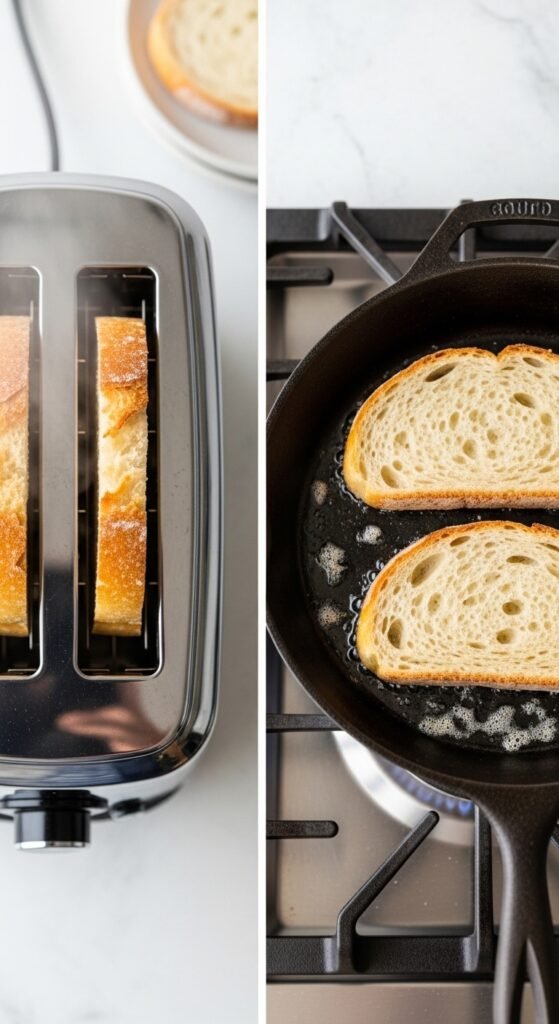
Step 4: The “Toast Twice” Method (Life Changing)

Remember the old man in Portland? Here is his secret. Do not just toast the bread once. You toast it twice.
First, take your sourdough slices and put them in a toaster or under a broiler for one minute. You just want them lightly toasted—barely golden. This initial toasting creates a barrier. When you add the tuna salad, this barrier prevents the moisture from seeping into the bread and making it soggy.
Set those lightly toasted slices aside. Let them cool for a minute.
Step 5: Assemble the Sandwich with Care

Now, take your lightly toasted bread and place it on a cutting board. On one slice of each pair, pile a generous amount of your chilled tuna salad. Do not be shy. Use about 1/2 cup per sandwich. Spread it evenly to the edges.
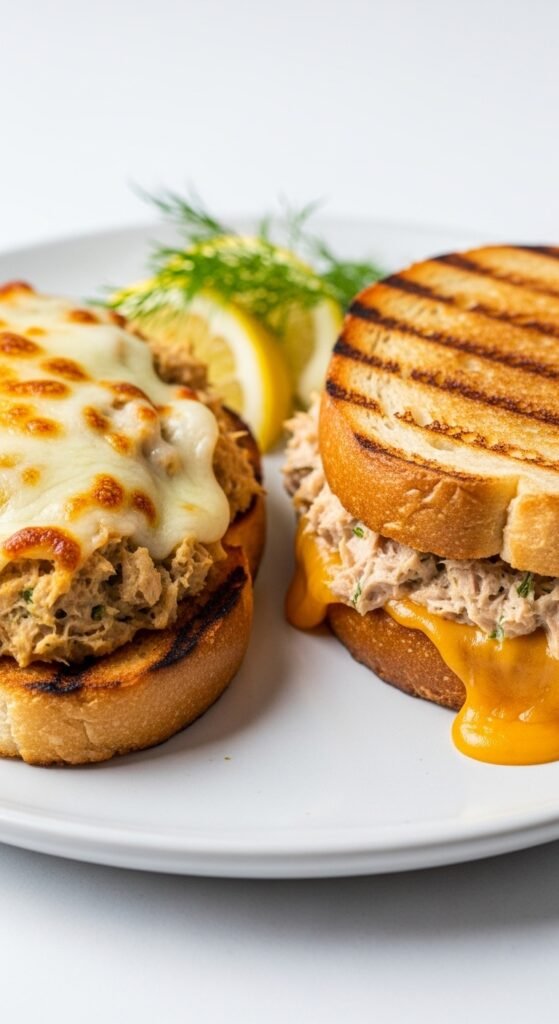
Now, here is the cheese strategy. Take your grated sharp cheddar and sprinkle half of it directly onto the tuna. Then, add your optional toppings if you are using them—maybe a few pickled jalapeños or some crispy bacon. Finally, top with the grated mozzarella and the remaining cheddar.
Place the other slice of bread on top. But wait. Do not cook it yet. Press down gently on the sandwich to settle everything.
Step 6: Butter the Bread Generously
This is where the magic happens. Take your softened salted butter. Spread a thick, even layer on the outside of the top slice of bread. Then, flip the sandwich over and spread butter on the outside of the other slice.
Do not skimp on the butter. This is not a diet sandwich. The butter is what gives you that crispy, golden, diner-style crust. If you use too little, the bread will burn or turn out dry.
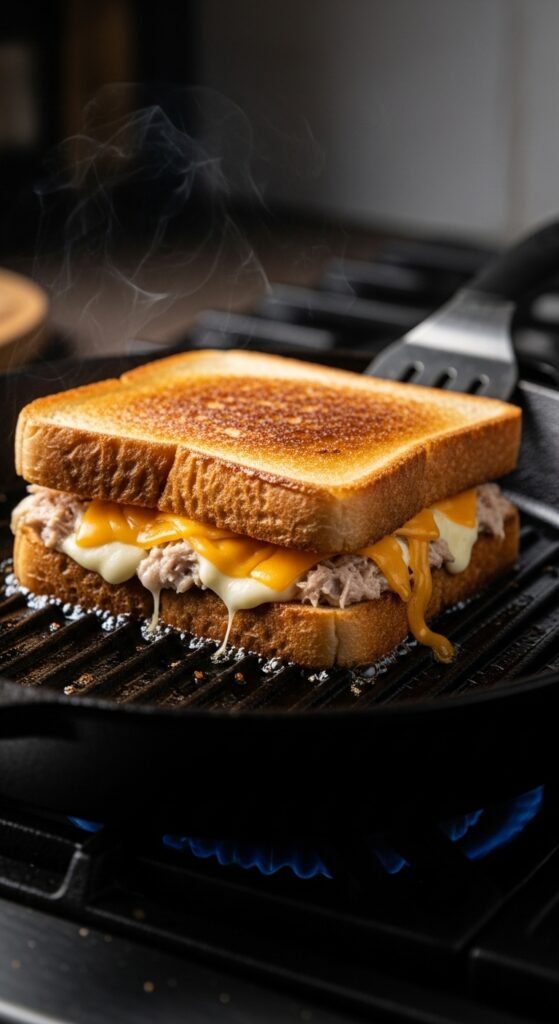
Step 7: The Grilling Process (Low and Slow)

Place a large non-stick skillet or cast-iron pan over medium-low heat. Let the pan warm up for about two minutes. You want it hot, but not smoking.
Carefully place your buttered sandwich into the pan. Let it cook undisturbed for about 3 to 4 minutes. Lift the edge with a spatula to check the color. You are looking for a deep, golden brown. Not pale, not burnt. The color of a good honey graham cracker.
Once the bottom is perfect, flip the sandwich. Here is the tricky part. The cheese needs to melt completely. If the outside is browning too fast, turn the heat down to low. Cover the pan with a lid for the last two minutes. The lid traps heat and steam, which helps melt the cheese without burning the bread.
Flip again if necessary. You want both sides to be perfectly crispy and the cheese to be oozing out the sides.
Step 8: The Rest (Yes, You Must Rest)
This sounds crazy, but do not cut the sandwich immediately. Remove it from the pan and place it on a cutting board. Let it rest for exactly one minute. During this time, the cheese sets slightly so it does not all run out when you cut it. Also, the internal temperature evens out, so you do not burn your mouth on molten tuna lava.
After one minute, take a sharp serrated knife (a bread knife works best) and cut the sandwich diagonally. There is something about a diagonal cut that makes food taste better. I cannot explain it, but science probably agrees with me.
Why You Should Buy Quality Ingredients with Confidence

At this point, you might be thinking, “This sounds amazing, but do I really need to buy high-end tuna or fancy cheese? Can’t I just use what I have?”
Here is the honest truth. You can make a tuna melt with cheap ingredients. It will fill your stomach. But it will not change your life. And since you are reading a 5000-word article about tuna melts, I suspect you want more than just a full belly. You want joy.
So, let me convince you to invest in quality with confidence.
Buy the Good Tuna
When you buy a can of premium solid white albacore, you are paying for flavor, texture, and ethics. Cheap tuna is often “light tuna,” which comes from skipjack. It has a stronger, fishier taste and a mushy texture. Premium albacore is milder, firmer, and almost meaty. It costs maybe two dollars more per can. For that extra two dollars, your sandwich goes from “meh” to “wow.” That is the best value in cooking.
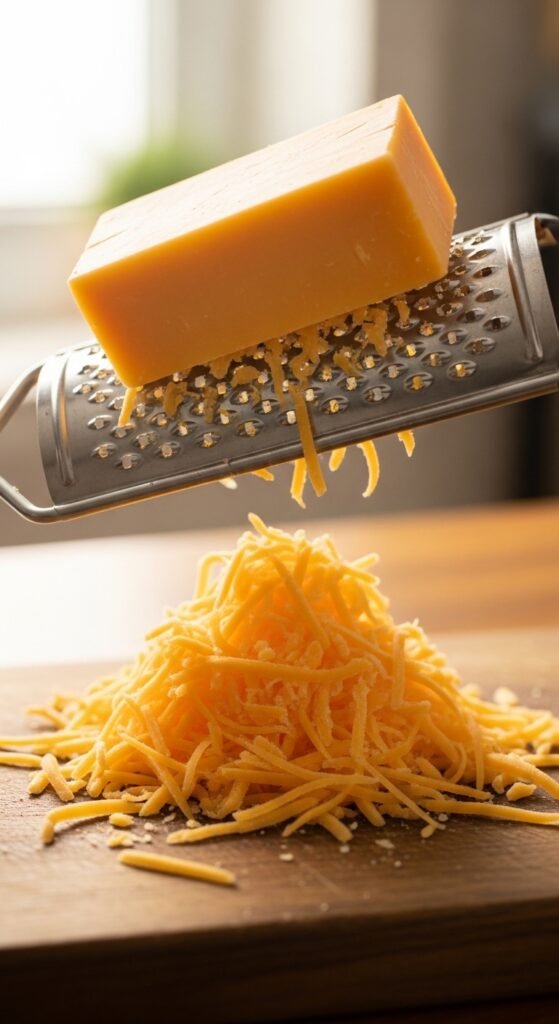
Buy Real Cheese and Grate It Yourself
A block of sharp cheddar costs about the same as a bag of pre-shredded cheese. But the block is infinitely better. Pre-shredded cheese is coated in potato starch and cellulose to prevent clumping. That coating also prevents smooth melting. When you grate your own cheese, it melts into a silky, cohesive blanket. Trust me. Spend the extra thirty seconds to grate it yourself. Your best tuna melt sandwich deserves that.
Buy Fresh Bread from a Bakery
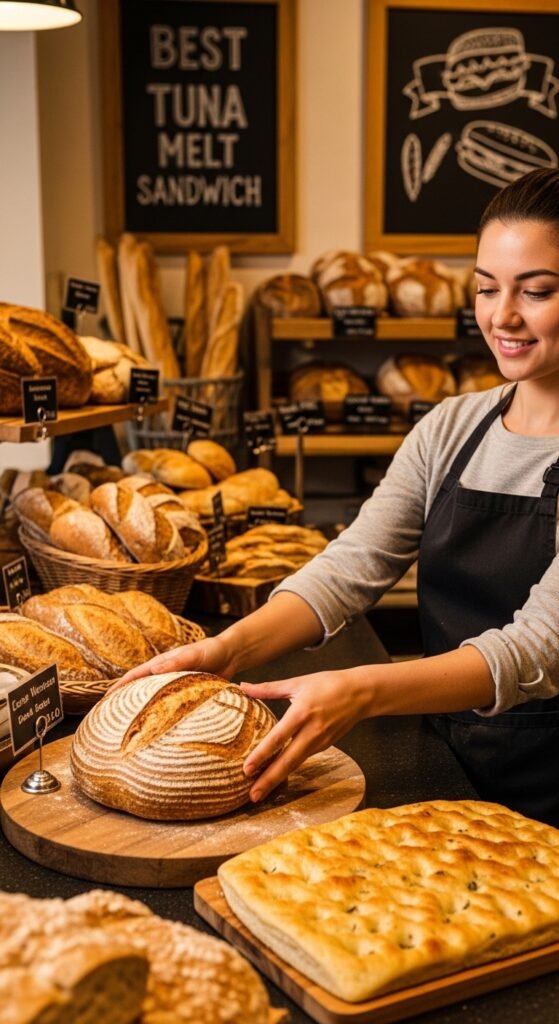
Supermarket bread is made to last for weeks. That means preservatives. That means a weird, gummy texture. A fresh loaf of sourdough from a local bakery costs three or four dollars. It has a crisp crust, a soft interior, and a complex tangy flavor. When you butter and grill that fresh bread, it becomes transcendent. Do not let a fifty-cent slice of factory bread ruin your hard work.
I promise you, spending a little extra on these core ingredients is not wasteful. It is an investment in your happiness. And you are worth it.
Common Mistakes That Ruin a Tuna Melt (And How to Avoid Them)
I have made every mistake in the book. I have served soggy sandwiches to friends. I have burnt bread so badly I set off a smoke alarm. Learn from my failures. Here are the most common errors people make when trying to create the best tuna melt sandwich.
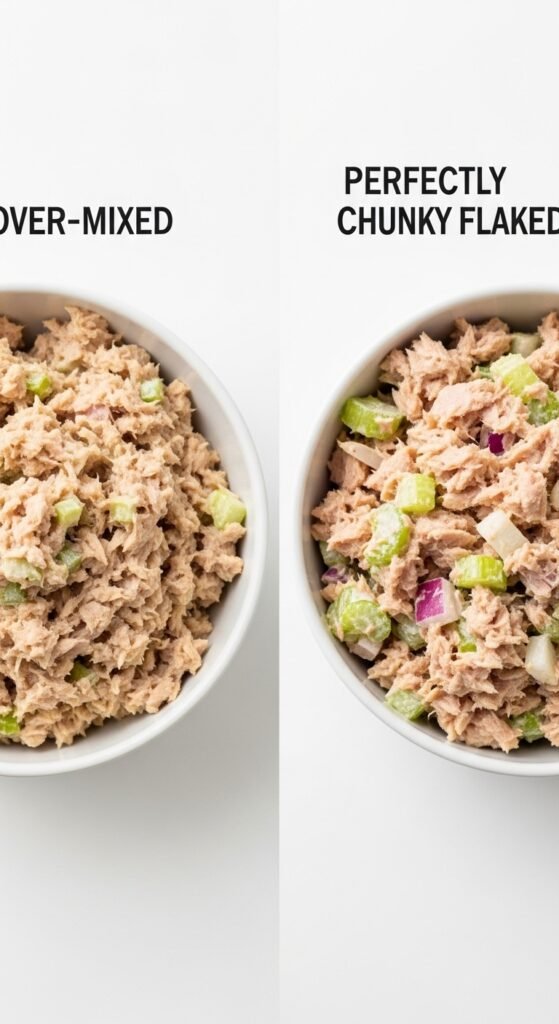
Mistake #1: Over-mixing the Tuna Salad
If you stir the tuna until it becomes a paste, you lose all texture. The result is a baby food sandwich. Always flake the tuna gently and stir just until combined. You want distinct pieces of tuna and crunchy bits of celery.
Mistake #2: Using Cold Cheese Straight from the Fridge
Cold cheese takes longer to melt. While you are waiting for the cheese to melt, your bread is burning. Always grate your cheese and let it sit at room temperature for ten minutes before assembling. Room temperature cheese melts faster and more evenly.
Mistake #3: Crowding the Pan
Do not try to cook two sandwiches in a small pan. They will touch each other, creating steam pockets that make the bread soggy. Cook one sandwich at a time. Give it space. Let the heat circulate.
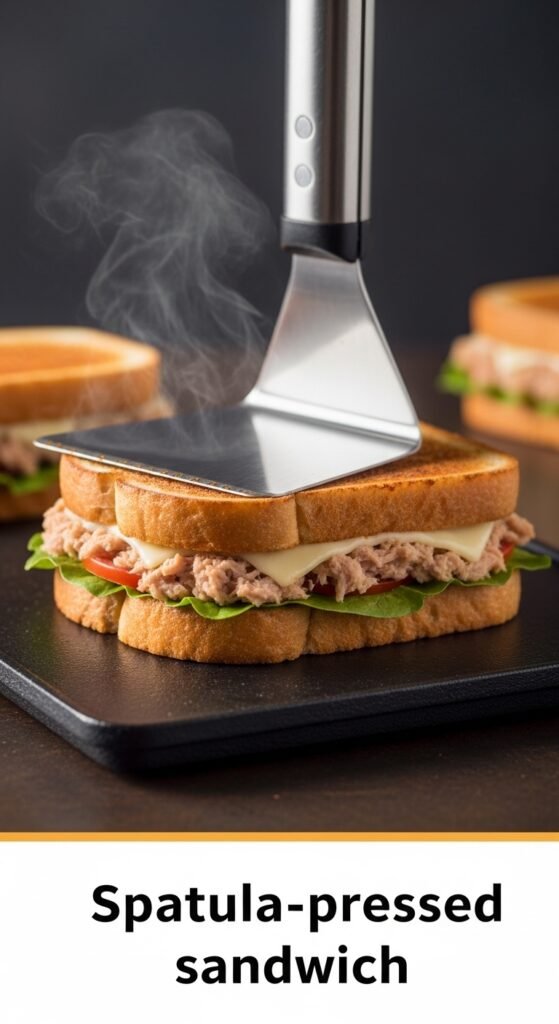
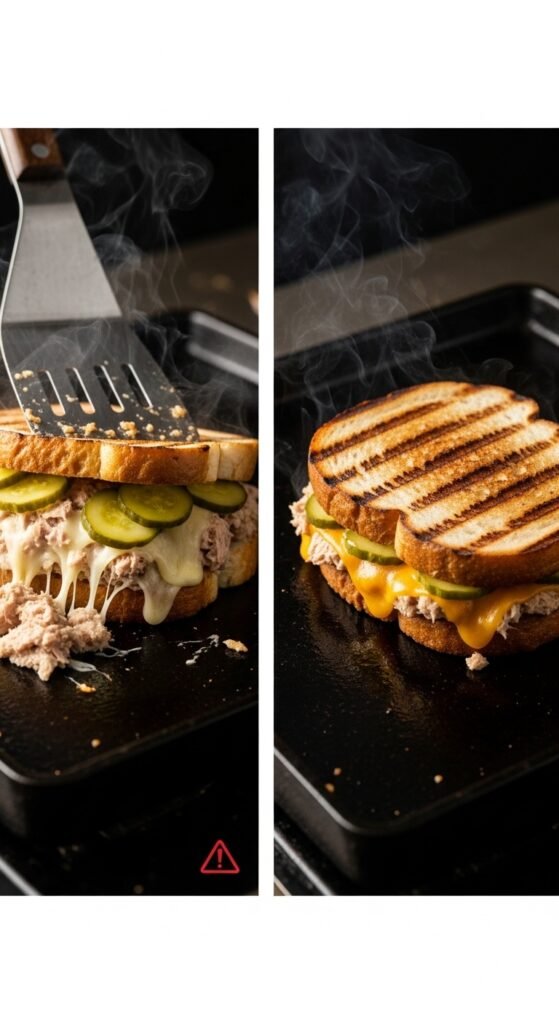
Mistake #4: Pressing Down with a Spatula
I see people do this at diners all the time. They smash the sandwich with a spatula to “flatten it.” Stop that. When you press down, you squeeze out all the melted butter and the creamy tuna filling. You end up with a dry, flat pancake of sadness. Be gentle. Let the sandwich cook naturally.
Mistake #5: Not Seasoning the Tuna
Tuna needs salt. It needs acid. If you skip the lemon juice or the salt, the sandwich will taste flat and dull. Always taste your tuna salad before you put it on the bread. Adjust the seasoning until it sings.
Delicious Variations to Try at Home
Once you have mastered the classic best tuna melt sandwich, it is time to get creative. The recipe I gave you is a fantastic base. But you can customize it a thousand different ways. Here are some of my favorite variations that will keep your lunch routine exciting for months.
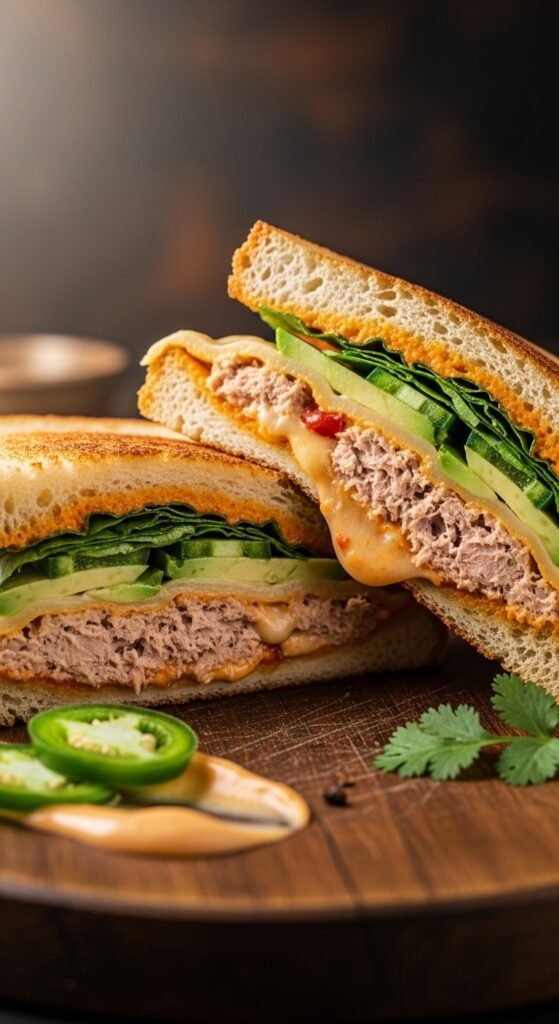
The Spicy Southwest Tuna Melt
Add 1 tablespoon of chopped pickled jalapeños to the tuna salad. Mix 1/2 teaspoon of chipotle powder into the mayonnaise. Use pepper jack cheese instead of cheddar. Top with sliced avocado before closing the sandwich. The result is smoky, spicy, and creamy.
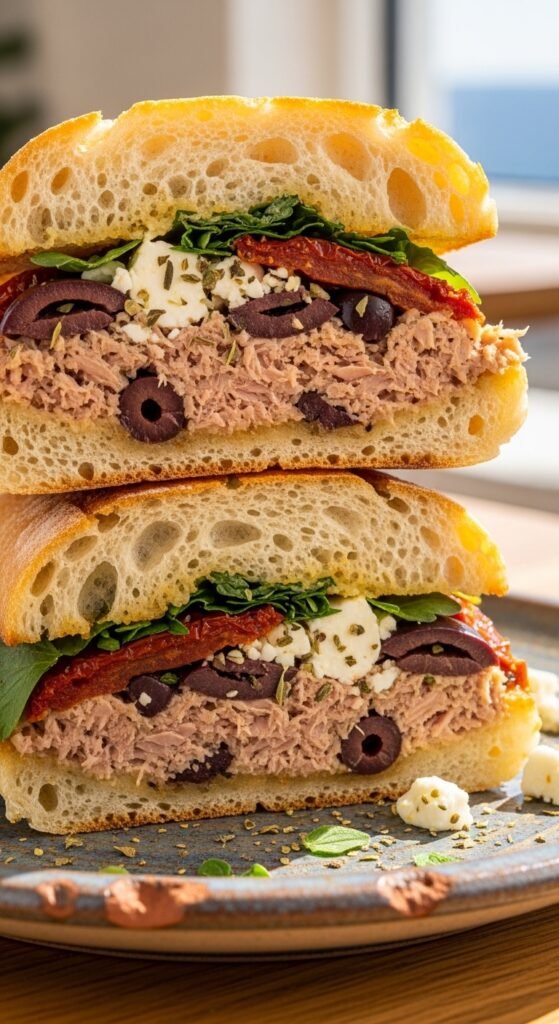
The Mediterranean Tuna Melt
Replace the celery with chopped kalamata olives and sun-dried tomatoes. Add 1 teaspoon of dried oregano. Use crumbled feta cheese mixed with mozzarella. Serve on pita bread instead of sourdough. This version tastes like a vacation in Greece.
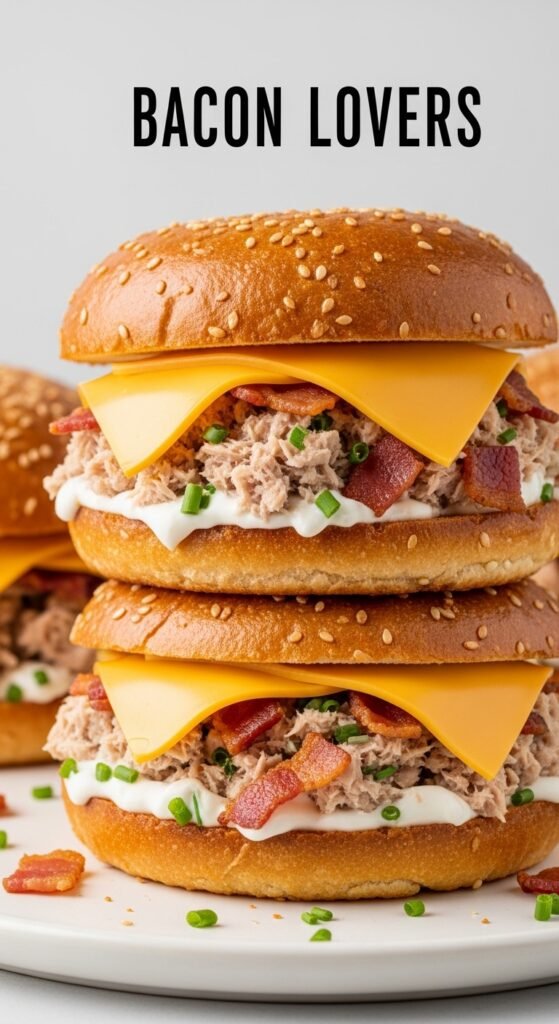
The Bacon Lover’s Tuna Melt
Cook three strips of bacon until crispy. Crumble them into the tuna salad. Also, add a tablespoon of the bacon grease to the pan instead of butter for the bread. Use smoked cheddar cheese. This is not for the faint of heart. It is for people who want to experience pure bliss.
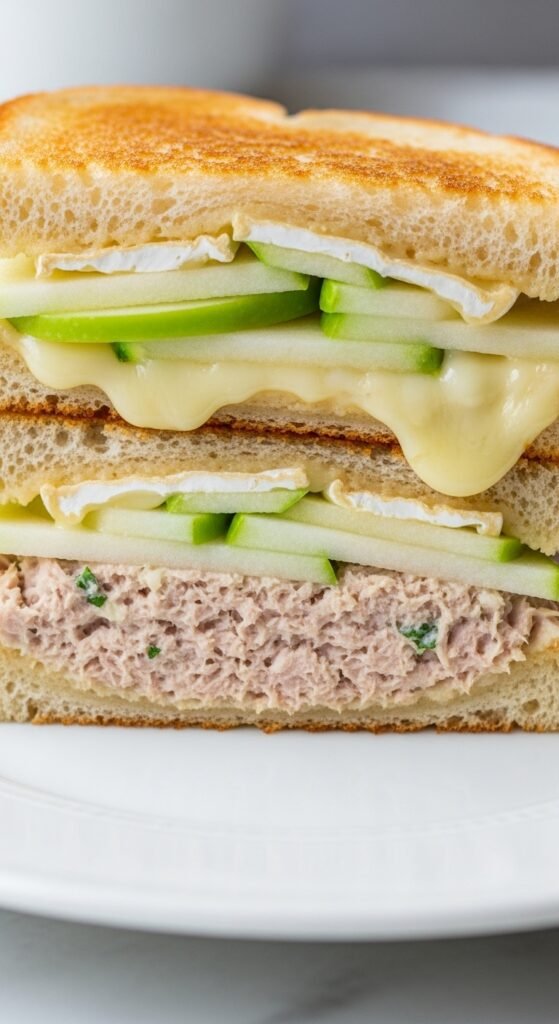
The Apple and Brie Tuna Melt
This one sounds weird, but hear me out. Add finely diced green apple (Granny Smith) to the tuna salad. The tart crunch is incredible. Replace the cheddar with creamy brie cheese. Do not add mozzarella. Spread a thin layer of honey on the inside of the top slice of bread. This sweet, salty, savory, crunchy sandwich is my secret weapon for impressing dinner guests.
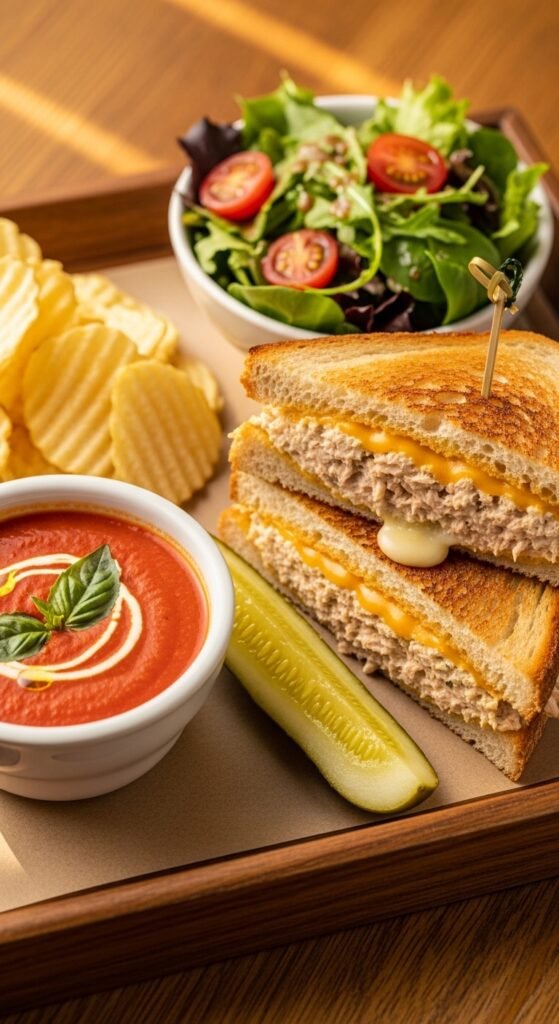
What to Serve with Your Best Tuna Melt Sandwich
A great sandwich deserves great sides. You do not want to just eat the sandwich alone (although you could, and I would not judge you). Here are some classic pairings that complete the meal.
Classic Potato Chips
There is a reason diners serve tuna melts with a handful of kettle-cooked potato chips. The salty, crunchy chips complement the creamy, warm sandwich perfectly. I recommend salt and vinegar chips because the vinegar cuts through the richness of the cheese and mayo.
Tomato Soup
This is the ultimate comfort food duo. A warm bowl of creamy tomato soup for dipping your tuna melt is like a hug in a bowl. The acidity of the tomatoes balances the fat of the sandwich. Make a quick soup by heating a can of good tomato soup with a splash of heavy cream and some fresh basil.
Dill Pickle Spear
A cold, sour, crunchy pickle spear on the side cleanses your palate between bites. It resets your taste buds so every bite of the sandwich tastes as good as the first. Plus, the green color looks pretty on the plate.
Simple Green Salad
If you want to pretend you are being healthy (and sometimes I do), serve the tuna melt with a simple arugula salad tossed in lemon vinaigrette. The peppery greens add a fresh, light contrast to the heavy sandwich.
Frequently Asked Questions (From Real Readers)
Over the years, I have received hundreds of emails and comments about tuna melts. People have questions. Let me answer the most common ones right now.
Can I make a tuna melt without mayonnaise?
Yes, absolutely. If you do not like mayo or are avoiding it, substitute Greek yogurt or mashed avocado. Greek yogurt gives a tangy, protein-packed creaminess. Mashed avocado gives a buttery, healthy fat flavor. Just know that the texture will be slightly different, but still delicious.
Can I use canned tuna in oil?
You can, but I do not recommend it. Tuna packed in oil is already very fatty. When you add mayonnaise, the sandwich becomes greasy and heavy. If you only have oil-packed tuna, drain it very well and consider reducing the mayonnaise by half.
How do I reheat a leftover tuna melt?
Leftover tuna melts are tricky because the bread loses its crispness. The best way is to reheat it in a dry skillet over low heat for about two minutes per side. Do not use a microwave. The microwave will make the bread rubbery and the tuna hot in a bad way.
Is a tuna melt healthy?
It depends on your definition of healthy. Tuna is high in protein and omega-3 fatty acids. Celery and onion add fiber and vitamins. However, mayonnaise and cheese add calories and saturated fat. I consider the best tuna melt sandwich a “sometimes food.” It is perfect for a treat, a weekend lunch, or a rainy day. Everything in moderation.
Can I make this gluten-free?
Absolutely. Use a high-quality gluten-free bread. Look for one that is sturdy, like a gluten-free sourdough or a multi-grain loaf. Toast it lightly first (the twice-toast method is even more important for gluten-free bread because it tends to get soggy faster). All the other ingredients are naturally gluten-free.
The Psychological Joy of Cooking the Best Tuna Melt Sandwich
Let me get a little deep for a moment. Why am I so passionate about a simple sandwich? Because cooking is an act of love. When you take the time to make the best tuna melt sandwich for yourself or someone else, you are saying, “You matter. This moment matters.”
I think about my dad in that diner all those years ago. He did not have to take me out for lunch. We did not have a lot of money. But he wanted to give me a memory. And that tuna melt became a memory that lasted thirty years.
When you make this sandwich, you are not just feeding your body. You are feeding your soul. The sizzle of the butter in the pan. The smell of toasting bread and melting cheese. The first bite where the crust shatters and the warm, creamy tuna floods your mouth. That is happiness. That is presence. That is the good stuff of life.
So, take your time. Do not rush. Put on some music. Pour a glass of iced tea. And make this sandwich like it is a ceremony.
Final Thoughts and a Call to Confidence
You now have everything you need. You have the history, the ingredients list, the step-by-step guide, the troubleshooting tips, and even some fancy variations. You have read my personal stories and my hard-earned lessons.
There is only one thing left to do.
Go to the store. Buy the solid white albacore tuna. Buy the block of sharp cheddar. Buy the fresh sourdough loaf and the salted butter. Spend the extra money. Trust the process.
When you get home, open the tuna. Drain it well. Chop the celery and onion with care. Mix the tuna salad slowly. Taste it and smile. Toast the bread twice. Butter it generously. Layer the cheese like you are building a masterpiece.
Cook it low and slow. Watch the edges turn golden. Flip it with confidence. Let it rest for one painful minute.
Then, cut it diagonally. Take a picture if you want. And take a bite.
That first bite? That is the moment you realize you did it. You made the best tuna melt sandwich you have ever had. Not because you followed a recipe perfectly, but because you cared. You paid attention. You showed up for yourself.