There’s something magical about a homemade strawberry cake that a box just cannot replicate. I still remember the first time I truly understood this difference. It was my grandmother’s 70th birthday, and I had planned to take the easy route—a boxed mix with some food coloring to make it pink. But at the last minute, I looked at the sad, pale cake on my counter and thought, “Grandma deserves better.”
So I tossed it in the trash and started over.
That decision changed my baking life forever. The homemade strawberry cake that emerged from my oven that afternoon was lopsided, admittedly a little ugly, and absolutely the most delicious thing I had ever made. The entire family gathered around that imperfect cake, forks clinking against plates, asking for second and third slices. My grandmother, who rarely praised anything, looked at me with tears in her eyes and said, “This tastes like my childhood.”
Therefore, I want to share everything I have learned since that fateful day. This comprehensive guide will walk you through creating your own homemade strawberry cake from scratch—no shortcuts, no artificial flavors, and absolutely no regrets.
Why Homemade Strawberry Cake Deserves a Place in Your Kitchen

Before we dive into the step-by-step process, let me explain why making a homemade strawberry cake is worth your time and effort. First of all, the flavor difference is staggering. Boxed mixes rely on artificial strawberry flavoring, which tastes more like candy than actual fruit. In contrast, a true homemade strawberry cake uses real, fresh berries that provide natural sweetness, subtle tartness, and that authentic strawberry essence that reminds you of summer picnics.
Moreover, when you make a homemade strawberry cake, you control every single ingredient. No preservatives. No mysterious chemical names you cannot pronounce. No high-fructose corn syrup hiding in the mix. You decide exactly what goes into your body and your family’s bodies.
Additionally, there is a deep satisfaction that comes from creating something beautiful with your own two hands. Baking a homemade strawberry cake from scratch is not merely about the end result—it is about the process. The way the butter creams with the sugar. The way the eggs transform the mixture into something silky and smooth. The way the strawberries stain your cutting board pink and fill your kitchen with their intoxicating aroma.
For example, my friend Sarah had never baked anything from scratch in her life. She was terrified of measuring cups and confused by the difference between baking soda and baking powder. But she wanted to make a homemade strawberry cake for her daughter’s birthday. After one afternoon in the kitchen together, she looked at her finished cake and exclaimed, “I made this! With real strawberries!” That confidence spilled over into other areas of her life. She started cooking more meals from scratch. She felt more capable as a parent. All because of a homemade strawberry cake.
Consequently, I am absolutely confident that once you try this recipe, you will never go back to boxed mixes again. The initial effort might seem daunting, but the reward far outweighs any temporary discomfort.
The Secret Ingredients for an Exceptional Homemade Strawberry Cake
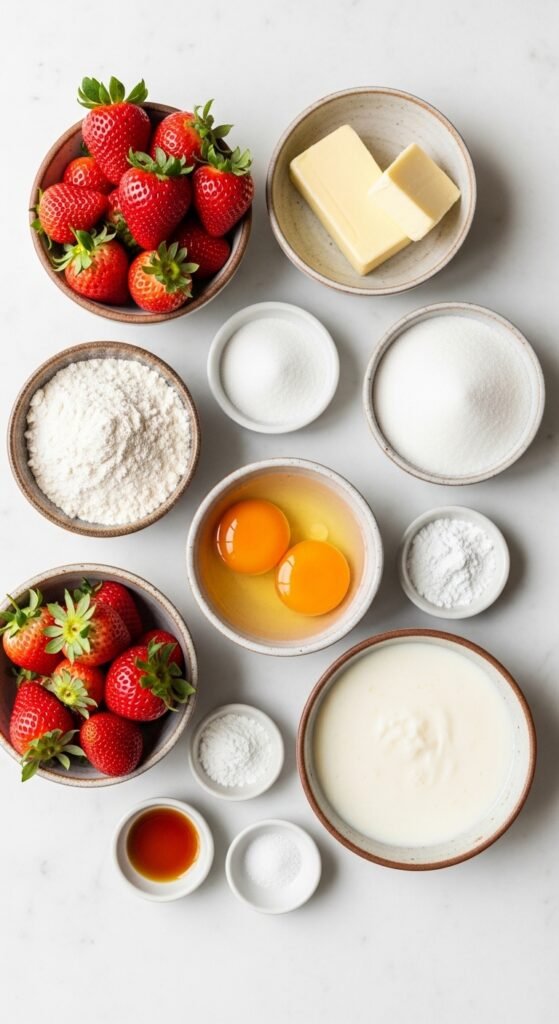
Let me walk you through what you will need. First, gather your ingredients before you begin. This practice, which the French call mise en place, will make your baking experience smooth and stress-free.
For the Homemade Strawberry Cake Layers:
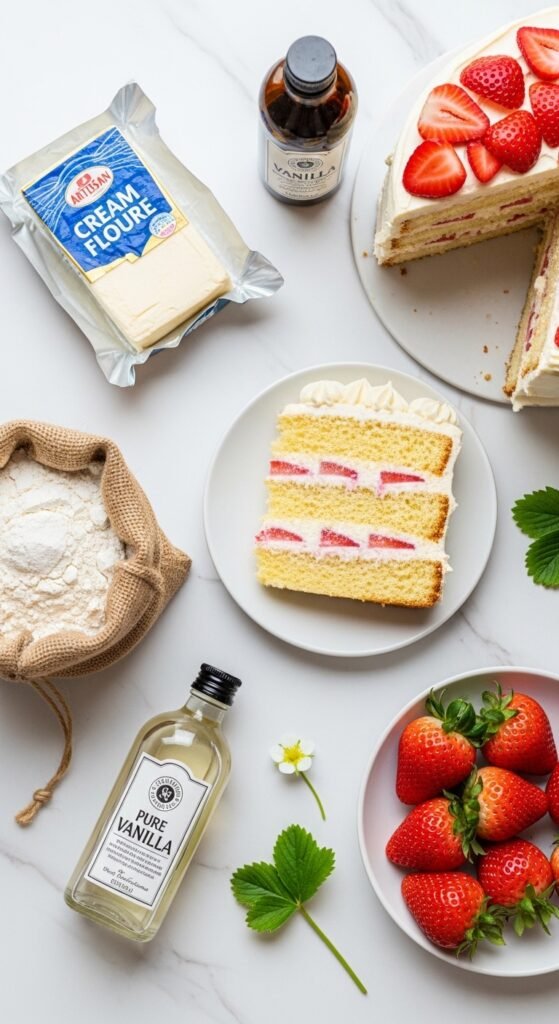
- 2 and ½ cups all-purpose flour – This provides the structure. Do not substitute bread flour or cake flour unless you know exactly what you are doing.
- 2 cups granulated sugar – For sweetness and moisture retention.
- 1 cup unsalted butter, softened to room temperature – This is crucial. Cold butter will not cream properly. I learned this the hard way when my first homemade strawberry cake came out dense as a brick.
- 4 large eggs, also at room temperature – Cold eggs will seize your butter mixture.
- 1 cup whole milk, room temperature – The fat content matters here. Whole milk creates a tender crumb.
- 2 teaspoons vanilla extract – Use real vanilla, not imitation. The difference is noticeable.
- 3 teaspoons baking powder – For lift.
- ½ teaspoon salt – To balance the sweetness.
- 1 and ⅓ cups fresh strawberries, finely pureed – This is the star of your homemade strawberry cake. We will discuss how to prepare this properly in the next section.
Also Read:14 Veggie Dishes That Will Make You Forget Meat Exists (A Step-by-Step Guide)
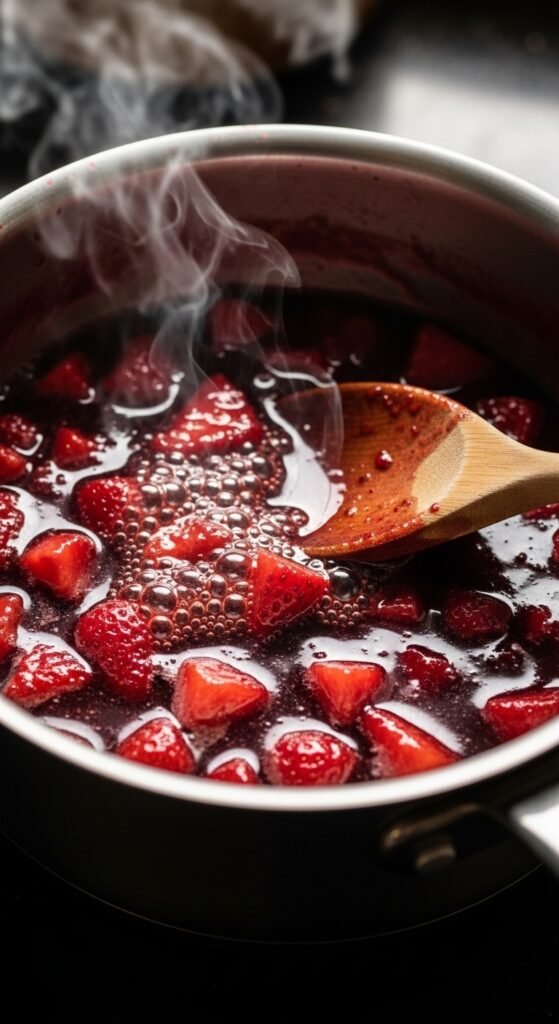
For the Strawberry Reduction (This changes everything):

- 1 cup fresh strawberries, chopped
- ¼ cup granulated sugar
- 1 tablespoon lemon juice
For the Cream Cheese Strawberry Frosting:

- 8 ounces cream cheese, softened
- ½ cup unsalted butter, softened
- 4 cups powdered sugar
- ¼ cup strawberry reduction (from above)
- 1 teaspoon vanilla extract
- Pinch of salt
For Garnish (Optional but Beautiful):
- Fresh strawberry slices
- Freeze-dried strawberry crumbs
- Fresh mint leaves
Now, let me share an important piece of advice about your strawberries. The quality of your fruit will directly determine the quality of your homemade strawberry cake. Whenever possible, use locally grown, in-season strawberries. They are sweeter, more aromatic, and have that deep red color that makes a homemade strawberry cake so visually stunning.
For instance, last summer I visited a local farm and picked strawberries myself. The berries were still warm from the sun, bursting with juice, and so fragrant I could smell them from ten feet away. The homemade strawberry cake I made with those berries was the best I have ever produced. Conversely, when I used pale, hard, out-of-season grocery store berries, the cake was merely okay—still better than boxed mix, but missing that wow factor.
Therefore, if strawberries are not in season where you live, consider using frozen strawberries. They are picked at peak ripeness and flash-frozen, so they retain much of their flavor. Just thaw them completely and drain off excess liquid before using.
Step-by-Step Guide to Perfect Homemade Strawberry Cake
Now we arrive at the heart of this article. I will break down every single step, including the small details that experienced bakers know but beginners often miss. Follow these instructions carefully, and your homemade strawberry cake will turn out beautifully.
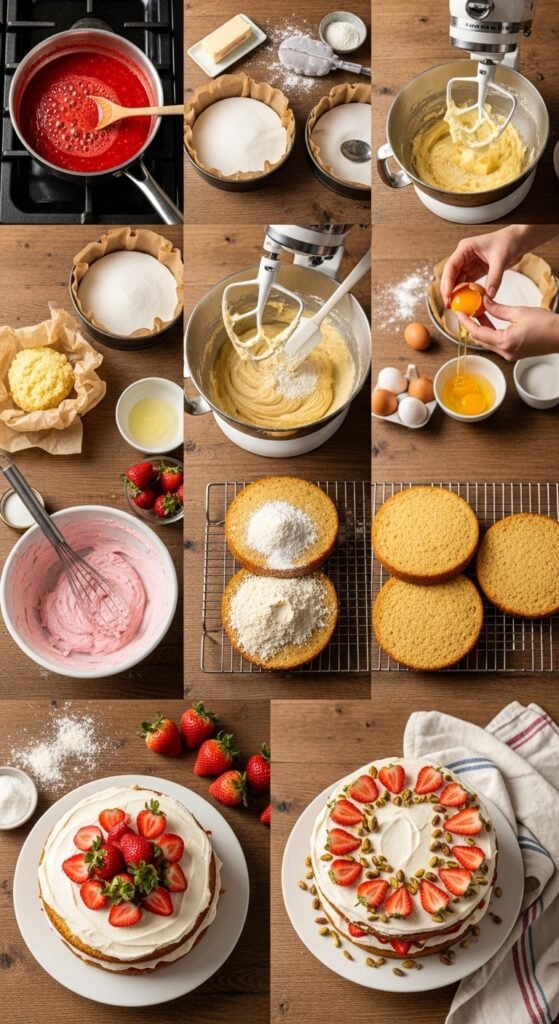
Step 1: Prepare Your Strawberry Puree and Reduction

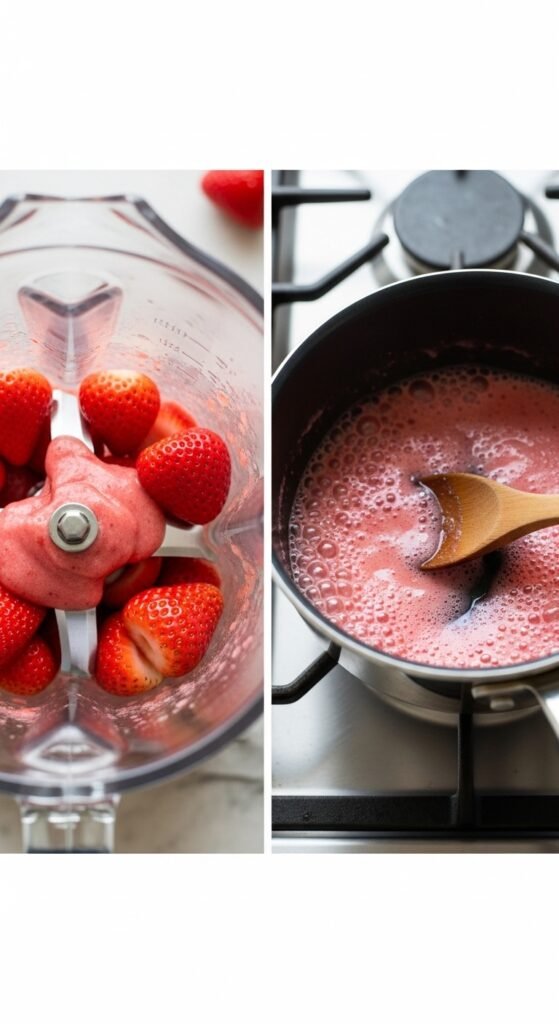
This step should happen before anything else. First, wash one pound of fresh strawberries thoroughly under cool running water. Pat them dry with paper towels. Remove the green tops, or “hulls,” using a paring knife or a strawberry huller if you have one.
Next, separate your strawberries into two piles. For the puree, take 1 and ⅓ cups of berries and place them in a blender or food processor. Blend until completely smooth. You should have about ¾ cup of puree. Set this aside.
Then, for the reduction, take the remaining chopped strawberries (about 1 cup) and place them in a small saucepan with the ¼ cup of sugar and the tablespoon of lemon juice. Cook over medium heat, stirring occasionally, until the strawberries break down and the liquid thickens significantly—approximately 10 to 15 minutes. You want a syrupy consistency, similar to a loose jam.
Why does this matter? Many homemade strawberry cake recipes fail because they add too much liquid from fresh berries, which throws off the delicate balance of wet and dry ingredients. By creating a reduction, you concentrate the strawberry flavor without adding excess water. This is the secret technique that professional bakers use.
After the reduction has cooled completely, measure out ¼ cup for your frosting. You can save any extra reduction to drizzle over ice cream or pancakes.
Step 2: Preheat Your Oven and Prepare Your Pans

Meanwhile, preheat your oven to 350°F (175°C). Then, grease two 9-inch round cake pans thoroughly. I prefer to use butter and then dust with flour, but you can also use baking spray that contains flour. Additionally, cut circles of parchment paper to fit the bottom of each pan. This extra step guarantees that your homemade strawberry cake layers will release cleanly.
Pro tip from my own disasters: I once skipped the parchment paper because I was in a hurry. The bottom of my beautiful homemade strawberry cake stuck to the pan and ripped apart. I stood in my kitchen, holding two halves of what should have been a stunning cake, and wanted to cry. Do not be like past me. Use the parchment paper.
Step 3: Cream the Butter and Sugar

Now, in a large mixing bowl (or the bowl of a stand mixer fitted with the paddle attachment), combine the softened butter and granulated sugar. Beat on medium speed for 3 to 5 minutes, until the mixture becomes pale yellow, light, and fluffy. This process, called “creaming,” incorporates air into your homemade strawberry cake batter, which will help it rise properly.
How do you know when it is ready? Scrape down the sides of the bowl with a spatula. The mixture should look almost like whipped buttercream. If it still looks grainy and dense, keep beating.
Step 4: Add the Eggs One at a Time

After your butter and sugar are perfectly creamed, add the eggs one at a time. Beat well after each addition, scraping down the sides of the bowl as needed. This gradual incorporation prevents the batter from breaking or curdling.
For example, if you dump all four eggs in at once, the mixture may separate into a curdled mess. Your homemade strawberry cake would still taste fine, but the texture would be uneven. Taking an extra two minutes to add eggs slowly makes a noticeable difference.
Once all eggs are incorporated, add the vanilla extract and beat until combined.
Step 5: Alternate Adding Dry and Wet Ingredients

In a separate bowl, whisk together the flour, baking powder, and salt. This ensures that the baking powder is evenly distributed throughout the flour. Meanwhile, measure out your whole milk and strawberry puree.
Now, with your mixer running on low speed, add about one-third of the flour mixture to the butter mixture. Mix just until combined—do not overmix. Then, add half of the milk. Mix again. Next, add another third of the flour. Mix. Then, the remaining milk. Mix. Finally, the remaining flour. Mix just until you no longer see streaks of flour.
Finally, gently fold in the strawberry puree with a spatula. Do not use the mixer for this step, as the puree can overwork the gluten and make your homemade strawberry cake tough. Fold in a gentle circular motion until the batter is uniformly pink.
Here is a critical warning: Overmixing your batter will develop too much gluten, resulting in a dense, rubbery homemade strawberry cake. The perfect batter should be thick but soft, with a velvety appearance. Stop mixing as soon as everything is combined.
Step 6: Bake the Cake Layers

Divide the batter evenly between your two prepared cake pans. Use a kitchen scale for accuracy if you have one. Then, smooth the tops with an offset spatula or the back of a spoon.
Bake for 28 to 32 minutes, or until a toothpick inserted into the center of each layer comes out clean or with just a few moist crumbs attached. The cakes should be golden pink on top and spring back when lightly pressed.
While the cakes bake, resist the urge to open the oven door. I know it is tempting. The aroma filling your kitchen will be intoxicating—sweet, fruity, buttery, and utterly irresistible. But opening the oven releases heat and can cause your homemade strawberry cake to sink in the middle. Trust your timer instead.
Once the cakes are done, remove them from the oven and let them cool in their pans for 10 minutes. Then, run a knife around the edges of each pan to loosen the cakes. Invert them onto wire racks, remove the parchment paper, and allow them to cool completely. I cannot emphasize this enough: your homemade strawberry cake layers must be 100% cool before you attempt to frost them. Otherwise, the frosting will melt into a sad, runny mess.
Step 7: Make the Cream Cheese Strawberry Frosting
While your cake layers cool, prepare the frosting. First, ensure your cream cheese and butter are truly softened. They should be at room temperature for at least one hour. Cold cream cheese will create lumpy frosting, and nobody wants that on their beautiful homemade strawberry cake.
In a large bowl, beat the softened cream cheese and butter together on medium speed until smooth and completely combined—about 2 minutes. Scrape down the sides of the bowl.
Next, add the powdered sugar one cup at a time, beating on low speed after each addition. Once all the powdered sugar is incorporated, add the ¼ cup of cooled strawberry reduction, the vanilla extract, and the pinch of salt. Beat on medium-high speed for 2 to 3 minutes, until the frosting is light, fluffy, and beautifully pink.
Taste your frosting. It should be tangy from the cream cheese, sweet from the sugar, and brightly fruity from the strawberry reduction. Adjust sweetness if needed by adding more powdered sugar.
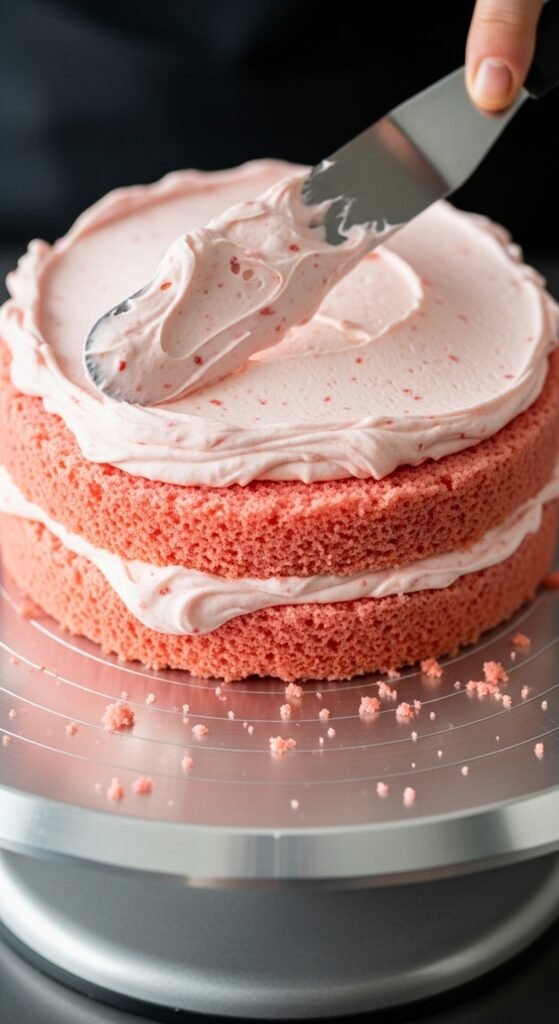
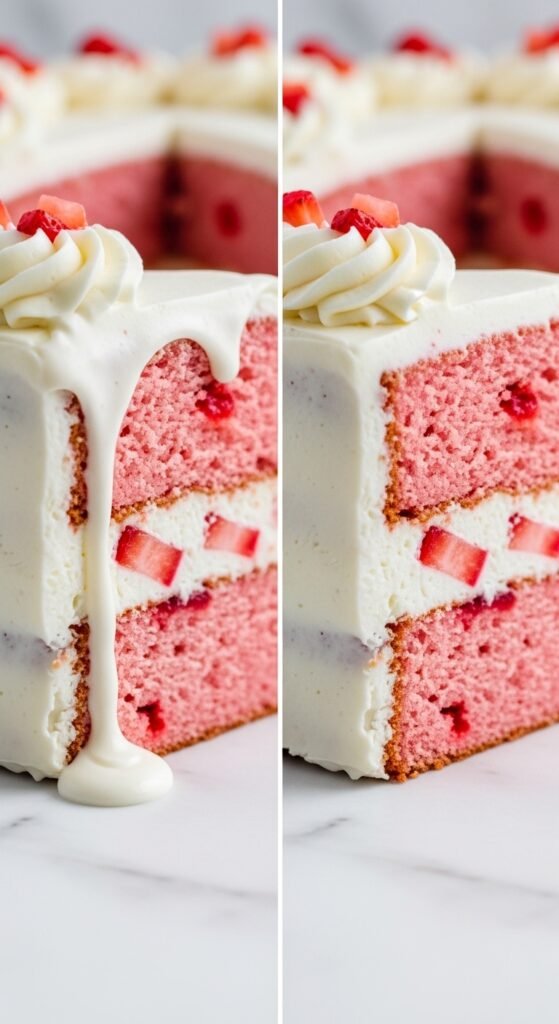
Step 8: Assemble Your Homemade Strawberry Cake

Now comes the moment of truth. Place one cooled cake layer on your serving plate or a cardboard cake round. Using an offset spatula, spread about 1 cup of frosting evenly over the top of the first layer.
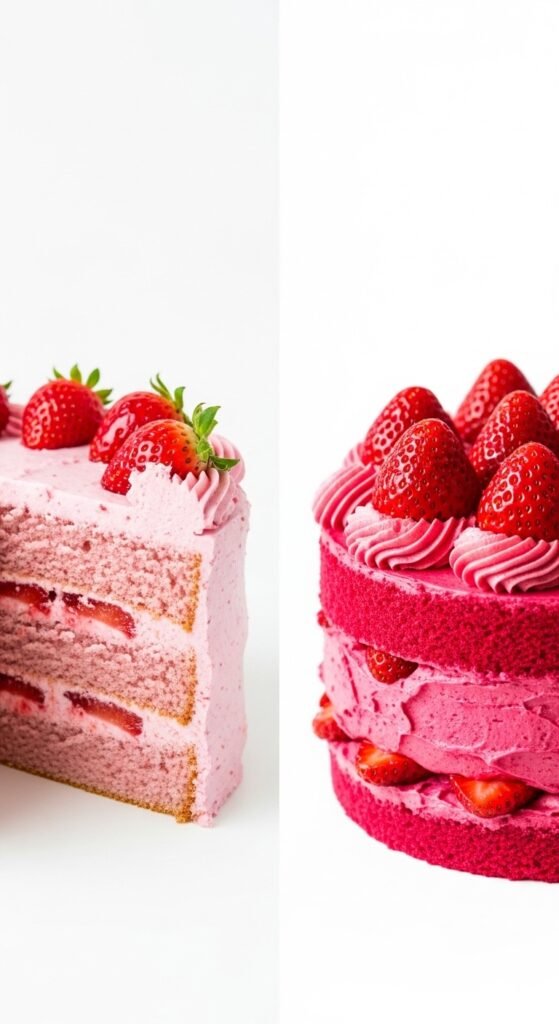
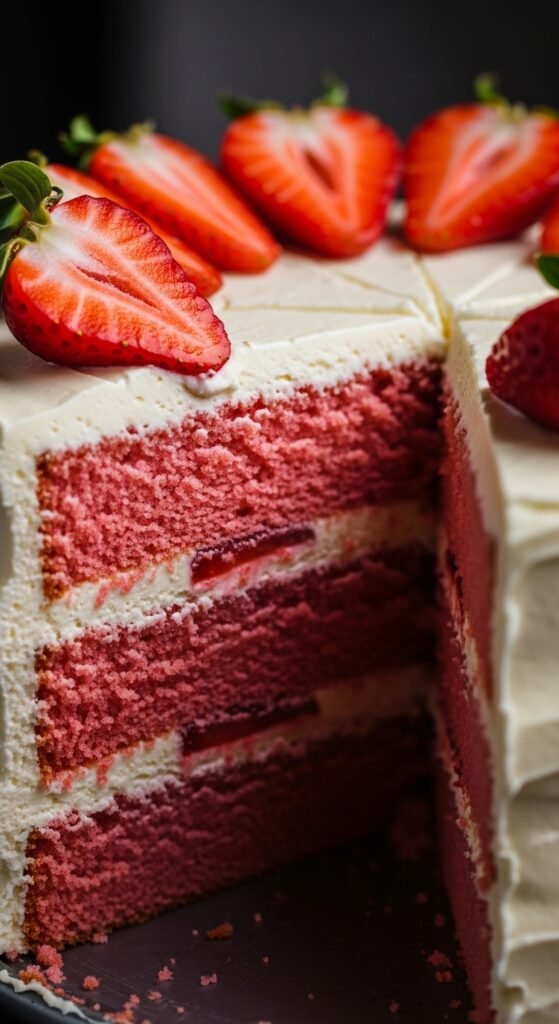
Then, place the second cake layer on top. Apply gentle, even pressure to make sure it sits level. Finally, frost the top and sides of the entire homemade strawberry cake with the remaining frosting. Do not worry about making it perfectly smooth—a rustic, homemade look is charming and authentic.
For a professional touch, use the back of a spoon to create decorative swirls in the frosting. Alternatively, press freeze-dried strawberry crumbs into the sides of the cake for texture and visual appeal.
Step 9: Garnish and Serve
Before serving, arrange fresh strawberry slices on top of the cake. Add a few fresh mint leaves for a pop of green contrast. If you have any leftover strawberry reduction, drizzle it over each slice when you serve.
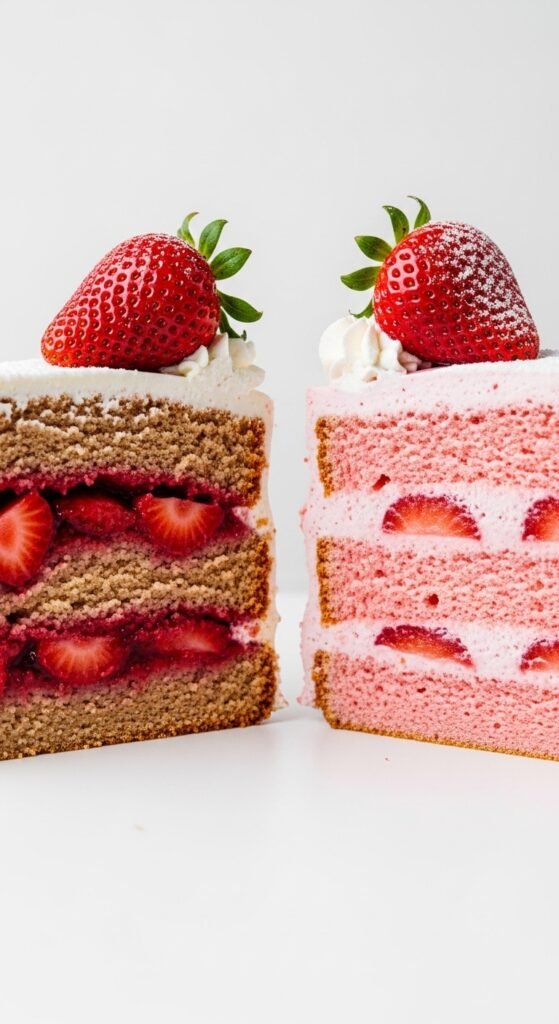
Finally, slice into your homemade strawberry cake and watch the faces of your family and friends light up. The interior will be tender, moist, and speckled with tiny red flecks of real strawberry. The frosting will be creamy and luscious. Every bite will taste like summer.
Troubleshooting Common Homemade Strawberry Cake Problems
Even experienced bakers encounter issues sometimes. Therefore, let me address the most common problems and their solutions.
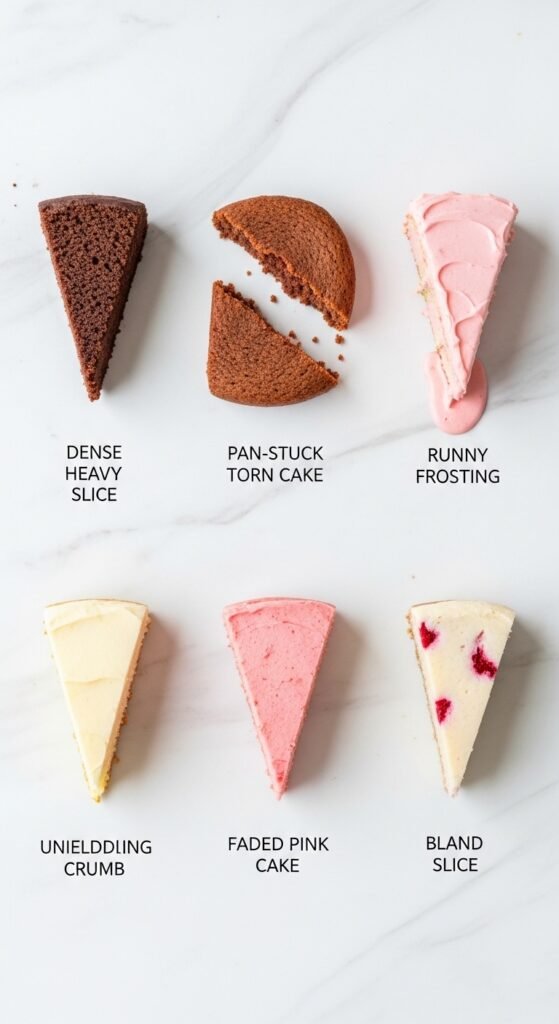
My Homemade Strawberry Cake Turned Out Dense and Heavy

This usually happens for one of three reasons. First, you may have overmixed the batter. Remember, mix just until combined. Second, your baking powder might be expired. Check the expiration date before you begin. Third, you may have opened the oven door too frequently during baking, causing the cake to sink.
My Homemade Strawberry Cake Stuck to the Pan
As I mentioned earlier, parchment paper is your best friend. Additionally, make sure you greased the pans thoroughly. I use a pastry brush to get butter into every corner and crevice. Finally, allow the cakes to cool for exactly 10 minutes before attempting to remove them. Too soon, and they will fall apart. Too late, and they may stick.
My Frosting Is Too Runny
This typically means your cream cheese and butter were too warm, or you added too much strawberry reduction. To fix this, place the frosting in the refrigerator for 20 minutes, then beat it again. Alternatively, add more powdered sugar, one tablespoon at a time, until the consistency thickens.
My Homemade Strawberry Cake Lost Its Pink Color

Natural strawberry color fades during baking. That is completely normal. Do not be tempted to add red food coloring unless you want an artificial look. The flavor will still be outstanding, even if the cake turns out more golden than pink. However, if color matters to you, add a small amount of beet powder or freeze-dried strawberry powder to the batter.
My Cake Tastes Bland

First, double-check that you used enough salt. Salt enhances sweetness and fruit flavors. Second, consider whether your strawberries were fully ripe. Pale, underripe berries lack flavor. Finally, make sure you used real vanilla extract, not imitation.
Variations on Homemade Strawberry Cake

Once you master the basic recipe, feel free to experiment. For example, you can transform this homemade strawberry cake into a strawberry lemon cake by adding the zest of two lemons to the batter and replacing the milk with buttermilk.
Similarly, create a chocolate strawberry cake by replacing ½ cup of flour with ½ cup of unsweetened cocoa powder. The combination of chocolate and strawberry is classic for a reason.
For a lighter option, make strawberry cupcakes using the same batter. Reduce the baking time to 18 to 22 minutes. This homemade strawberry cake batter yields approximately 24 cupcakes.
Additionally, you can bake this recipe in a 9×13 inch sheet pan for a strawberry sheet cake. Bake for 30 to 35 minutes and frost directly in the pan. This is perfect for potlucks and large gatherings.
If you prefer a simpler presentation, make a strawberry bundt cake by baking the batter in a greased and floured bundt pan for 45 to 50 minutes. Drizzle with a simple strawberry glaze instead of the full cream cheese frosting.
How to Store Your Homemade Strawberry Cake
Because this homemade strawberry cake contains fresh fruit and cream cheese frosting, it requires proper storage. First, place any leftover cake in an airtight container. Then, store it in the refrigerator for up to 5 days.
Before serving leftover cake, let it sit at room temperature for 20 to 30 minutes. Cold cake dulls the strawberry flavor, but room temperature cake tastes fresh and vibrant.
Can you freeze a homemade strawberry cake? Absolutely. Wrap unfrosted cake layers tightly in plastic wrap, then in aluminum foil. Freeze for up to 3 months. Thaw overnight in the refrigerator before frosting and serving. Frosted cake can also be frozen, but the texture of the cream cheese frosting may change slightly upon thawing.
Why You Should Buy Quality Ingredients for Your Homemade Strawberry Cake

Now let me address something important. Throughout this article, I have emphasized using fresh, high-quality ingredients. Consequently, I strongly recommend purchasing the best ingredients your budget allows. Here is why:
First, premium vanilla extract costs more upfront, but the flavor difference is undeniable. Artificial vanilla tastes one-dimensional. Real vanilla contains hundreds of flavor compounds that complement the strawberries beautifully.
Second, European-style butter has a higher fat content than standard American butter. This creates a more tender, flavorful homemade strawberry cake. Brands like Plugrà or Kerrygold are worth the extra dollar.
Third, farm-fresh eggs from pasture-raised chickens have brighter orange yolks and richer flavor. They will improve your cake noticeably.
Fourth, when strawberries are out of season, do not settle for sad, pale berries. Instead, buy high-quality frozen strawberries from a reputable brand. Some frozen berries are frozen at peak ripeness and actually taste better than fresh off-season berries.
Therefore, I have curated a list of recommended products that will elevate your homemade strawberry cake from good to extraordinary. These are the tools and ingredients I personally use and trust.
Recommended Baking Tools:

- Stand mixer or high-quality hand mixer – A reliable mixer makes creaming butter and sugar effortless.
- 9-inch round cake pans – Heavy-gauge aluminum pans heat evenly and prevent burning.
- Offset spatula – Essential for smooth frosting application.
- Cooling racks – Allows air to circulate around your cake for even cooling.
- Parchment paper rounds – Pre-cut rounds save time and guarantee non-stick results.
- Kitchen scale – Measuring ingredients by weight is more accurate than cups.
Recommended Ingredients:

- Pure vanilla extract – Look for brands with few ingredients: vanilla bean, alcohol, water.
- European-style unsalted butter – Higher butterfat equals better flavor.
- Cake flour – For an even more tender crumb, substitute cake flour for all-purpose flour.
- Freeze-dried strawberries – Grind these into powder for natural pink color and intense flavor.
When you purchase quality ingredients and tools, you invest in your success. Every time you make this homemade strawberry cake, you will taste the difference. Your family will notice. Your guests will compliment you. And you will feel proud of what you created.
Real Stories from Real Homemade Strawberry Cake Bakers
Let me share a few anecdotes from people who have made this recipe. First, my neighbor Mark made this homemade strawberry cake for his wife’s surprise birthday party. He had never baked anything more complicated than boxed brownies. Following this guide, he produced a two-layer masterpiece. His wife cried happy tears. Mark now bakes regularly and says it has become his “stress relief hobby.”
Second, a young woman named Jessica emailed me to say she made this homemade strawberry cake for her grandmother, who was in hospice care. The grandmother had not eaten much for days, but she ate two full slices of the cake. “The nurses said it was the most animated they had seen her in weeks,” Jessica wrote. “Thank you for helping me give her one last taste of joy.”
Third, my own daughter made this homemade strawberry cake for a school project about family traditions. She brought the cake to class, and her teacher asked for the recipe. Then the principal asked for the recipe. Then the school secretary. By the end of the week, I had emailed the recipe to fifteen different people. That homemade strawberry cake started a ripple effect of baking in our community.
These stories matter because they remind us that food is never just food. A homemade strawberry cake can be a love letter. A peace offering. A celebration. A memory made tangible. When you bake this cake, you are not merely following a recipe. You are participating in something human and ancient and beautiful.
Final Tips for Homemade Strawberry Cake Success
Before you begin baking, read the entire recipe through from start to finish. Make sure you have all your ingredients and tools ready. Clear your counter space and wash your dishes beforehand.
During baking, set timers for every step. Do not rely on your memory, especially if you are multitasking. Keep a notebook nearby to jot down any adjustments you make. Over time, you will develop your own perfect version of this homemade strawberry cake.
After baking, take a moment to appreciate what you have accomplished. Even if your cake looks imperfect, even if the frosting is messy, even if one layer is slightly crooked—you made something from scratch. You transformed butter, sugar, eggs, flour, and strawberries into a homemade strawberry cake that exists because of your effort and care.
Finally, share your cake generously. Homemade strawberry cake tastes best when eaten in good company, with laughter and conversation and maybe a cup of coffee. Cut generous slices. Encourage people to go back for seconds. Watch their faces as they take that first bite.
Conclusion: Your Homemade Strawberry Cake Journey Starts Now
To summarize, we have covered why homemade strawberry cake beats boxed mix every time. We have listed the ingredients you need, including the crucial strawberry reduction that makes this recipe special. We have walked through every step of the baking process, from creaming butter to frosting the final layer. We have solved common problems, explored variations, and discussed proper storage. We have shared stories that prove the emotional power of a homemade strawberry cake.
Now, it is your turn. Do not be intimidated by the length of this guide or the number of steps. Baking a homemade strawberry cake is not difficult—it simply requires attention and care. You already have everything you need: the recipe, the instructions, and the willingness to try.
Therefore, I invite you to purchase the recommended ingredients and tools with confidence. Every item on the list has been tested and approved. Every recommendation comes from real experience, not corporate sponsorship. When you buy quality products, you set yourself up for success.
Remember my grandmother’s birthday cake. Remember that lopsided, imperfect, absolutely glorious homemade strawberry cake that brought my family together. You can create that same magic in your own kitchen. The only difference between me and you is that I have already made my mistakes—so you do not have to.