Have you ever tasted a dessert that instantly transports you to a sunny meadow, with a gentle breeze carrying the scent of fresh citrus blossoms? That’s exactly what happened the first time I baked my own lemon cheesecake recipe from scratch. I was a nervous college student, living in a tiny apartment with a borrowed hand mixer and a dream of impressing my friends. The cheesecake cracked. The crust burned. And yet, somehow, the tangy, creamy filling still made everyone close their eyes in pure bliss. That imperfect cake taught me a valuable lesson: lemon cheesecake doesn’t need to be flawless to be wonderful. But with the right guidance, you can make one that tastes as spectacular as it looks.
In this comprehensive guide, I’ll walk you through every single step of creating a lemon cheesecake recipe that will become your go‑to for birthdays, holidays, or just because it’s Tuesday and you deserve a treat. We’ll talk about ingredients, tools, techniques, and even the little secrets that professional bakers use to achieve that silky‑smooth texture and bright, zesty flavor. By the end, you’ll feel confident enough to bake this dessert for any occasion. Moreover, I’ll convince you why investing in a few key baking essentials is absolutely worth it – because quality ingredients and the right equipment make all the difference.
So, grab a cup of coffee, sit back, and let’s dive into the wonderful world of lemon cheesecake.
Why Lemon Cheesecake Deserves a Spot in Your Recipe Collection
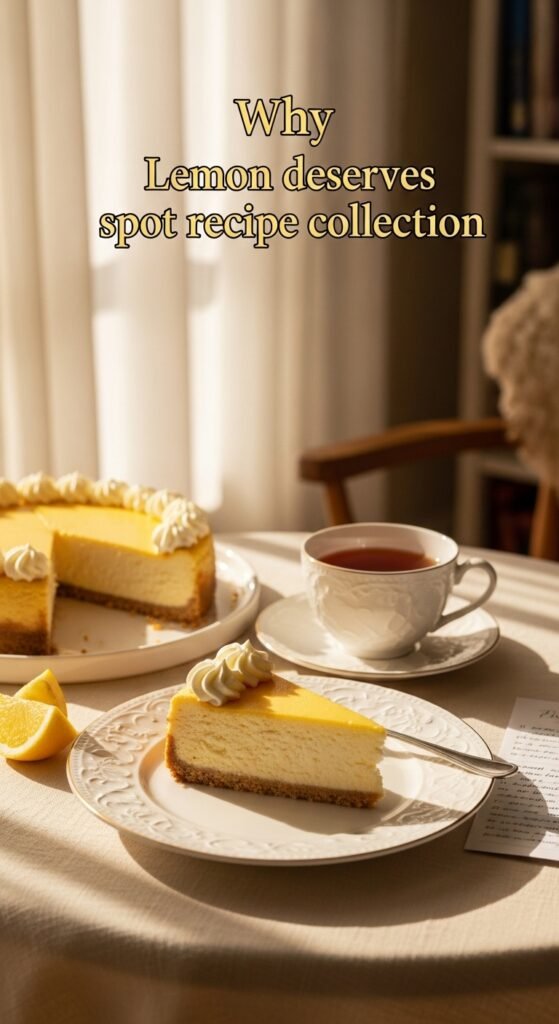
First of all, let’s talk about why this particular dessert stands out among the countless cheesecake variations. Traditional New York cheesecake is rich, dense, and wonderfully comforting. However, it can sometimes feel a bit heavy. On the other hand, a lemon cheesecake recipe introduces a bright, citrusy note that cuts through the richness like a ray of sunshine. The result is a dessert that feels indulgent yet refreshing – perfect after a hearty meal or as an afternoon pick‑me‑up.
Lemon itself is a powerhouse of flavor. It adds complexity, balances sweetness, and even enhances the creamy texture of the cream cheese. When you use fresh lemon juice and lemon zest, you get layers of aroma that bottled juice simply cannot replicate. Consequently, your cheesecake will taste vibrant and natural, not artificial or overly sour.
Another reason to love this recipe is its versatility. You can serve it plain, topped with lemon curd, whipped cream, fresh berries, or even a drizzle of honey. It works beautifully as a spring or summer dessert, but honestly, I’ve made it on chilly winter evenings just to remind myself that warmer days are ahead. Anecdotally, I once brought a lemon cheesecake to a potluck in January, and it disappeared within fifteen minutes. People crave that bright, sunny flavor no matter the season.
Gathering Your Ingredients – And Why Quality Matters
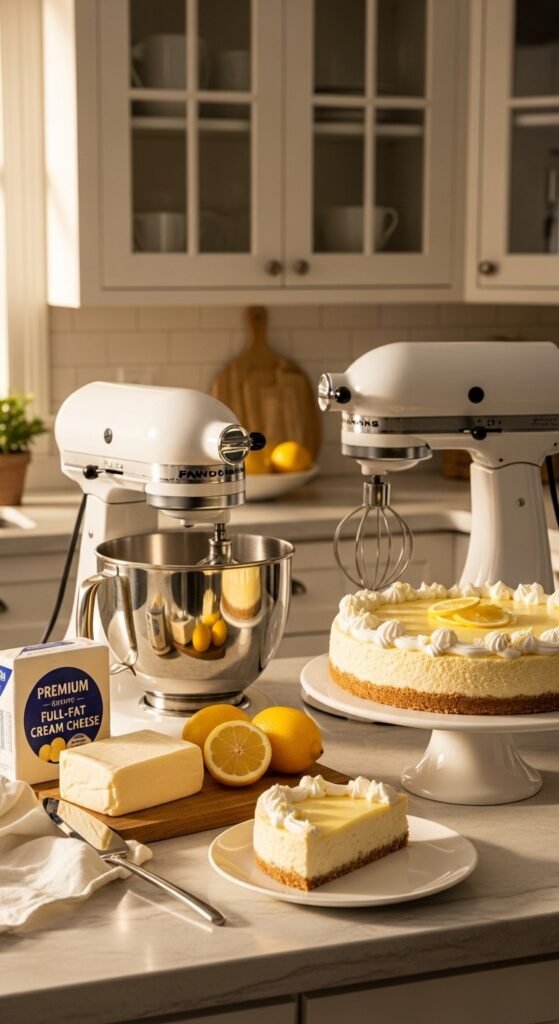
Before we start mixing, let’s go over everything you’ll need. I’ve organized this list into two parts: the crust and the filling. Additionally, I’ll mention a few optional toppings. For each ingredient, I’ll explain why the right choice matters – because this is where I convince you to buy with confidence.
For the Graham Cracker Crust:
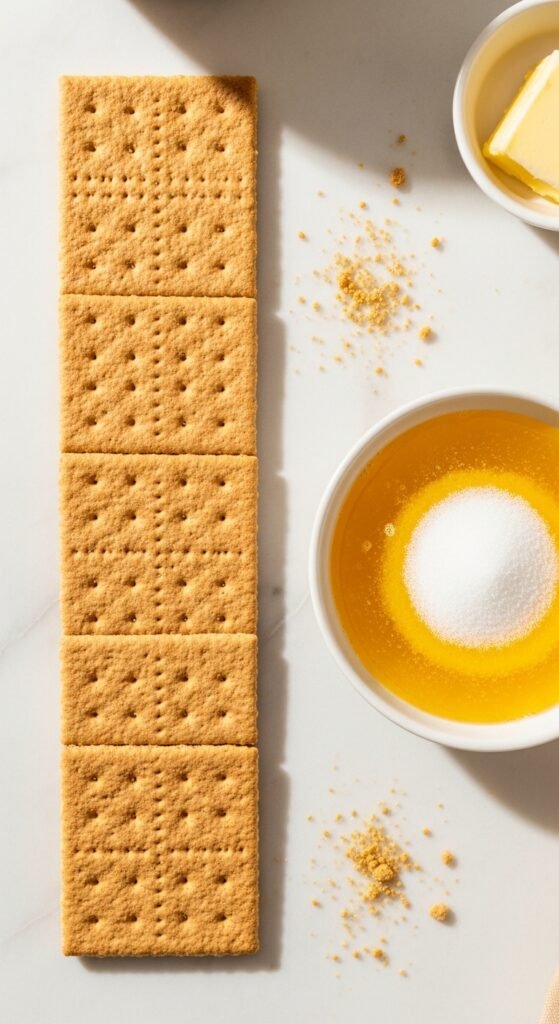
- 1 ½ cups graham cracker crumbs (about 12 full sheets)
You can buy pre‑made crumbs, but I strongly suggest buying whole graham crackers and crushing them yourself. The texture is more consistent, and you avoid any stale aftertaste. Look for a brand with simple ingredients – honey or cinnamon varieties work wonderfully. - ¼ cup granulated sugar – adds a touch of sweetness to balance the buttery crust.
- 6 tablespoons unsalted butter, melted
Unsalted butter gives you control over the salt level. Use a good quality European‑style butter if possible; it has a higher fat content, which makes the crust richer and more flavorful. Trust me, the difference is noticeable. - Pinch of salt – just a tiny pinch enhances all the other flavors.
For the Creamy Lemon Filling:
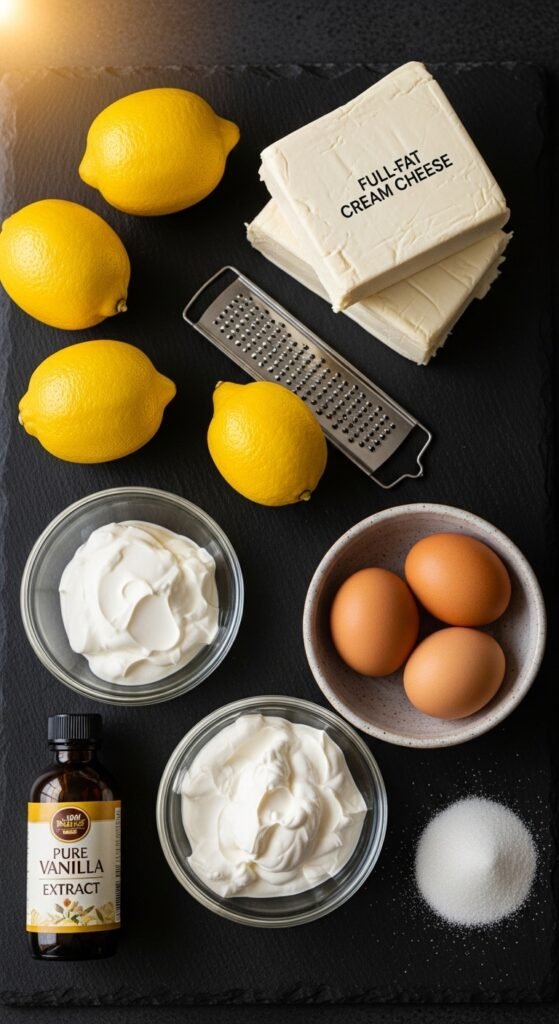
- 32 oz (four 8‑oz blocks) full‑fat cream cheese, softened
This is the heart of your cheesecake. Full‑fat cream cheese is non‑negotiable – low‑fat or whipped varieties contain added air and stabilizers that can ruin the texture. I always buy Philadelphia or another reputable brand. Leave the cream cheese on the counter for at least an hour before you start; cold cream cheese leads to lumpy batter. - 1 ¼ cups granulated sugar – fine‑grained sugar dissolves more easily.
- 4 large eggs, at room temperature – room‑temperature eggs incorporate more smoothly. If you forget to take them out early, place them in a bowl of warm water for 10 minutes.
- ⅓ cup sour cream (full‑fat) – sour cream adds tanginess and extra creaminess. Greek yogurt can work in a pinch, but sour cream gives a more traditional cheesecake texture.
- ⅓ cup fresh lemon juice (from about 2–3 large lemons)
Please, please use fresh lemon juice. Bottled lemon juice often contains preservatives and a bitter, flat flavor. The difference is night and day. Roll your lemons on the counter before juicing to get more juice out of them. - 2 tablespoons lemon zest (from about 3–4 lemons)
Zest holds the essential oils that provide that incredible lemon aroma. Use a fine microplane or zester, and be careful to avoid the white pith – it’s bitter. - 1 teaspoon vanilla extract – pure vanilla extract, not imitation. It rounds out the lemon flavor beautifully.
- 2 tablespoons all‑purpose flour (optional, for a slightly sturdier texture) – helps prevent cracks without making the cheesecake cake‑y.
Also Read: The Ultimate Guide to a Crowd-Pleasing Broccoli Cauliflower Salad Recipe
For the Topping (Optional but Highly Recommended):
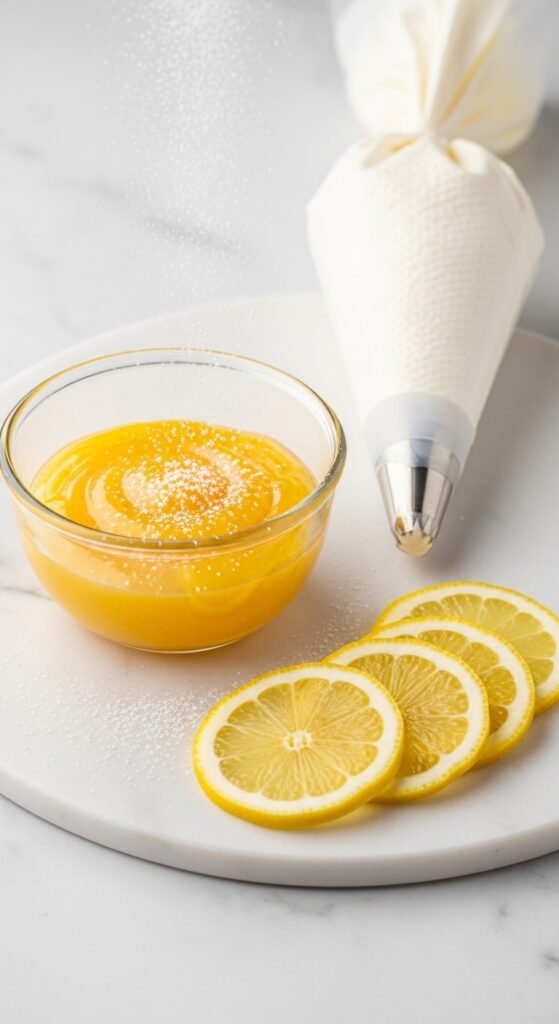
- Lemon curd (homemade or store‑bought)
- Whipped cream (1 cup heavy cream + 2 tablespoons powdered sugar)
- Fresh berries (raspberries, blueberries, or sliced strawberries)
Essential Tools – Invest Once, Bake for Years
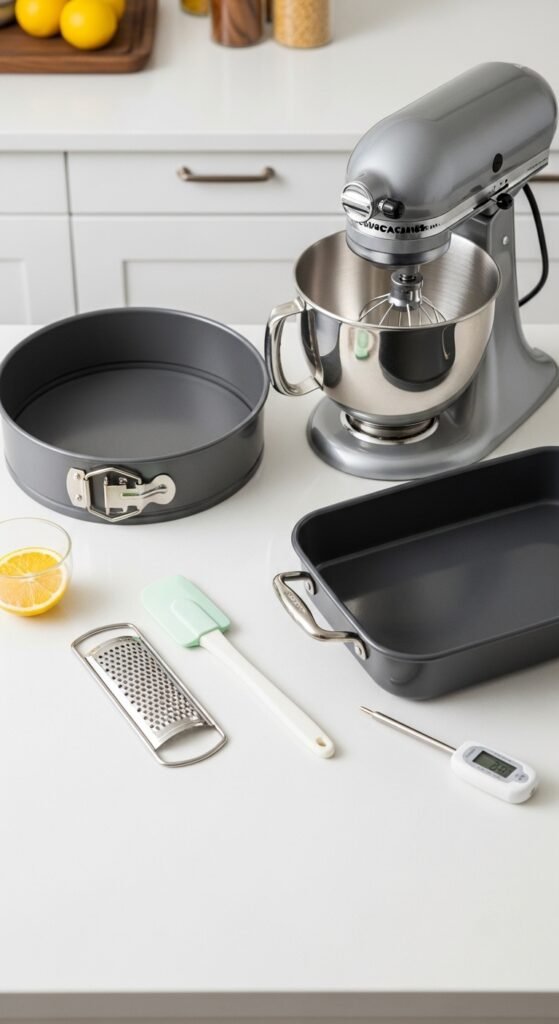
Now, let’s talk equipment. You don’t need a professional kitchen, but a few key tools will make your lemon cheesecake recipe much easier and more successful. I highly recommend buying these items – they are worth every penny.
- 9‑inch springform pan: A springform pan has removable sides, which is essential for getting the cheesecake out intact. Look for a heavy‑duty, leak‑proof one. Brands like Nordic Ware or KitchenAid are excellent choices.
- Electric mixer (hand mixer or stand mixer): A hand mixer is affordable and gets the job done. A stand mixer with a paddle attachment is even better.
- Microplane zester: For getting fine, fluffy lemon zest without bitter pith.
- Citrus juicer: A simple handheld juicer saves time and catches seeds.
- Large roasting pan or deep baking dish: For the water bath (bain‑marie). It must be large enough to hold your springform pan.
- Heavy‑duty aluminum foil: To wrap the outside of the springform pan so water doesn’t seep in.
- Instant‑read thermometer (optional but helpful): Cheesecake is done when the internal temperature reaches 150°F (65°C) in the center.
- Offset spatula: For smoothing the top and releasing the cake from the pan sides.
- Cooling rack: To let the cheesecake cool gradually.
Why buy these with confidence? Because each tool serves you for years. A good springform pan will outlast dozens of cheesecakes. A microplane is also fantastic for grating garlic, nutmeg, or Parmesan. These aren’t single‑use gadgets – they’re kitchen workhorses.
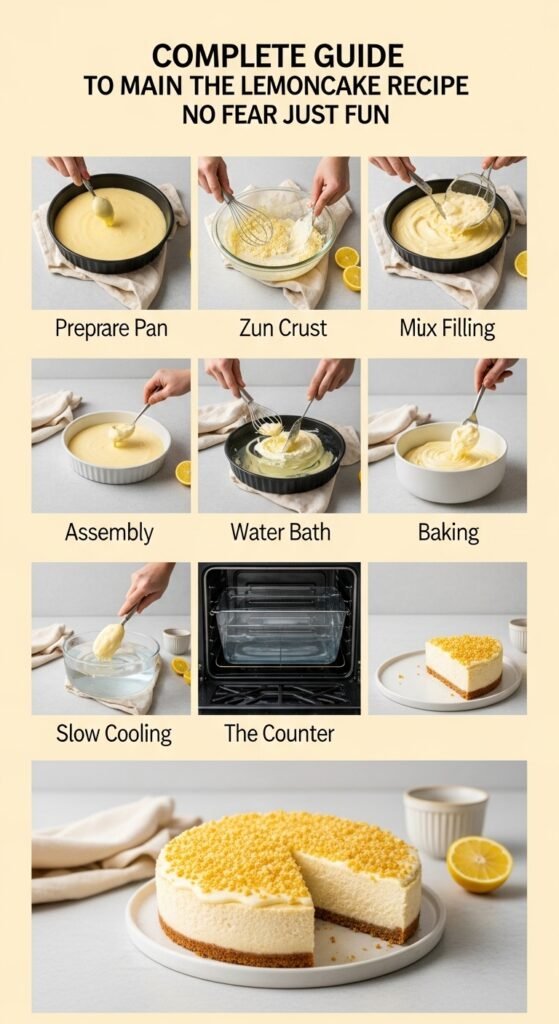
Step‑by‑Step Lemon Cheesecake Recipe – No Fear, Just Fun
Now for the main event. I’ve broken this down into manageable stages. Follow along, and don’t skip the tips – they come from my own mistakes (like the time my water bath leaked and I ended up with a soggy crust). Let’s begin.
Step 1: Prepare Your Pan and Preheat the Oven
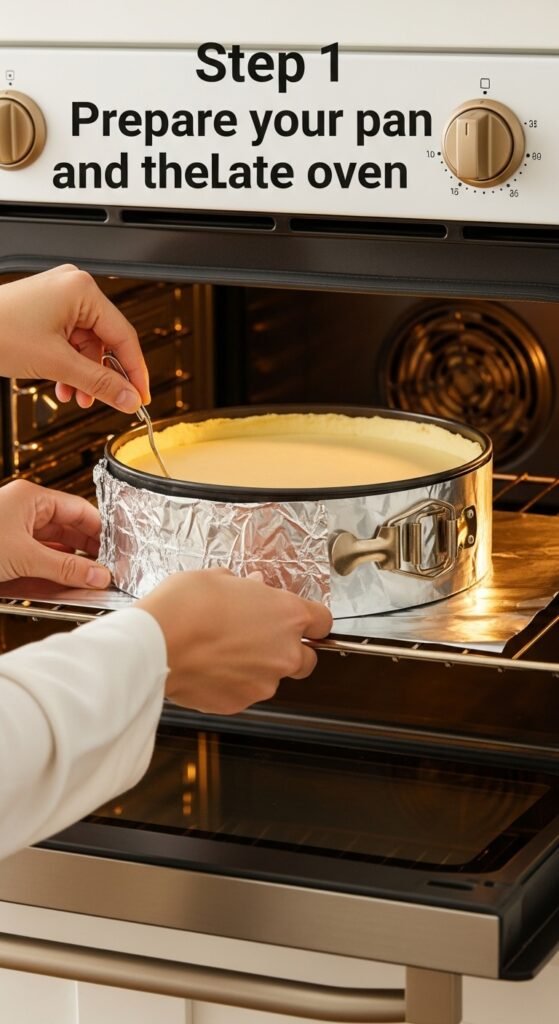
First, preheat your oven to 350°F (175°C). Then, take your springform pan and lightly grease the bottom and sides with butter or non‑stick spray. Some bakers also line the bottom with a round of parchment paper – I recommend this for extra insurance.
Next, wrap the outside of the pan with two layers of heavy‑duty aluminum foil. The foil should come up at least halfway to the top. This prevents water from the water bath from seeping into the pan and turning your crust into mush. Crimp the foil tightly around the base.
Anecdote: My first attempt at a water bath, I used regular thin foil and only one layer. Halfway through baking, I heard a hissing sound. Water had leaked in, and the crust was a sad, soggy mess. Now I always use heavy‑duty foil and double‑wrap. Learn from my tears.
Step 2: Make the Graham Cracker Crust
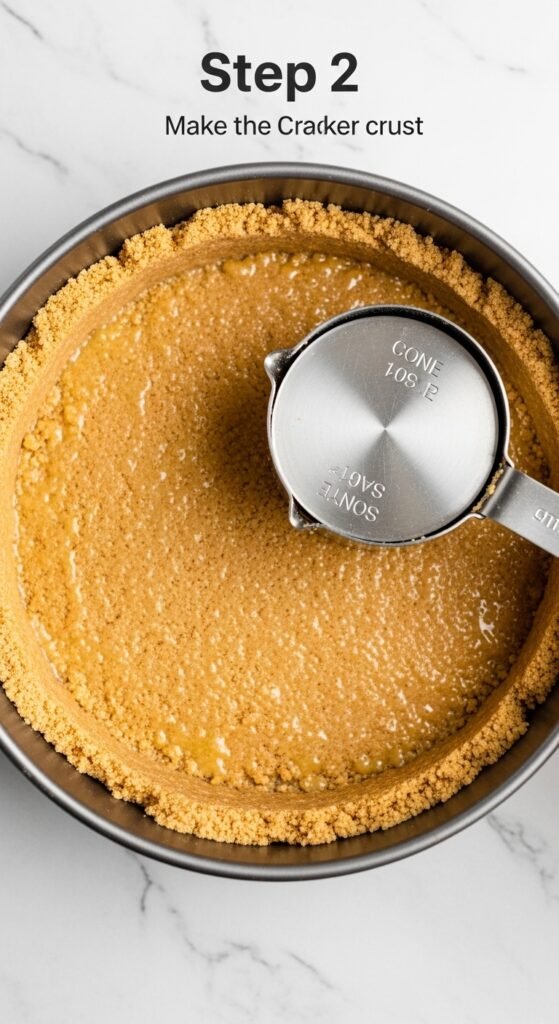
In a medium bowl, combine the graham cracker crumbs, sugar, and a pinch of salt. Pour in the melted butter and stir with a fork until the mixture resembles wet sand. It should hold together when you squeeze a handful.
Transfer the crumb mixture to your prepared springform pan. Using the bottom of a measuring cup or a flat‑bottomed glass, press the crumbs firmly and evenly into the bottom of the pan. Don’t forget to go a little bit up the sides – about ½ inch is perfect.
Bake the crust for 10 minutes at 350°F (175°C). Remove from the oven and let it cool on a wire rack while you make the filling. Leave the oven on – you’ll reduce the temperature shortly.
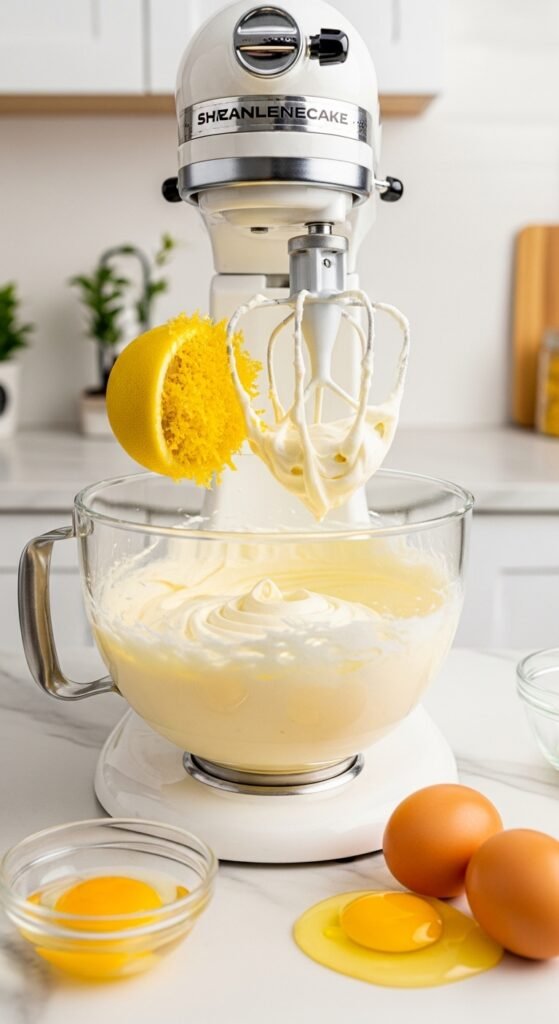
Step 3: Make the Lemon Cheesecake Filling
This is where patience pays off. Room temperature ingredients are critical. If your cream cheese is cold, you’ll get lumps. If your eggs are cold, the batter can curdle.
In a large mixing bowl (or the bowl of your stand mixer), beat the softened cream cheese on medium speed until it’s completely smooth and fluffy. This takes about 2–3 minutes. Scrape down the sides of the bowl with a rubber spatula at least once.
Add the sugar and beat again until well combined. Then add the sour cream, lemon zest, vanilla extract, and flour (if using). Mix on low speed just until incorporated – overmixing at this stage incorporates too much air, which can cause cracks later.
Now add the eggs, one at a time. Beat on low speed after each addition just until the yolk disappears. Do not overbeat. The batter should be silky and uniform.
Finally, gently stir in the fresh lemon juice by hand with a spatula. Why by hand? Because the mixer can make the batter too thin if you overmix after adding liquid.
Pro tip: At this point, you can dab a tiny bit of batter on a spoon and microwave it for 10 seconds to taste the flavor. But generally, trust your fresh ingredients.
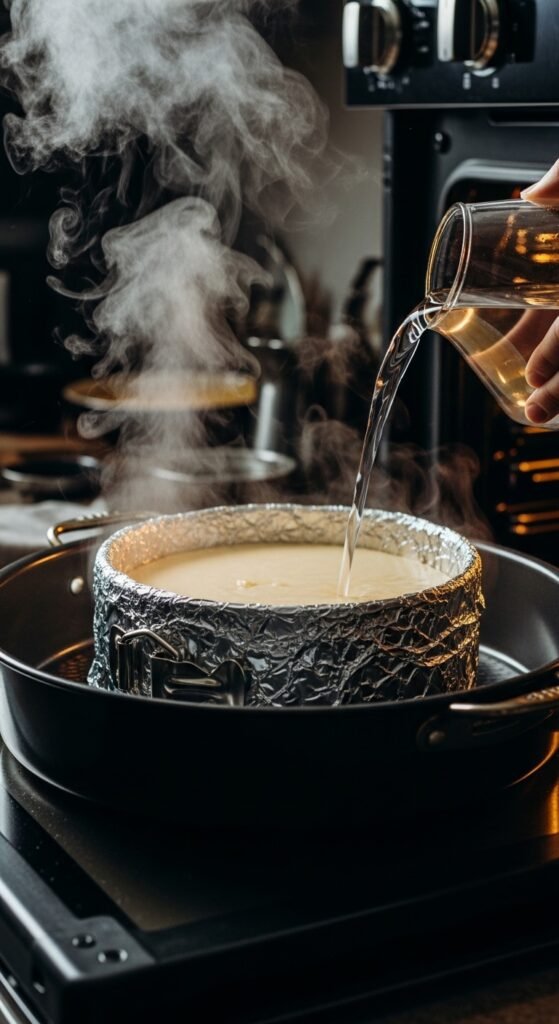
Step 4: Assemble and Prepare the Water Bath
Pour the filling into the cooled crust. Smooth the top with an offset spatula. Tap the pan gently on the counter a few times to release any air bubbles.
Now, place your foil‑wrapped springform pan inside a large roasting pan. Set the roasting pan on the middle rack of the oven. Carefully pour hot water (from the tap is fine, or boiling if you want) into the roasting pan until it reaches about halfway up the sides of the springform pan. Be careful not to splash water into the cheesecake.
Why a water bath? The steam and gentle heat ensure that the cheesecake bakes evenly and slowly. This prevents large cracks and keeps the texture silky instead of rubbery.
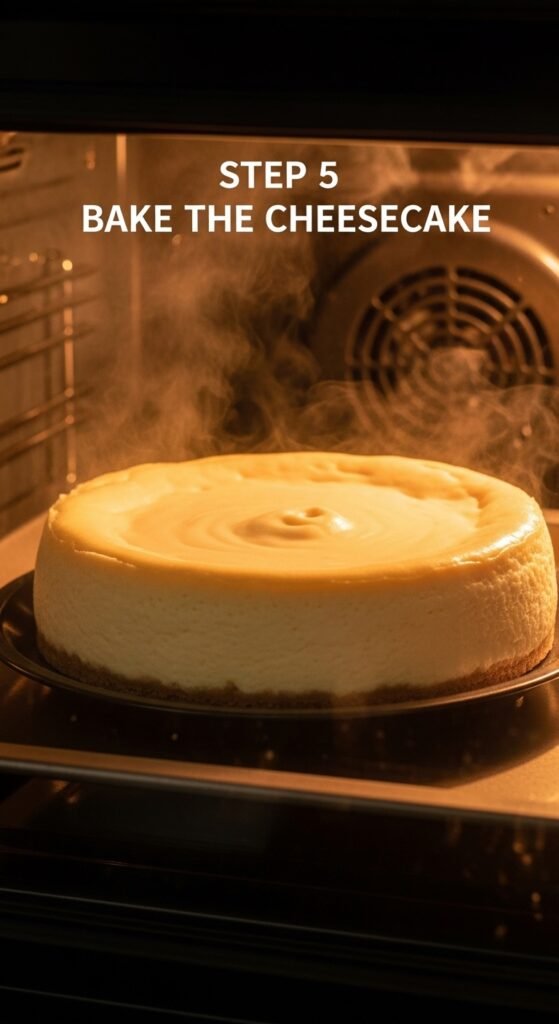
Step 5: Bake the Cheesecake
Reduce the oven temperature to 325°F (160°C). Bake the cheesecake for about 60–70 minutes. The edges should be set and slightly puffed, but the center will still jiggle like Jell‑O when you gently shake the pan.
If you’re using an instant‑read thermometer, the internal temperature in the center should be 150°F (65°C).
Important: Do not open the oven door during the first 45 minutes of baking. Sudden temperature changes can cause cracks. I know it’s tempting – resist!
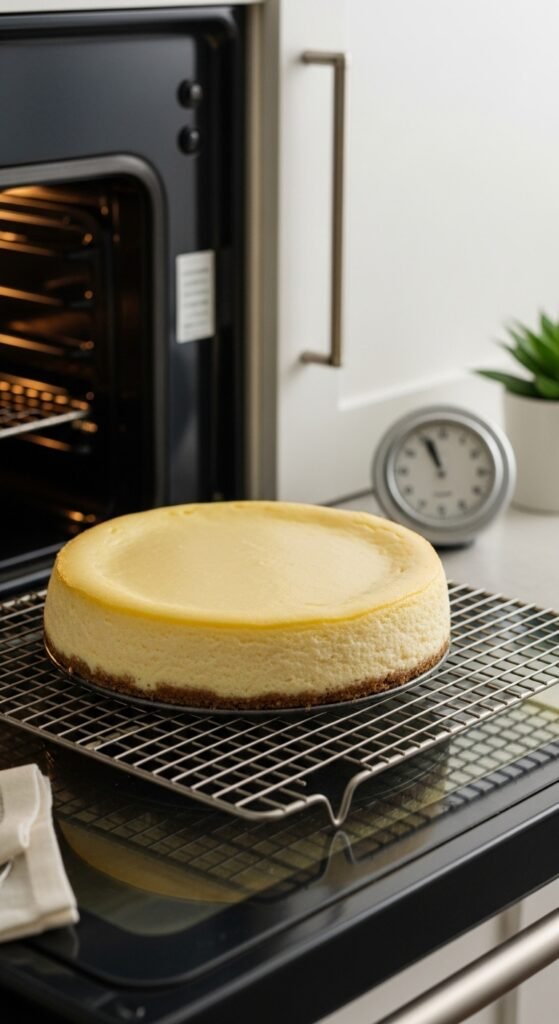
Step 6: Cool the Cheesecake Slowly (The Most Critical Step)
Once the cheesecake is done, turn off the oven. Crack the oven door open by about 6 inches (use a wooden spoon to prop it open). Let the cheesecake cool inside the oven for 1 hour. This gradual cooling prevents the cheesecake from contracting too quickly and cracking.
After an hour, remove the roasting pan from the oven. Carefully lift the springform pan out of the water bath. Remove the foil. Place the cheesecake (still in the pan) on a wire rack to cool to room temperature, which takes another 1–2 hours.
When it’s completely cool, run a thin knife or offset spatula around the inside edge of the pan to loosen the cheesecake. Then, cover the pan with plastic wrap or foil and refrigerate for at least 4 hours, but preferably overnight. Cheesecake needs this time to set fully and develop its flavor.
Anecdote: The first time I made this recipe, I was so impatient that I tried to slice the cheesecake after only two hours in the fridge. The slices were messy, the texture was soft, and the flavor was muted. Now I always chill overnight. The wait is torture, but the result is pure magic.
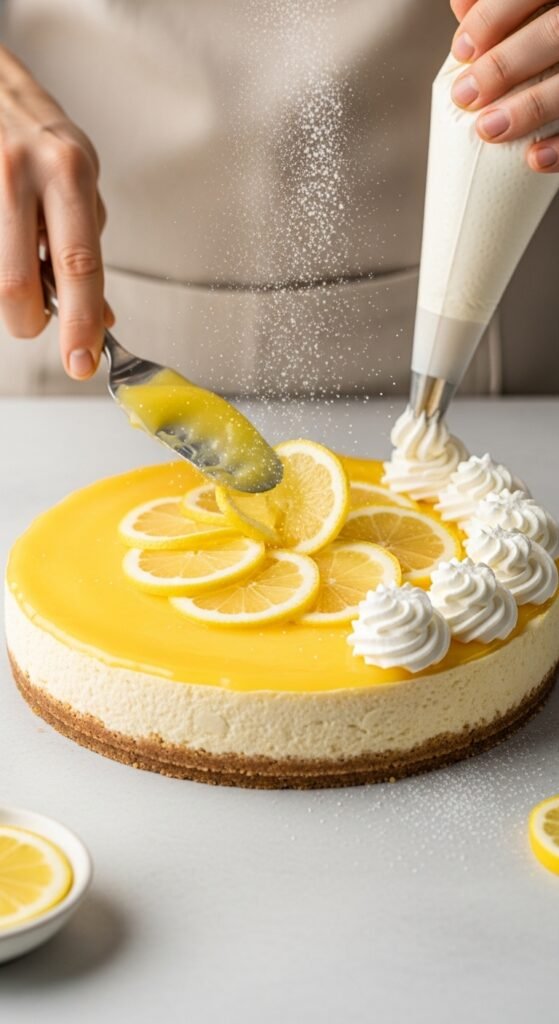
Step 7: Add Toppings and Serve
Before serving, unlock and remove the sides of the springform pan. If you want a picture‑perfect look, gently smooth the sides with a warm knife. Transfer the cheesecake to a serving plate.
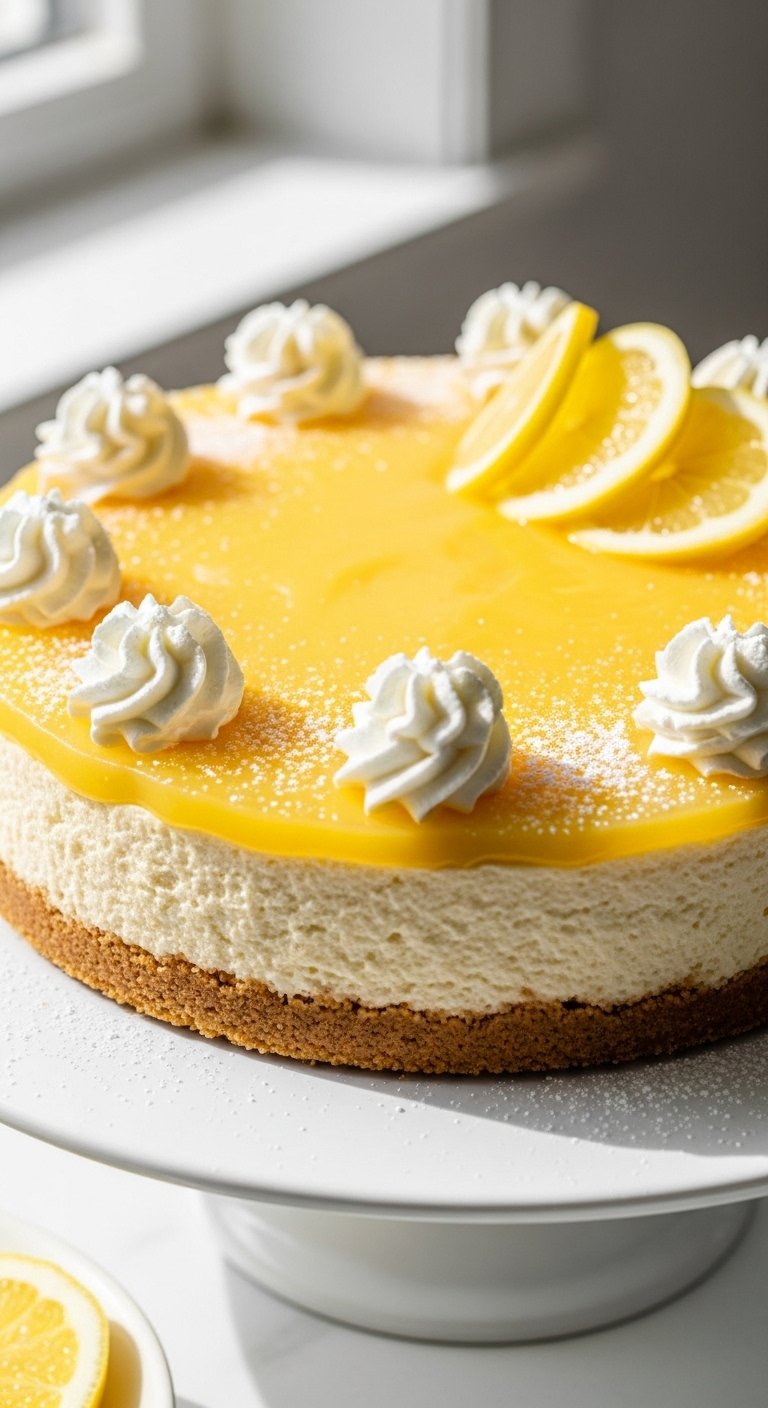
For a classic finish, spread a thin layer of lemon curd over the top, then pipe or dollop whipped cream around the edges. Sprinkle with extra lemon zest and a few fresh berries. Alternatively, keep it minimalist – a dusting of powdered sugar is elegant too.
Slice with a sharp knife that you’ve run under hot water (and wiped dry) between cuts. This gives clean, beautiful slices.
Troubleshooting Common Lemon Cheesecake Problems
Even with the best instructions, things can go wrong. Here are the most frequent issues and how to fix them – or better yet, prevent them.
| Problem | Likely Cause | Solution |
|---|---|---|
| Large cracks on top | Overbaking, sudden temperature change, or too much air in batter | Bake only until the center jiggles. Cool gradually in the oven. Mix on low speed. |
| Soggy crust | Water leaked into pan (poor foil wrap) or crust not pre‑baked | Double‑wrap with heavy‑duty foil. Pre‑bake crust for 10 minutes. |
| Lumpy filling | Cream cheese or eggs were too cold | Bring all ingredients to room temperature. Beat cream cheese until completely smooth first. |
| Cheesecake sank in middle | Underbaked or overmixed | Bake a few minutes longer next time. Mix minimally after adding eggs. |
| Lemon flavor too weak | Used bottled juice, not enough zest, or old lemons | Always use fresh lemon juice and plenty of lemon zest. Taste your lemons first. |
| Burned top | Oven too hot or rack too high | Use an oven thermometer to verify temperature. Bake on the middle rack. |
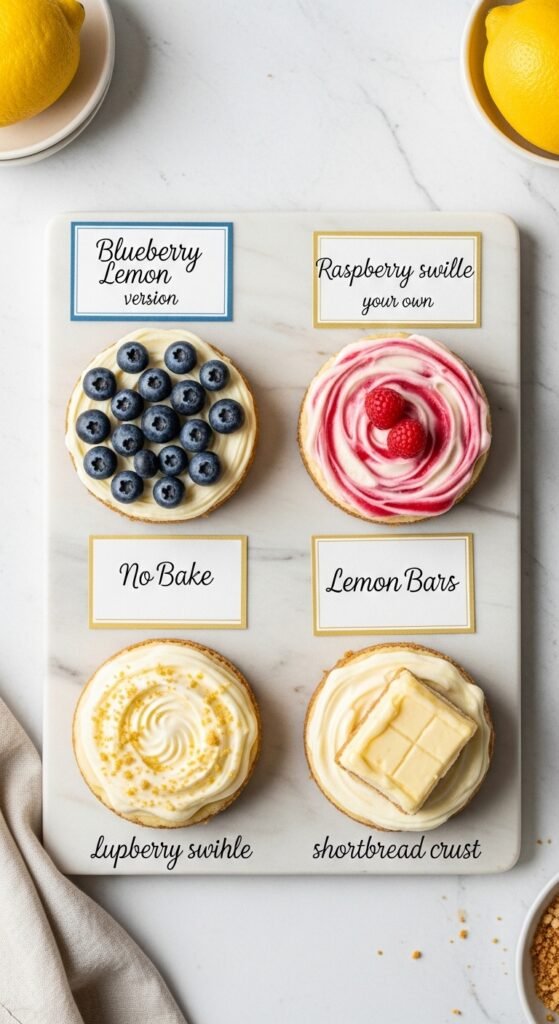
Variations to Make This Lemon Cheesecake Recipe Your Own

Once you’ve mastered the basic recipe, feel free to experiment. Here are a few delicious twists:
- No‑Bake Lemon Cheesecake: Skip the eggs and baking. Use 2 cups heavy cream (whipped to stiff peaks) and 24 oz cream cheese with ¾ cup sugar, plus lemon juice and zest. Fold everything together, pour into a crust, and refrigerate for 6 hours. The texture is lighter and mousse‑like.
- Lemon Blueberry Cheesecake: Fold 1 cup fresh or frozen blueberries (tossed in a little flour) into the batter before baking. Or swirl in blueberry sauce after pouring the batter.
- Lemon Lavender Cheesecake: Add 1 tablespoon dried culinary lavender to the sugar and pulse in a food processor before mixing. The floral note is divine.
- Vegan Lemon Cheesecake: Use soaked cashews, coconut cream, and tofu as the base. (That’s a whole other article, but it’s absolutely possible.)
- Lemon Meringue Cheesecake: After baking and cooling, top the cheesecake with a layer of lemon curd, then pipe Italian meringue over the top. Torch the meringue for a toasted finish.
Why You Should Buy Quality Ingredients and Tools – With Confidence
Let’s circle back to the idea of buying with confidence. Throughout this article, I’ve emphasized using fresh lemons, full‑fat cream cheese, unsalted butter, and a reliable springform pan. You might be wondering: “Can I get away with cheaper substitutes?” The honest answer is yes – sometimes. But here’s what I’ve learned after baking dozens of cheesecakes:
- Fresh lemons (about $0.80 each) versus bottled lemon juice ($3 for a small bottle). Bottled juice is convenient, but it lacks the essential oils and contains preservatives that can taste metallic. For a dessert where lemon is the star, fresh is non‑negotiable. Buy those lemons with confidence – you’ll use the zest too, so nothing goes to waste.
- Full‑fat cream cheese (about $4–5 per block) versus low‑fat ($3–4). Low‑fat cream cheese contains more water and stabilizers. Your cheesecake will be less creamy, more likely to crack, and may have a gummy texture. The extra dollar or two is a small price for a luxurious result.
- Heavy‑duty aluminum foil ($5 for a large roll) versus regular foil ($3). Regular foil tears easily and may not create a watertight seal. Imagine spending hours on your cheesecake only to have it ruined by a $2 saving. Buy the heavy‑duty foil – it also works for grilling and roasting.
- Good springform pan ($20–30) versus a cheap one ($10). Cheap pans often have flimsy latches that pop open, or bottoms that warp in the oven. Worse, they may leak water during the water bath. A quality pan from a trusted brand will last for years. Consider it an investment in every future cheesecake.
- Microplane zester ($12–15). This tool is a revelation. It produces fluffy zest without any bitter pith. You’ll also use it for Parmesan, garlic, ginger, nutmeg, and chocolate. It’s one of my most‑used kitchen tools. Buy it once, love it forever.
I’m not saying you need to spend a fortune. But when you buy these specific items, you’re setting yourself up for success. And success tastes like a perfect slice of lemon cheesecake – creamy, tangy, and unforgettable.
Final Tips for an Outstanding Lemon Cheesecake
Before we wrap up, here’s a quick checklist to ensure your cheesecake turns out fantastic:
- All dairy ingredients at room temperature.
- Springform pan wrapped tightly in two layers of heavy‑duty foil.
- Pre‑baked crust cooled before adding filling.
- Do not overmix the batter – mix on low speed just until combined.
- Water bath filled with hot water, not cold.
- Bake at 325°F (not higher) until edges set but center jiggles.
- Cool slowly in the oven with door cracked.
- Refrigerate overnight (or at least 4 hours).
- Serve with fresh berries, lemon curd, or whipped cream.
Conclusion: Your Lemon Cheesecake Journey Starts Now
I still remember that first cracked, lopsided cheesecake from my tiny college apartment. It wasn’t perfect, but it was mine – and it tasted like determination mixed with butter and lemons. Over the years, I’ve refined this lemon cheesecake recipe into something I’m truly proud of. And now, it’s your turn.
You have the knowledge, the step‑by‑step guide, the troubleshooting tips, and the encouragement to go out and buy the right ingredients and tools with confidence. So, what are you waiting for? Preheat that oven. Zest those lemons. Wrap that pan in foil like a pro. Your family, friends, or even just your future self will thank you.
And when you take that first bite – when the buttery crust crumbles, the creamy filling melts on your tongue, and the bright lemon sings – you’ll understand exactly why this dessert is so beloved. Share it with someone you love. Or keep the whole cake for yourself. I won’t judge.