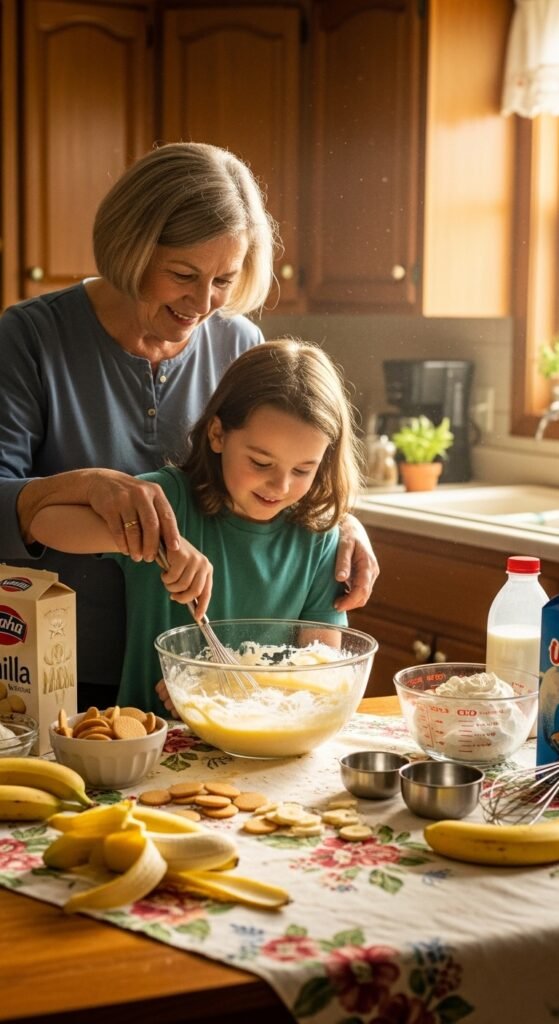
There are some desserts that just feel like a warm hug in a bowl. Banana pudding is one of them. I still remember the first time I tasted homemade banana pudding as a kid. It was at my grandmother’s house, a sticky summer afternoon in July. She pulled a glass dish out of the fridge, and I could see the layers—golden Nilla wafers, creamy vanilla pudding, and perfectly ripe banana slices peeking through. One spoonful, and I was hooked for life.
Now, after years of testing, tweaking, and tasting, I’ve perfected what I truly believe is the best banana pudding recipe out there. The best part? You don’t need to be a professional baker to nail it. In fact, this dessert is so forgiving, so flexible, and so ridiculously delicious that it might just become your go-to potluck contribution, holiday treat, or weeknight family surprise.
In this guide, I’ll walk you through everything—from the history of banana pudding to the science behind getting that perfect pudding texture. We’ll cover ingredient selection, a step-by-step assembly guide, common mistakes to avoid, storage tips, and even a few fun variations. By the end, you’ll feel confident enough to make this dessert for a crowd—or just for yourself on a quiet Tuesday evening. Let’s dive in.
Why This Banana Pudding Recipe Deserves a Spot in Your Kitchen
First, not all banana puddings are created equal. Some are too runny. Some are overly sweet. Others rely on instant pudding mix that leaves a chalky aftertaste. My approach strikes a perfect balance between creamy richness and light, fluffy texture, using a combination of homemade vanilla pudding and whipped cream instead of heavy condensed milk or cool whip.
Moreover, this recipe embraces real bananas—not just as a topping, but as a core layer that infuses every bite with natural sweetness. And let’s talk about those vanilla wafers. When layered correctly, they soften just enough to become cake‑like, while still maintaining a little crunch around the edges.
Consequently, every spoonful offers a symphony of textures: silky pudding, tender bananas, soft‑yet‑crisp wafers, and airy whipped topping. It’s no wonder this dessert has been a Southern staple for over a century.
A Brief History of Banana Pudding (Because Every Great Dessert Has a Story)

Believe it or not, banana pudding didn’t always exist. Bananas only became widely available in the United States in the late 1800s, thanks to faster shipping routes from the Caribbean. Around the same time, companies like Nabisco started mass‑producing vanilla wafers (originally called “Nilla Wafers” after the brand name).
The first published banana pudding recipe appeared in 1888, but it wasn’t the creamy layered dessert we know today. Early versions were more like a steamed custard with bananas mixed in. Then, in the 1920s, someone had the brilliant idea to layer wafers, bananas, and pudding in a dish—and let it chill overnight. The rest, as they say, is history.
Today, banana pudding is a beloved classic across the United States, especially in the South. You’ll find it at family reunions, church picnics, and holiday dinners. And while many people rely on boxed pudding mix, I’m here to show you how making it from scratch—with just a few extra minutes of effort—elevates the dessert to a whole new level.
The Essential Ingredients for the Best Banana Pudding Recipe
Let’s start with the building blocks. Using high‑quality ingredients makes a noticeable difference. I’ve bolded key product names to help you shop with confidence.
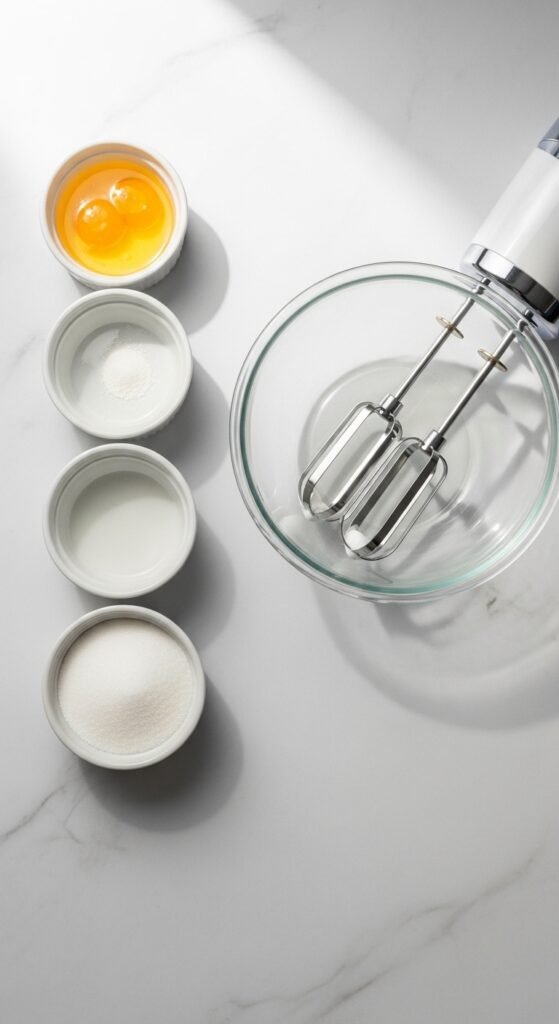
For the Homemade Vanilla Pudding:

- 2/3 cup granulated sugar – Regular white sugar works best. Avoid brown sugar here (it will darken the pudding and add a molasses flavor).
- 1/4 cup cornstarch – This is your thickening agent. Argo Corn Starch is a trusted brand that dissolves smoothly.
- 1/2 teaspoon fine sea salt – Salt balances sweetness and enhances the vanilla flavor.
- 4 large egg yolks – Save the whites for another recipe. Room‑temperature yolks blend better.
- 4 cups whole milk – Whole milk is non‑negotiable for creamy pudding. Lower‑fat milks result in a thinner texture.
- 2 teaspoons vanilla extract – Pure vanilla extract, not imitation. Nielsen‑Massey Pure Vanilla Extract is my go‑to for its rich, floral notes.
- 2 tablespoons unsalted butter – Adds richness and a silky finish. Use Kerrygold or any high‑quality European‑style butter.
For the Layers:
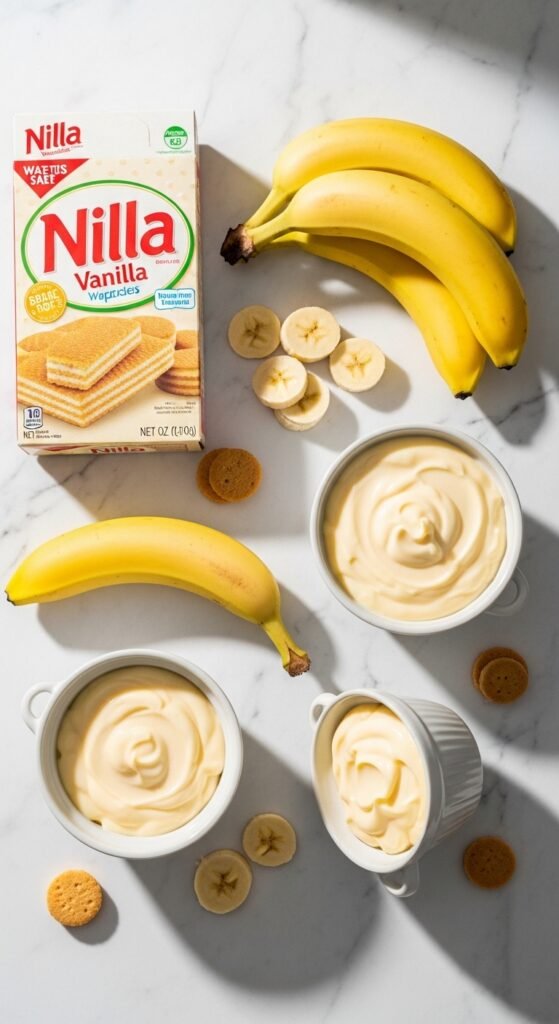
- 1 box (11 ounces) Nilla Wafers – The classic choice. You can use generic vanilla wafers, but Nilla Wafers have the perfect crunch and sweetness.
- 4 to 5 medium ripe bananas – Look for yellow skins with a few brown speckles. Green bananas are too starchy; overripe black bananas are too mushy.
- 1 tablespoon lemon juice – Tossed with banana slices to prevent browning.
For the Whipped Topping (Optional but Highly Recommended):
- 1 1/2 cups heavy whipping cream – Must be cold for best whipping results.
- 3 tablespoons powdered sugar – Dissolves easily and adds a touch of sweetness.
- 1/2 teaspoon vanilla extract
For the Meringue Topping (Traditional Southern Style):
- 4 large egg whites – Leftover from the pudding yolks.
- 1/4 teaspoon cream of tartar – Stabilizes the meringue.
- 1/2 cup granulated sugar
Pro Tip: If you’re short on time, you can use Jell‑O Instant Vanilla Pudding Mix and Cool Whip as shortcuts. However, for the truly unforgettable experience, I highly recommend making the pudding from scratch at least once. You’ll taste the difference immediately.
Step‑by‑Step Guide to Making the Perfect Banana Pudding Recipe
Now comes the fun part. I’ve broken this down into simple, manageable steps. Follow along, and you’ll have a stunning dessert in no time.
Step 1: Prep Your Ingredients and Tools
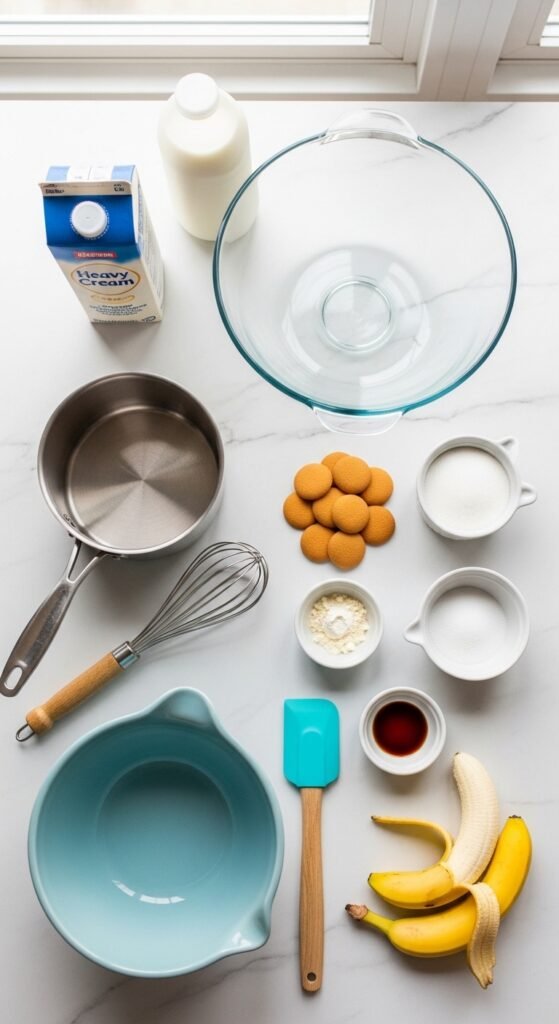
Before you start cooking, gather everything you need. This is called mise en place, and it prevents frantic scrambling later.
Tools You’ll Need:
- Medium saucepan
- Whisk
- Mixing bowls (glass or stainless steel)
- Rubber spatula
- 9×13‑inch baking dish (or a deep 2‑quart dish)
- Electric mixer (handheld or stand)
- Sharp knife and cutting board
- Plastic wrap
Take your eggs and milk out of the refrigerator about 30 minutes before starting. Room‑temperature ingredients blend more smoothly.
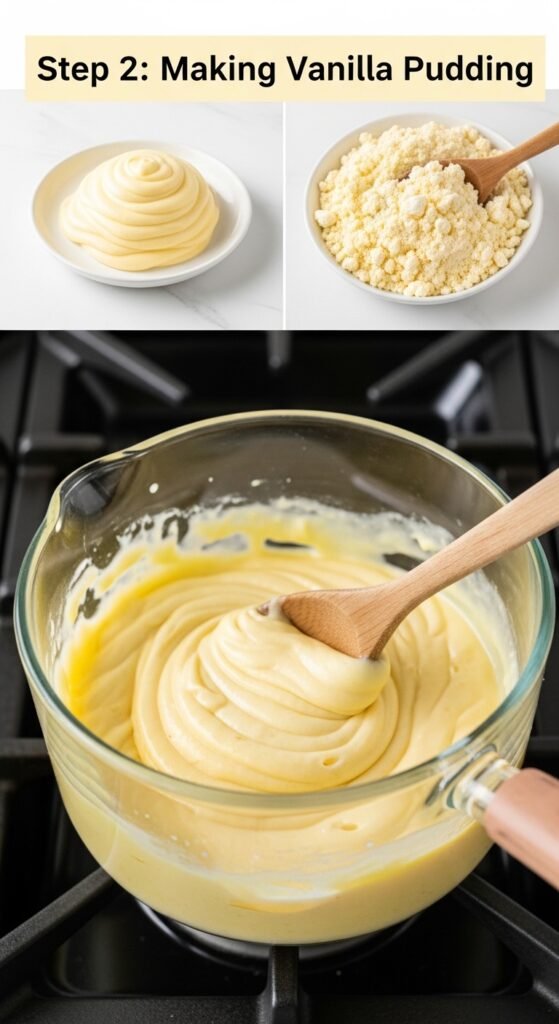
Step 2: Make the Homemade Vanilla Pudding
This is the heart of your banana pudding recipe. Don’t rush it.
- In your medium saucepan, whisk together sugar, cornstarch, and salt until no lumps remain.
- In a separate bowl, lightly beat the egg yolks. Then slowly whisk in about 1/2 cup of the milk until smooth. This tempers the yolks so they don’t scramble when added to hot liquid.
- Pour the remaining milk into the saucepan with the dry ingredients. Whisk to combine.
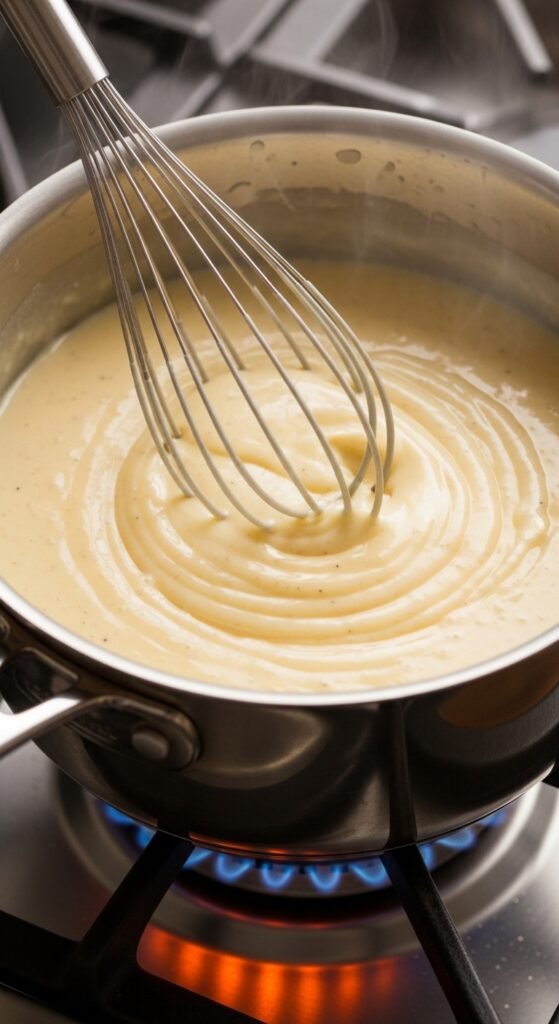
- Place the saucepan over medium heat. Stir constantly with your whisk, scraping the bottom and corners. After about 5–7 minutes, the mixture will start to thicken and bubble. Once you see the first big bubble, cook for 1 more minute while stirring.
- Remove from heat. Slowly pour about 1 cup of the hot milk mixture into the egg yolk mixture, whisking constantly. This is called tempering—it raises the temperature of the eggs gradually.
- Pour the egg mixture back into the saucepan. Return to medium heat and cook for 2–3 more minutes, whisking constantly. The pudding will become very thick, almost like a paste.
- Remove from heat. Stir in vanilla extract and butter until the butter melts completely.
- Pour the pudding through a fine‑mesh strainer into a clean bowl. This removes any accidental lumps or cooked egg bits.
- Press plastic wrap directly onto the surface of the pudding (this prevents a skin from forming). Refrigerate for at least 2 hours, or until completely chilled and firm.
Anecdote: The first time I made pudding from scratch, I got distracted by my phone and stopped whisking for just 30 seconds. Big mistake. Scorched milk on the bottom of the pan ruined the entire batch. So please, learn from my error: never stop whisking once that milk is on the heat.
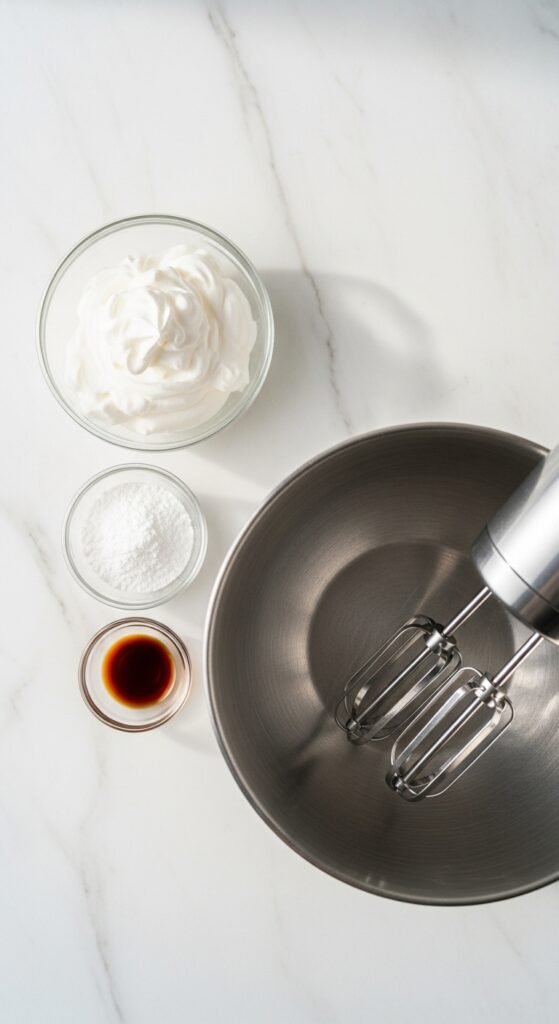
Step 3: Prepare the Whipped Topping (If Using)
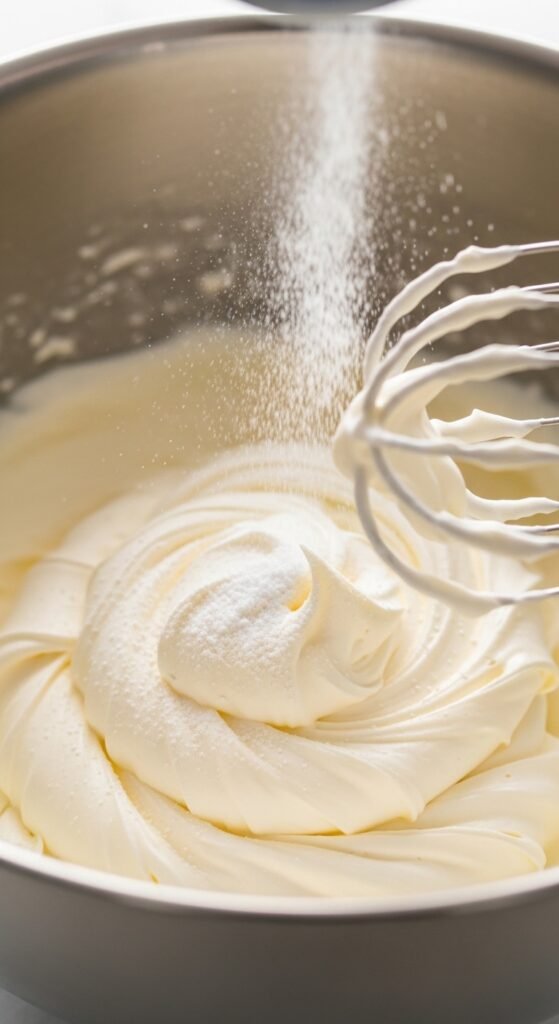
While the pudding chills, make your whipped topping.
- Place your mixing bowl and whisk attachment in the freezer for 10–15 minutes. Cold tools help cream whip faster.
- Pour heavy cream, powdered sugar, and vanilla into the chilled bowl.
- Beat on medium‑high speed until soft peaks form. This means when you lift the whisk, the cream forms a peak that flops over slightly.
- Continue beating for another 30–60 seconds until stiff peaks form. The cream should hold its shape firmly. Be careful not to over‑whip, or you’ll end up with butter.
Set the whipped cream aside in the refrigerator.
Step 4: Slice the Bananas and Prevent Browning
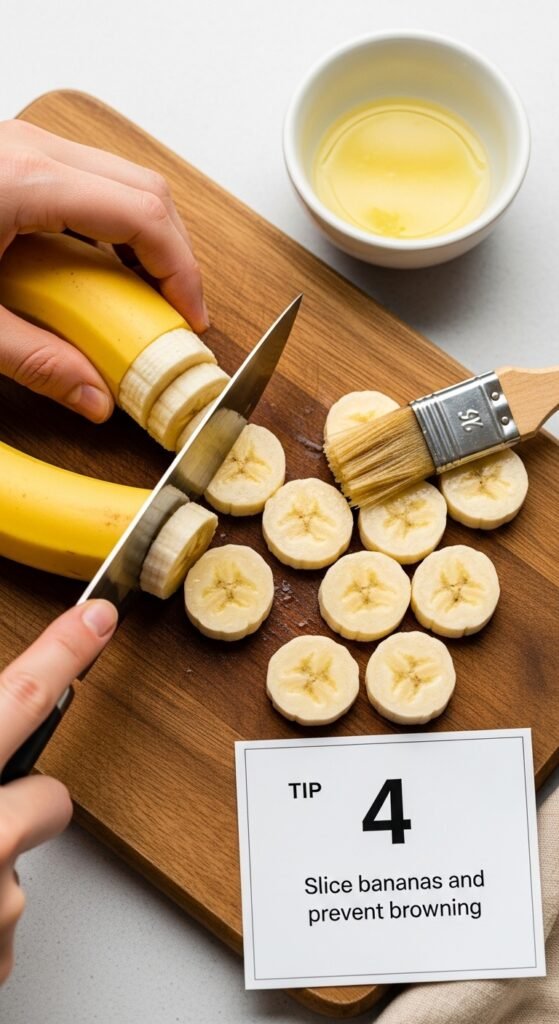
This step is crucial. Nobody wants brown, mushy bananas in their pudding.
- Peel your bananas and slice them into 1/4‑inch rounds. Not too thin (they’ll disintegrate) and not too thick (they’ll be awkward to bite).
- Place the slices in a bowl and gently toss with 1 tablespoon lemon juice. The acidity slows down oxidation.
- Pat the slices lightly with a paper towel to remove excess juice. Too much liquid can make the pudding watery.
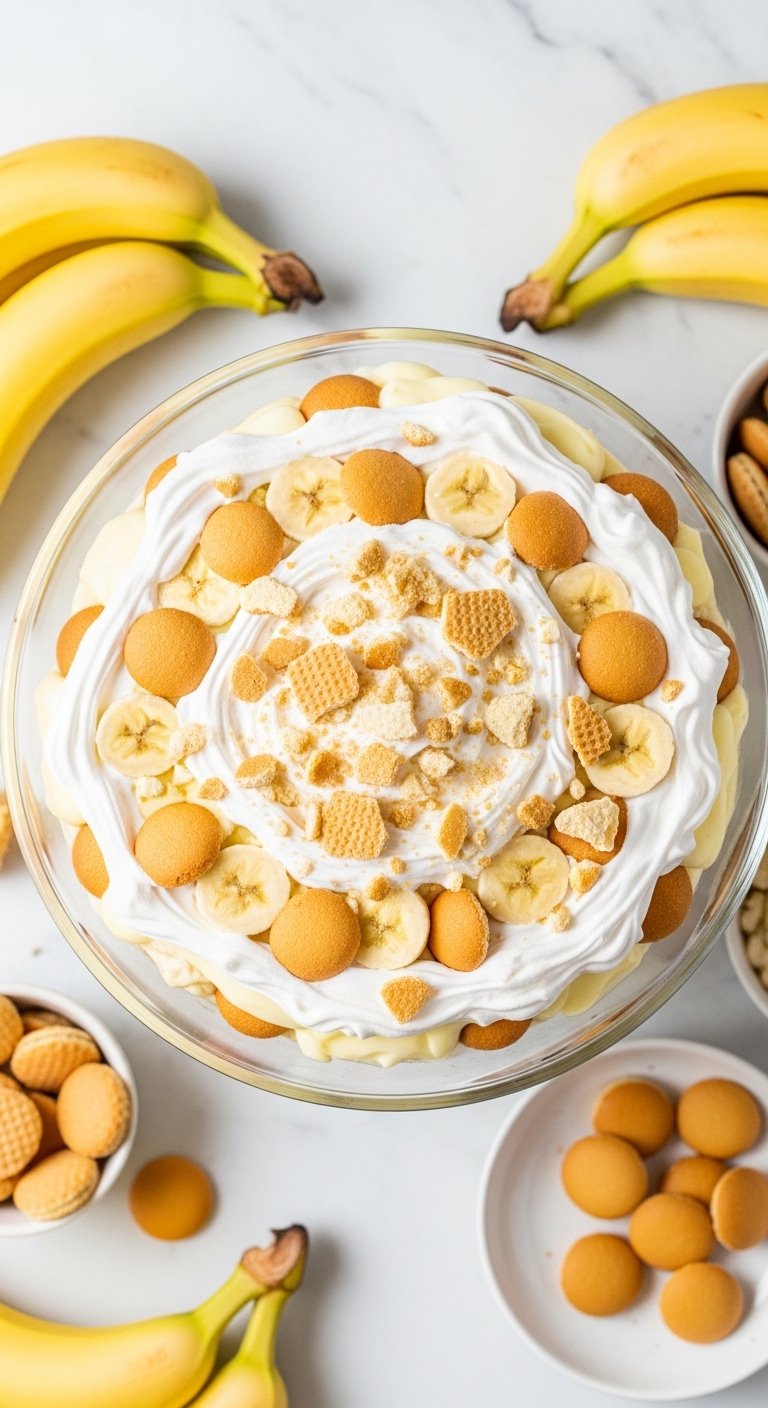
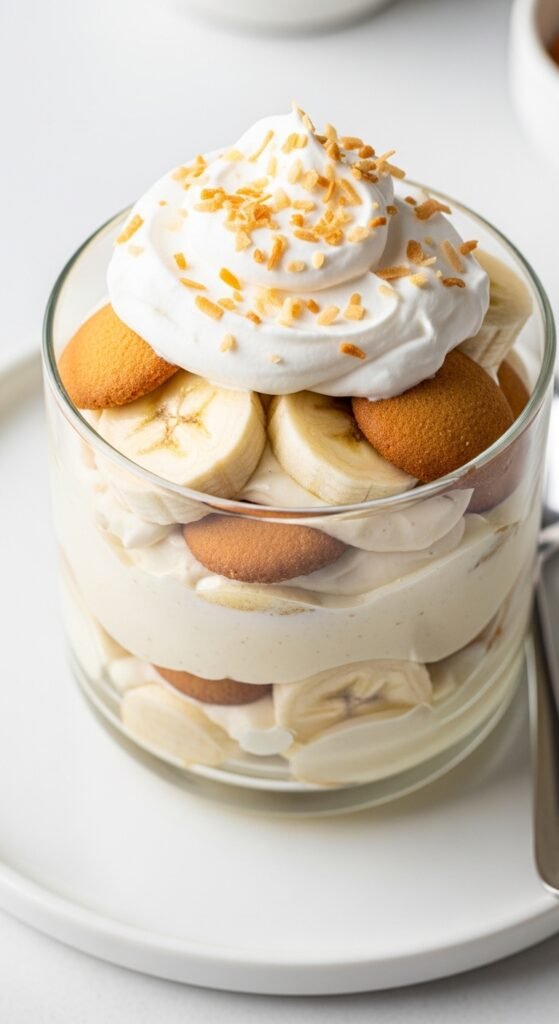
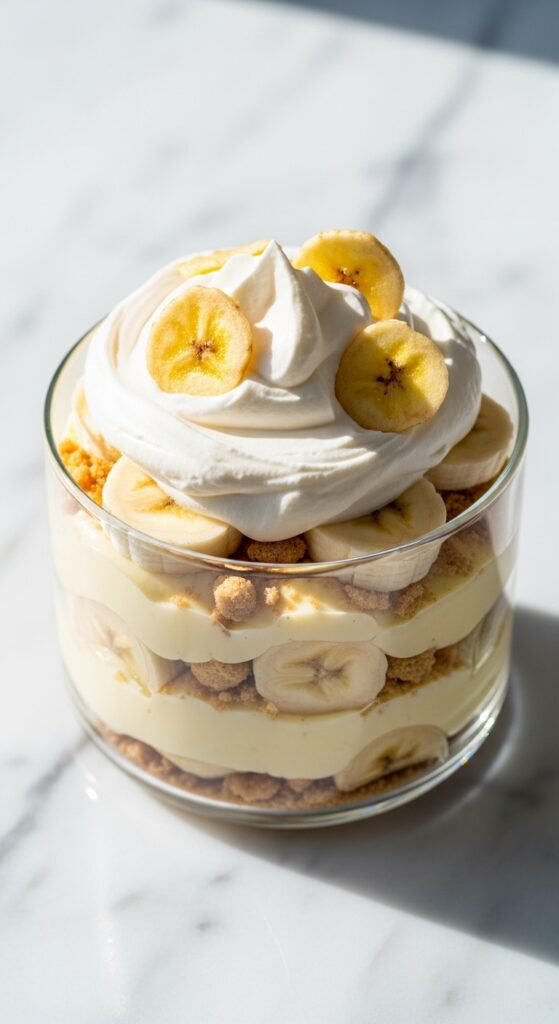
Step 5: Assemble the Banana Pudding Layers
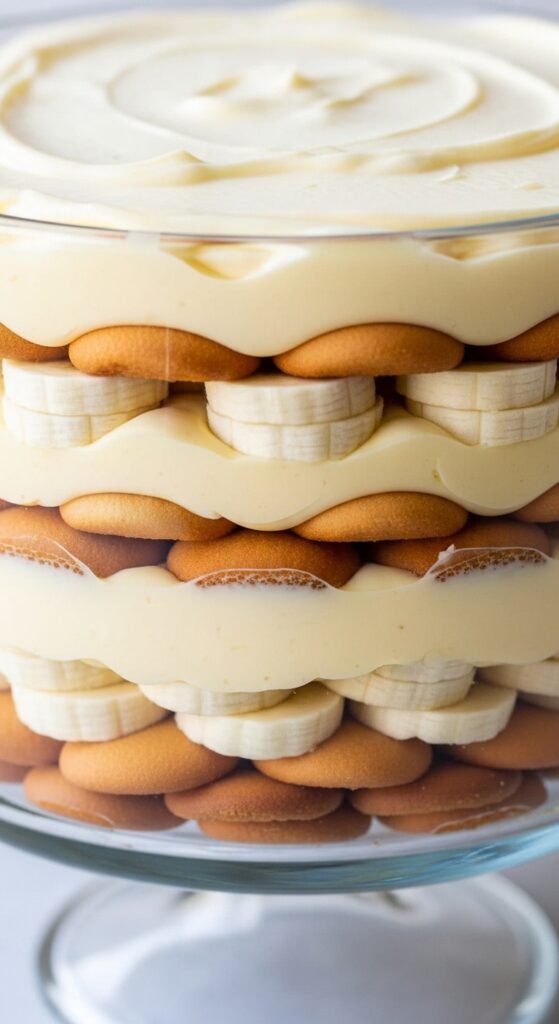
Now for the satisfying part—building those beautiful layers.
- Spread a thin layer of chilled pudding on the bottom of your 9×13‑inch dish. This prevents the first layer of wafers from sliding around.
- Arrange a single layer of Nilla wafers on top of the pudding. Don’t be afraid to break a few to fill gaps.
- Add a layer of banana slices, overlapping slightly.
- Spoon about one‑third of the remaining pudding over the bananas and spread evenly.
- Repeat the layers: wafers, bananas, pudding. You should get about three full layers total.
- Finish with a final layer of pudding on top. If using whipped topping, spread it over the pudding now. If making meringue, hold off until after baking (see variation below).
Step 6: Chill – The Most Important Step
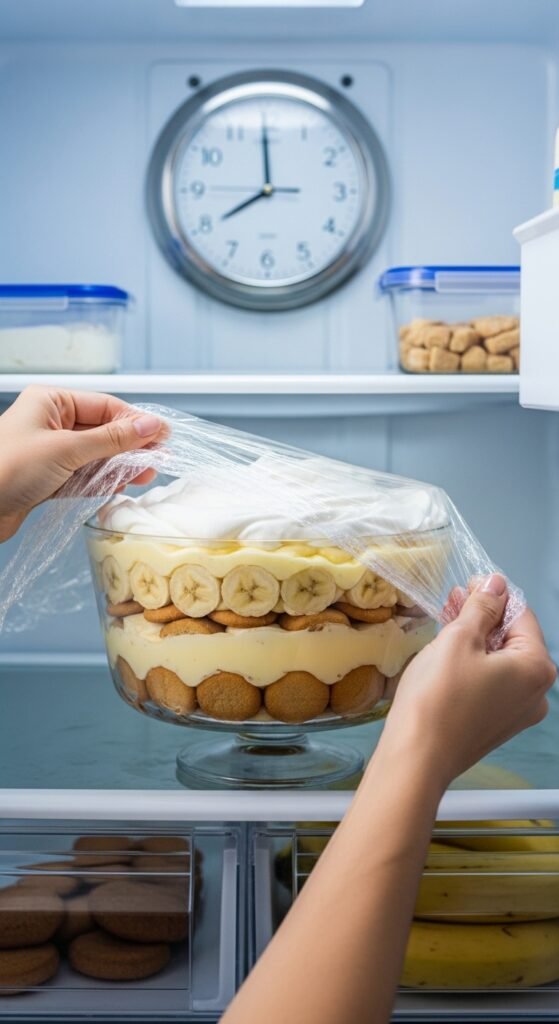
Here’s the secret that separates good banana pudding from great banana pudding: resting time.
Cover your dish tightly with plastic wrap and refrigerate for at least 8 hours, but preferably overnight. During this time, the wafers absorb moisture from the pudding and bananas. They transform from crunchy cookies into soft, cake‑like morsels. Meanwhile, the flavors meld together beautifully.
Anecdote: I once served banana pudding just 2 hours after assembling it, and my guests were polite but unimpressed. The next day, I tried the leftovers and was blown away. Now I always make this dessert the day before I need it. Patience truly pays off.
Traditional Southern Banana Pudding Recipe with Meringue Topping
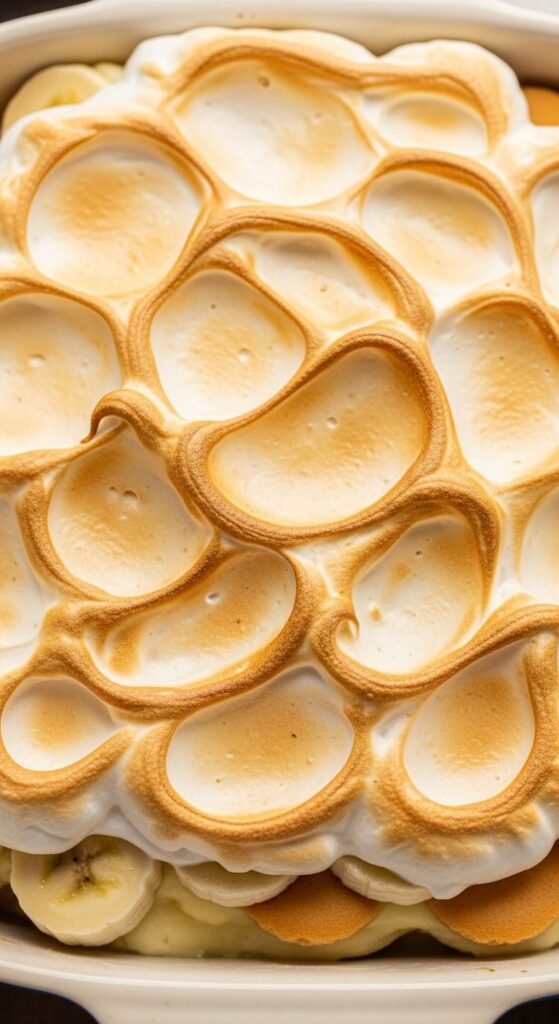
If you want to go full authentic, skip the whipped cream and top your pudding with meringue instead. Here’s how:
- After assembling the layers (but before the long chill), preheat your oven to 350°F.
- In a clean, grease‑free bowl, beat 4 egg whites and cream of tartar until foamy.
- Gradually add 1/2 cup sugar, one tablespoon at a time, while beating on high speed. Continue until stiff, glossy peaks form.
- Spread the meringue over the top layer of pudding, sealing it to the edges of the dish.
- Bake for 10–12 minutes, or until the meringue is golden brown.
- Cool completely on the counter, then refrigerate for at least 4 hours before serving.
The meringue adds a lovely toasted marshmallow flavor. However, note that meringue doesn’t hold up as well overnight—it can weep or deflate. So if you go this route, serve within 24 hours.
Common Mistakes to Avoid in Your Banana Pudding Recipe
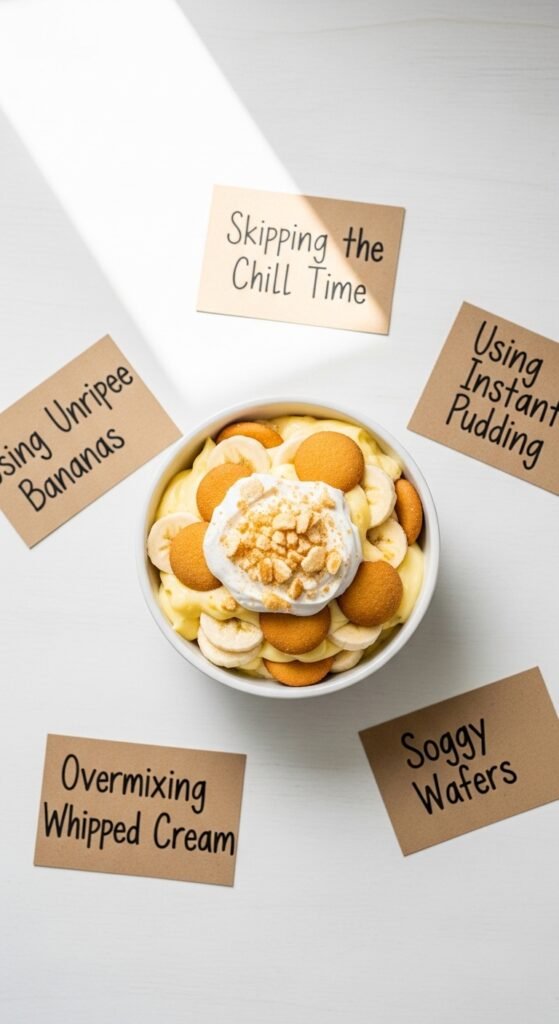
Even experienced cooks can stumble. Here are the top pitfalls and how to sidestep them.
| Mistake | Why It Happens | The Fix |
|---|---|---|
| Runny pudding | Not cooking long enough or using low‑fat milk | Cook until it thickly coats the back of a spoon. Use whole milk. |
| Lumpy pudding | Cornstarch not fully dissolved or eggs scrambled | Whisk dry ingredients thoroughly. Temper eggs slowly. Strain final pudding. |
| Brown bananas | Oxidation from air exposure | Toss with lemon juice. Assemble just before chilling. |
| Soggy wafers | Too much liquid or too long chilling | Use less pudding between layers. Chill exactly 8–12 hours, not 3 days. |
| Grainy texture | Sugar not fully dissolved | Cook pudding until sugar dissolves completely. Don’t rush. |
| Weeping meringue | Undercooked or humidity | Bake until golden. Serve same day. |
Delicious Variations to Customize Your Banana Pudding Recipe
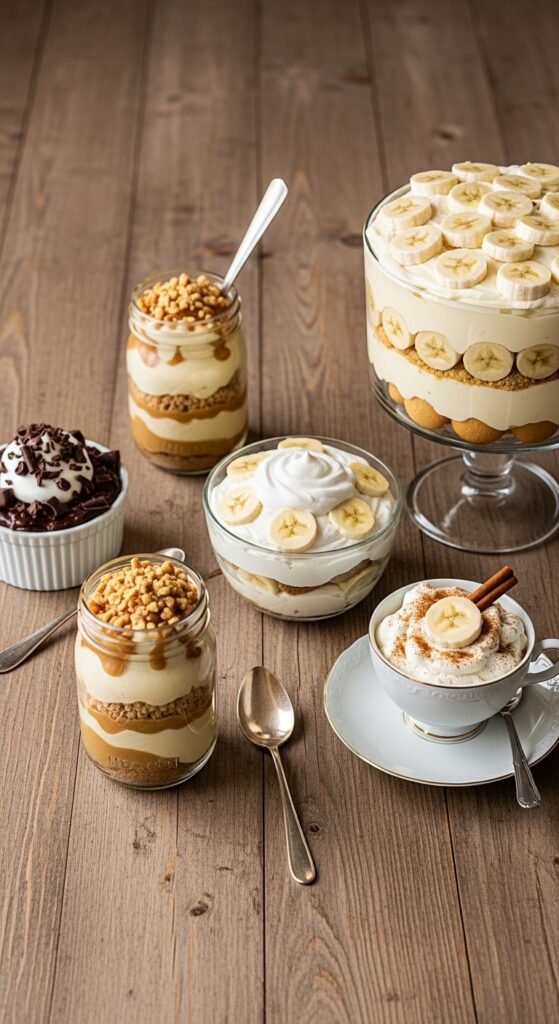
Once you’ve mastered the classic, feel free to experiment. Here are some crowd‑favorite twists.
Chocolate Banana Pudding
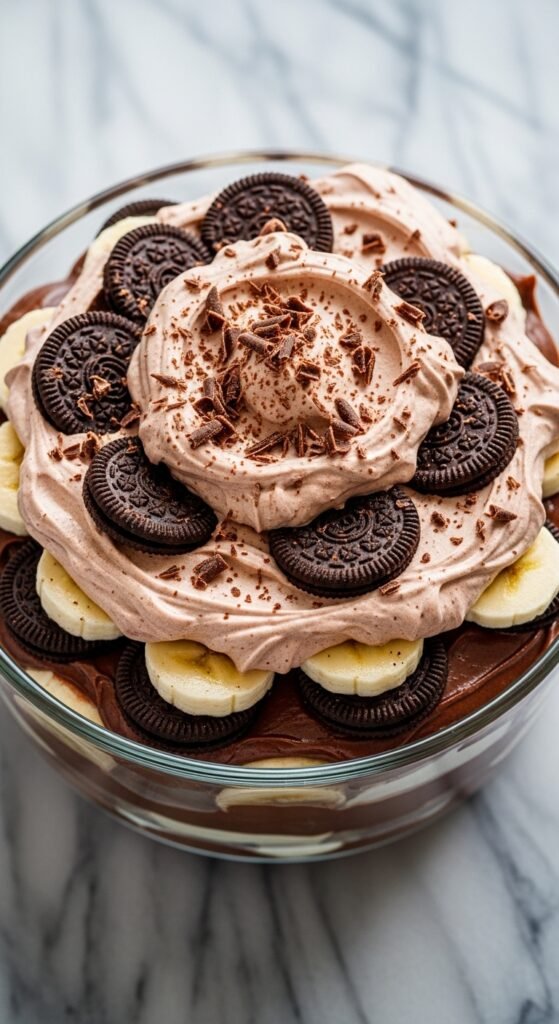
Add 1/2 cup unsweetened cocoa powder to the sugar mixture when making the pudding. Layer with chocolate wafers instead of vanilla. The chocolate‑banana combo is irresistible.
Peanut Butter Banana Pudding
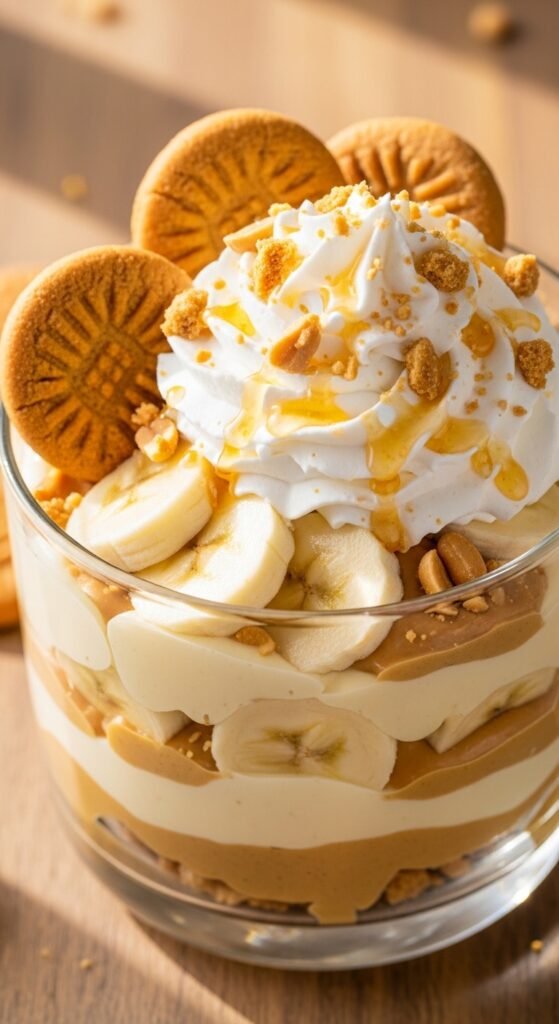
Warm 1/2 cup creamy peanut butter and drizzle it between the layers. Or swirl peanut butter into the pudding itself. Top with crushed Reese’s pieces for crunch.
Vegan Banana Pudding
Use coconut milk (full‑fat) and cornstarch for the pudding. Replace egg yolks with 1/4 cup silken tofu blended smooth. Use vegan vanilla wafers (available at most health food stores). The result is surprisingly creamy.
Gluten‑Free Banana Pudding
Swap the Nilla wafers for gluten‑free vanilla wafers (such as Kinnikinnick brand). Ensure your cornstarch is gluten‑free (most are). Everything else remains the same.
Banana Pudding Trifle
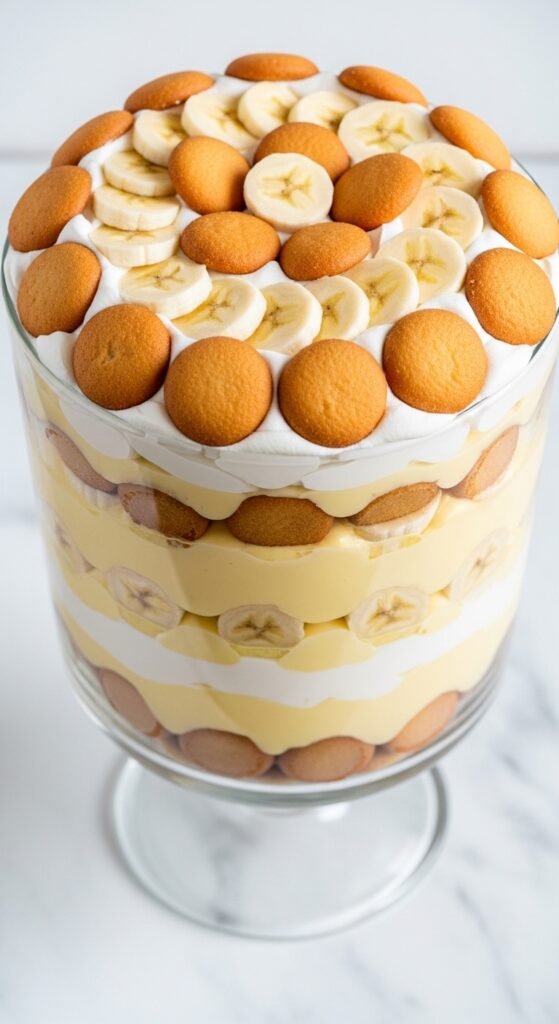
Instead of a baking dish, assemble everything in a large glass trifle bowl. The clear sides show off your beautiful layers. This presentation is perfect for parties.
How to Serve and Store Your Banana Pudding Recipe
Serving Suggestions
- Scoop into individual bowls or small mason jars for a cute, portable dessert.
- Garnish with fresh banana slices and a crushed wafer just before serving.
- Pair with coffee, iced tea, or a glass of cold milk.
Storage Instructions
- Cover tightly and refrigerate for up to 3 days.
- After 3 days, the bananas will darken and wafers become too soft.
- Do not freeze banana pudding. The texture becomes watery and grainy upon thawing.
Can You Make It Ahead?
Absolutely. In fact, I encourage it. Assemble the entire dessert (minus any meringue or fresh banana garnish) up to 24 hours in advance. Keep refrigerated. Add final touches just before serving.
Why You Should Buy These Specific Ingredients with Confidence
Let’s talk about product recommendations. I’ve tested this banana pudding recipe with both budget and premium ingredients. Here’s where spending a little more makes a real difference.
- Nilla Wafers: The original brand has a unique vanilla flavor and sturdy texture that holds up to layering. Generic brands often turn to mush. Buy the 11‑ounce box—you’ll use almost all of it.
- Pure Vanilla Extract: Imitation vanilla tastes flat and chemical. McCormick Pure Vanilla or Nielsen‑Massey are worth every penny.
- Heavy Whipping Cream: Look for cream with at least 36% milk fat. Organic Valley or Horizon brands whip up reliably.
- Fresh Bananas: Choose Dole or Chiquita bananas at the “yellow with brown speckles” stage. Avoid green or all‑brown fruit.
Confidence Booster: Every ingredient listed here is widely available at grocery stores like Walmart, Kroger, Target, and Whole Foods. You don’t need specialty shops.
I’ve made this recipe over 50 times for potlucks, birthdays, and holiday dinners. Every single time, people ask for the recipe. Some have even said it’s better than their grandmother’s version (don’t tell my grandma). So trust me when I say: buy these ingredients without hesitation. You will not regret it.
Frequently Asked Questions About Banana Pudding Recipe
Q: Can I use instant pudding instead of homemade?
Yes, but the texture will be softer and the flavor less rich. If using instant, reduce the milk to 3 cups and follow the box directions. Chill for 1 hour before assembling.
Q: Why are my bananas turning black?
Bananas naturally oxidize when exposed to air. Lemon juice helps, but for best results, assemble the pudding no more than 8 hours before serving.
Q: Can I use low‑fat milk?
You can, but the pudding will be thinner. Add an extra tablespoon of cornstarch to compensate. The flavor won’t be as creamy.
Q: How do I get clean slices when serving?
Use a large spoon or spatula and scoop straight down. Avoid dragging through the layers. For trifle‑style, individual servings are easier.
Q: Is banana pudding gluten‑free?
Not traditionally, because Nilla wafers contain wheat. However, gluten‑free vanilla wafers work beautifully.
Q: Can I reduce the sugar?
You can cut the sugar by 1/4 cup without ruining the texture. The pudding may taste less rich. Use ripe bananas for natural sweetness.
Final Thoughts: Your Banana Pudding Recipe Journey Starts Now
If you’ve made it this far, congratulations—you’re officially ready to create a dessert that will earn you legend status among family and friends. This banana pudding recipe isn’t just a set of instructions; it’s an experience. It’s the smell of vanilla simmering on the stove. It’s the satisfaction of peeling back plastic wrap to reveal perfect, wobbly layers. It’s the first bite that makes everyone at the table go silent—then ask for seconds.
So go ahead. Add those ingredients to your shopping list. Clear some space in your fridge. And give yourself the gift of homemade banana pudding. Whether you stick to the classic version or try one of the variations, I promise you’ll be proud of what you create.
And hey—when someone asks for your secret? Just smile and say, “It’s all about the patience. And the Nilla wafers.”