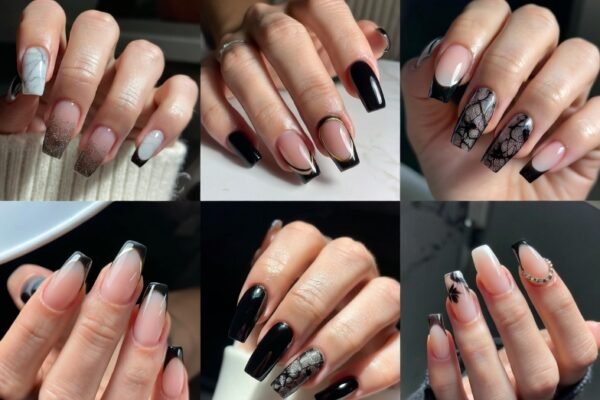
When you think of black lace, you might picture elegant evening gowns or vintage veils. But bringing that same intricate, delicate pattern to your nails creates a stunning contrast that is both fierce and feminine. Black lace nails designs are the perfect way to make a statement without saying a word, offering a sophisticated twist on the classic dark manicure. Whether you are heading to a formal event or just want to elevate your daily style, this look blends gothic romance with modern edge, ensuring your hands become the center of attention wherever you go.
The beauty of this trend lies in its versatility. Unlike solid black polish, which can sometimes feel harsh, the lace effect adds texture and depth. You can achieve it with stamping plates, decals, or even freehand painting for a truly customized result. These designs work surprisingly well on both short and long nails, proving that you don’t need extreme length to pull off intricate art. In this article, we will walk you through sixteen breathtaking variations, from subtle accents to full-coverage masterpieces, so you can find the perfect match for your personality and next big night out.
Classic Black Lace Over French Tips
The traditional French manicure gets a dark, romantic upgrade when you layer black lace designs over a crisp white or nude tip. Instead of the usual solid color, imagine a sheer, barely-there base coat with a delicate web of black vines and scalloped edges tracing the smile line of your nail. This combination keeps the look office-appropriate while adding a secret hint of rebellion. The contrast between the clean, bright tips and the dark, tangled lace creates a visual pop that is both polished and playful.
To make this design truly shine, opt for a matte top coat on the lace portion only, leaving the French tip glossy. This small detail highlights the texture of the lace pattern without overwhelming the nail. Many women love this style for weddings or anniversary dinners because it feels bridal but with a modern, non-traditional twist. The key is ensuring the lace lines are thin and consistent, so using a fine-liner brush or a high-quality stamping plate is your best friend here.
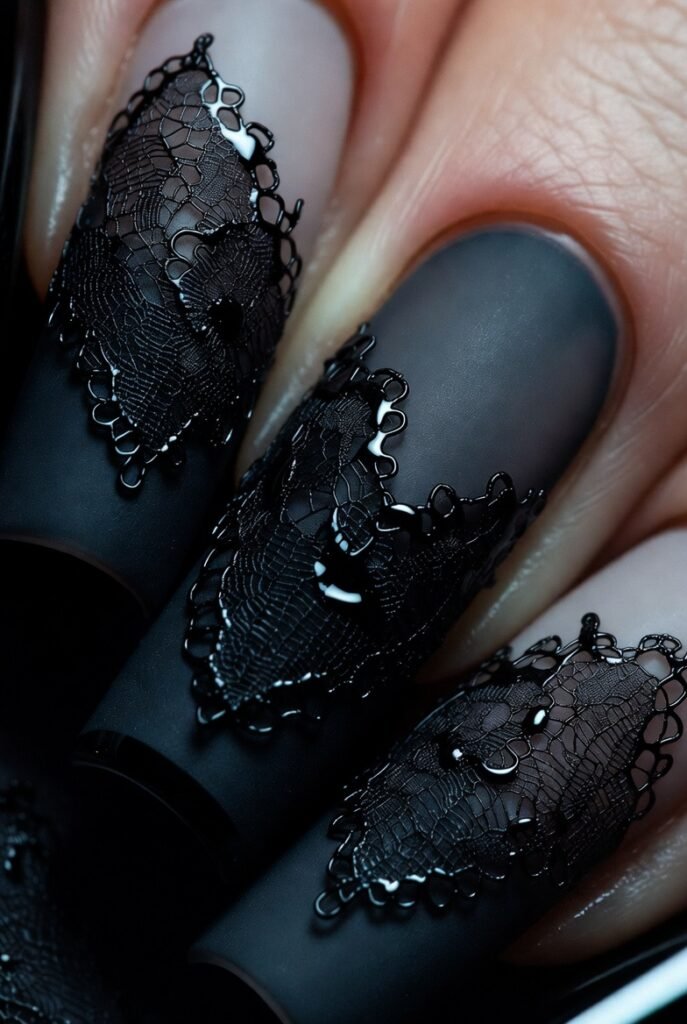
Matte Black Base with Glossy Lace Accents
Reversing the usual texture rules can produce one of the most dramatic black lace nail designs in your collection. Start with a rich, matte black base coat that absorbs light and gives your nails a velvety, almost leather-like finish. Then, paint the lace pattern using a glossy black or even a clear, high-shine top coat mixed with a tiny bit of dark pigment. The result is a subtle, tonal effect where the lace seems to rise out of the darkness like an etching on stone.
This design excels in low-light environments like candlelit dinners or cocktail bars, where the play of light reveals the hidden pattern. It is a masterclass in understated elegance because the design only becomes fully visible when you turn your hand or step into brighter lighting. Nail artists love this approach for clients who want something “dark but different,” as it avoids the flat look of ordinary black polish. Finish with a hydrating cuticle oil to keep the matte surface from looking dry or chalky.
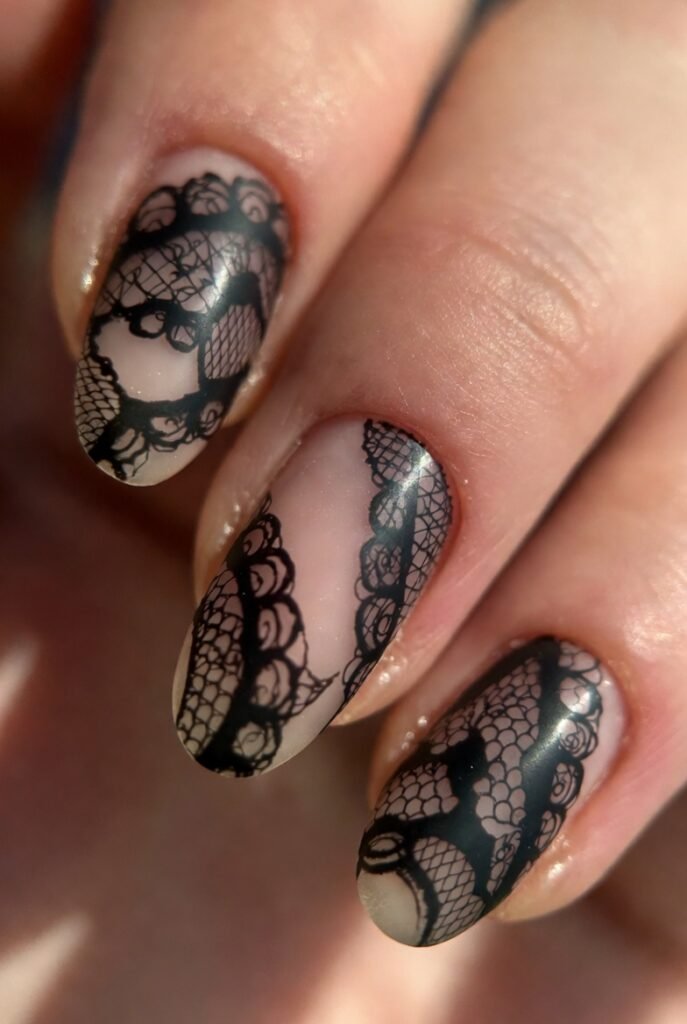
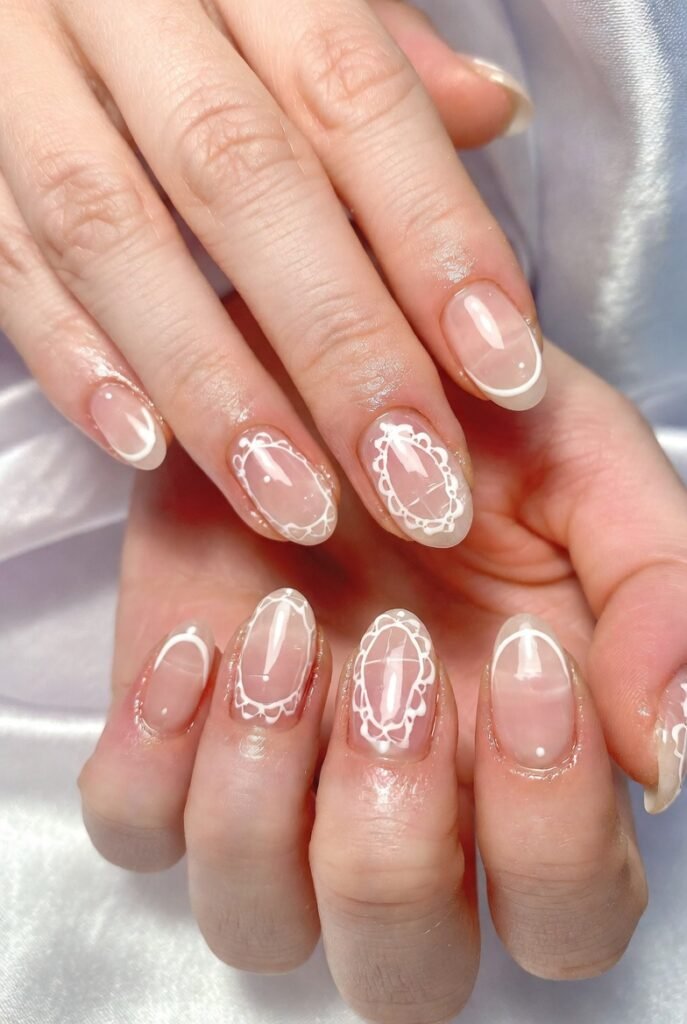
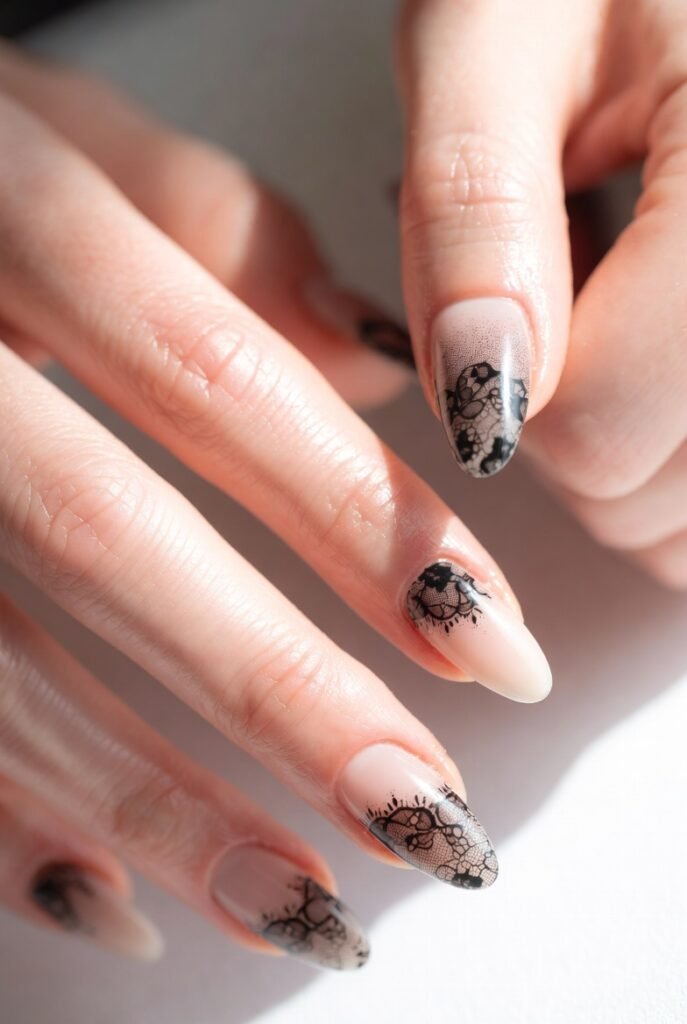
Sheer Nude Base with Bold Black Lace Overlay
For a softer, everyday wearable version of the trend, a sheer nude or blush pink base works wonders. The transparency of the base mimics the look of real fabric lace resting against bare skin, making the black lace nails designs feel organic and airy rather than heavy. Paint two thin coats of a jelly-like nude polish that still allows your natural nail moon and tip to peek through. Then, apply a dense, swirling lace pattern across the entire nail, concentrating thicker lines near the cuticle and fading them out toward the tip.
Read Also: 16 Black Lace Nails Designs: Unleash Your Bold, Romantic Side with These Edgy-Chic Manicures
What makes this style so universally flattering is how it elongates the fingers and hides any imperfections in the nail bed. Because the base is translucent, regrowth is less obvious, meaning you can stretch your manicure to two and a half weeks without touch-ups. Pair this design with oval or almond-shaped nails to enhance the romantic, vintage vibe. A single tiny pearl or rhinestone placed at the center of each lace flower adds just enough sparkle without turning gaudy.
Reverse Lace Outline on Negative Space Nails
Negative space manicures have been trending for years, and merging them with black lace nails designs creates a futuristic yet gothic look. Leave large portions of your natural nail completely bare, then paint a thick black outline that mimics the scalloped edge of lace around the perimeter. Inside the negative space, use a dotting tool to create tiny connecting circles and V-shapes that suggest lace without fully filling in the pattern. This method works exceptionally well on square or coffin-shaped nails where straight edges contrast with the organic lace curves.
The advantage of this design is breathability. Because so much of the nail is bare, you avoid the suffocated feeling that sometimes comes with heavy dark polish. It is also a fantastic choice for summer months when you want dark drama but not full coverage. To keep the look cohesive across all ten fingers, vary the placement of the lace outline—some nails can have lace along the sidewalls, while others feature it only near the cuticle. A high-quality latex barrier around your skin before painting will keep those bare spaces crisp and clean.
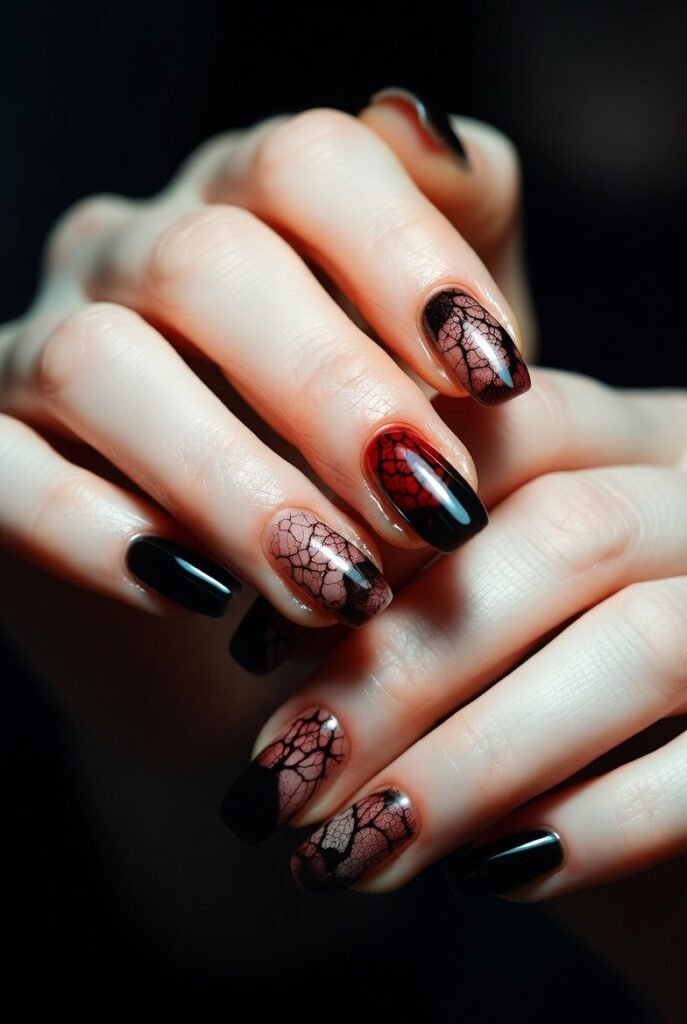
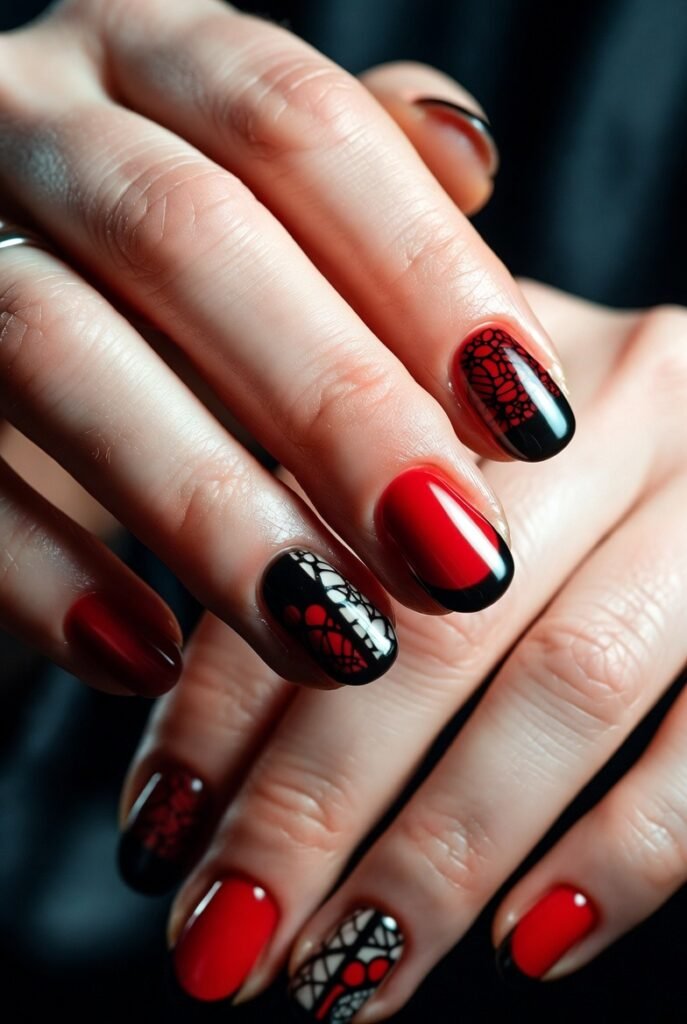
Burgundy and Black Lace Gradient
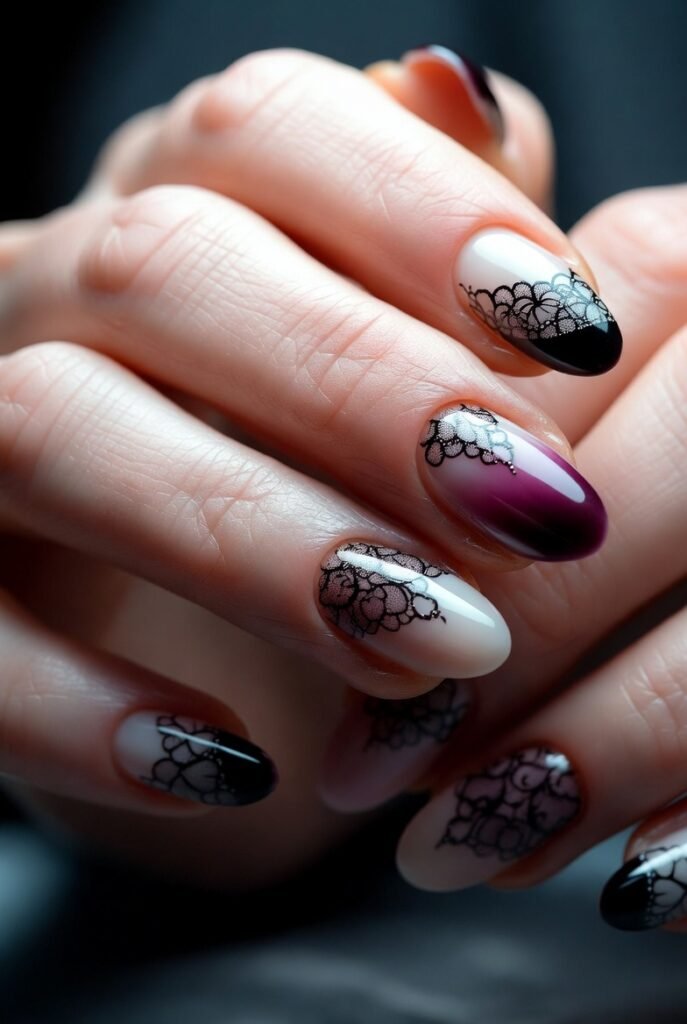
Introducing a secondary color like deep burgundy or wine red into your black lace nails designs adds warmth and depth that pure black cannot achieve alone. Create an ombré effect on each nail, starting with burgundy at the cuticle and blending into black at the tip. Once the gradient is fully dry, stamp or paint white or silver lace over the entire nail. The light-colored lace pops against the dark gradient, mimicking the look of embroidered lace on a rich velvet gown. This combination is especially striking for autumn and winter events.
The psychological impact of red and black together is powerful—it signals confidence, passion, and a touch of danger. For a more subtle twist, use a sheer black tint over the burgundy base so the red glows through the lace openings. This layered technique requires patience between drying stages but pays off with a jewel-like finish that photographs beautifully. Avoid adding glitter or chrome powder, as those elements compete with the lace pattern’s intricate details.
White Lace on Solid Black Canvas
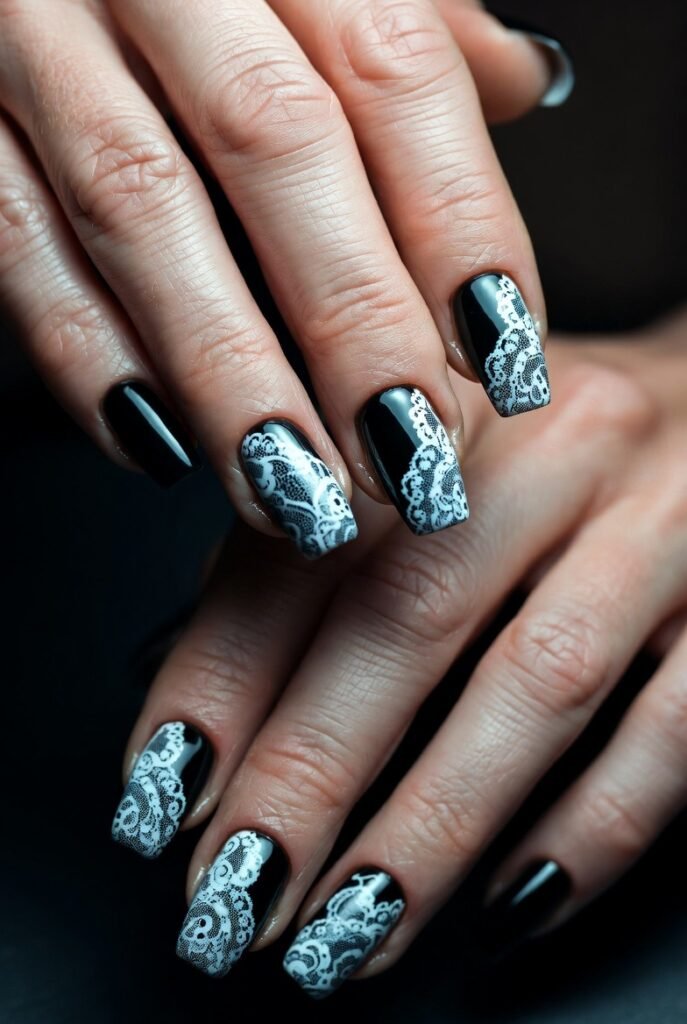
Sometimes the most iconic looks are also the simplest: white lace painted over a jet-black base. The high contrast between the two extremes makes every curl and loop of the lace pattern instantly readable from across the room. Use a creamy white polish and the thinnest liner brush possible to trace delicate florals and spiderwebs. The challenge is keeping the white lines opaque—you may need two passes over the same line once the first layer dries. This design demands steady hands, so resting your wrist on a table while painting is non-negotiable.
This version of black lace nails designs reads as both punk rock and princess, depending on the accessories you choose. Add tiny silver studs near the cuticle for an edgy feel, or place a single pearl in the center of each lace flower for a classic bridal look. Because the white can yellow over time if exposed to heavy UV light, always finish with a high-quality UV-blocking top coat. Reapply the top coat every three days to keep the white from fading to cream.
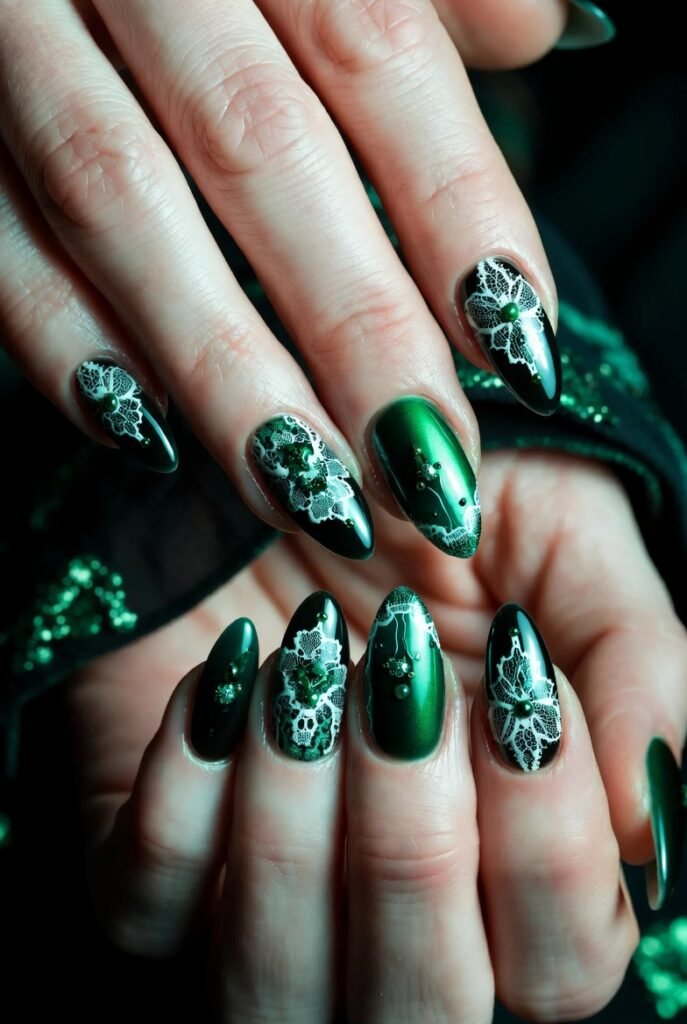
Emerald and Black Lace for a Jewel-Tone Statement
Move beyond the usual noir palette by introducing emerald green as an accent color within your lace design. Paint three nails in a deep, dimensional green with subtle shimmer, and the remaining two nails in solid black. Then, use a reverse stamping technique to apply black lace over the green nails and green lace over the black nails. This color swap creates a harmonious, curated look that feels luxurious and intentional. The green tones pick up any golden undertones in your skin, making the whole manicure glow.
This design is a favorite for holiday parties and milestone birthdays because it feels celebratory without relying on glitter or metallics. To enhance the jewel-like quality, apply a gel top coat and cure it under a lamp for mirror-level shine. Keep the nail shape either ballerina or stiletto to emphasize the richness of the colors. When choosing your emerald polish, avoid neon or pastel versions—stick to a true, dark jewel tone so it reads as elegant rather than costume-y.
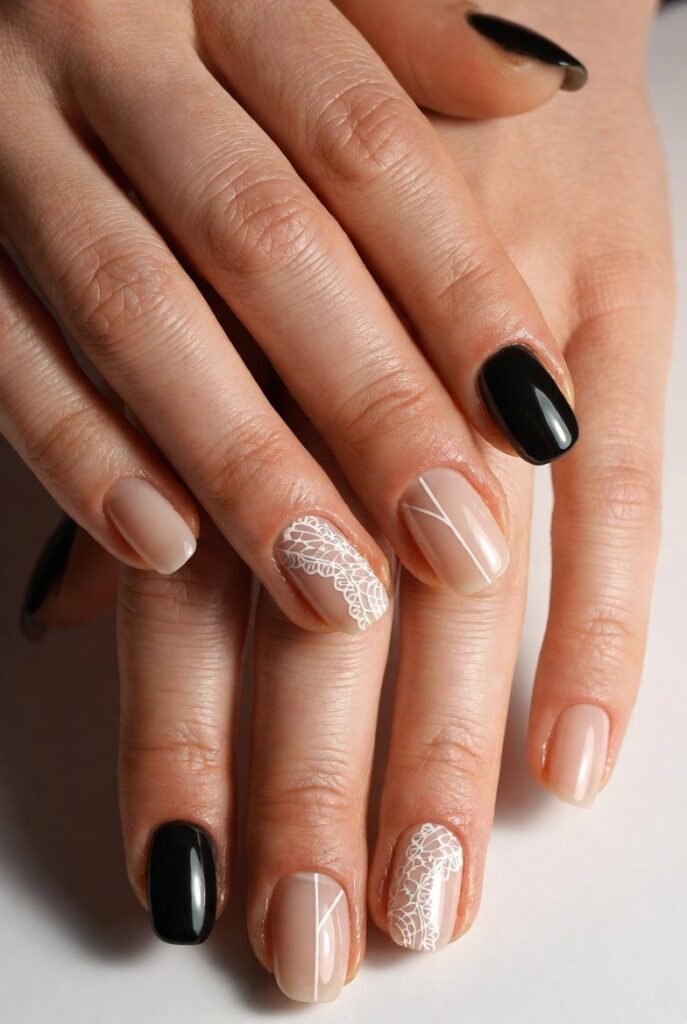
Minimalist Single-Stroke Lace on Ring Fingers
Not every black lace nail design needs to cover every inch of every nail. For a breath of fresh air, paint all your nails in a simple translucent gray or taupe, then reserve the lace pattern exclusively for your ring fingers. On those accent nails, paint a single, long-stemmed lace motif that runs vertically from cuticle to tip, like a runner bean vine. Keep the rest of the accent nail bare or in a sheer wash of color. This minimalist approach gives you the lace aesthetic without the time commitment of full-coverage art.
The beauty here is in the asymmetry. Your other nails serve as quiet neutrals, so the lace accent becomes a delightful surprise rather than an overwhelming pattern. This style works particularly well in professional settings where full dark nails might be frowned upon. It also makes touch-ups easier—if the lace smudges, you only have two nails to redo. Pair this with round or squoval nails to keep the overall impression soft and feminine. A final coat of quick-dry spray will seal the fine lines instantly.
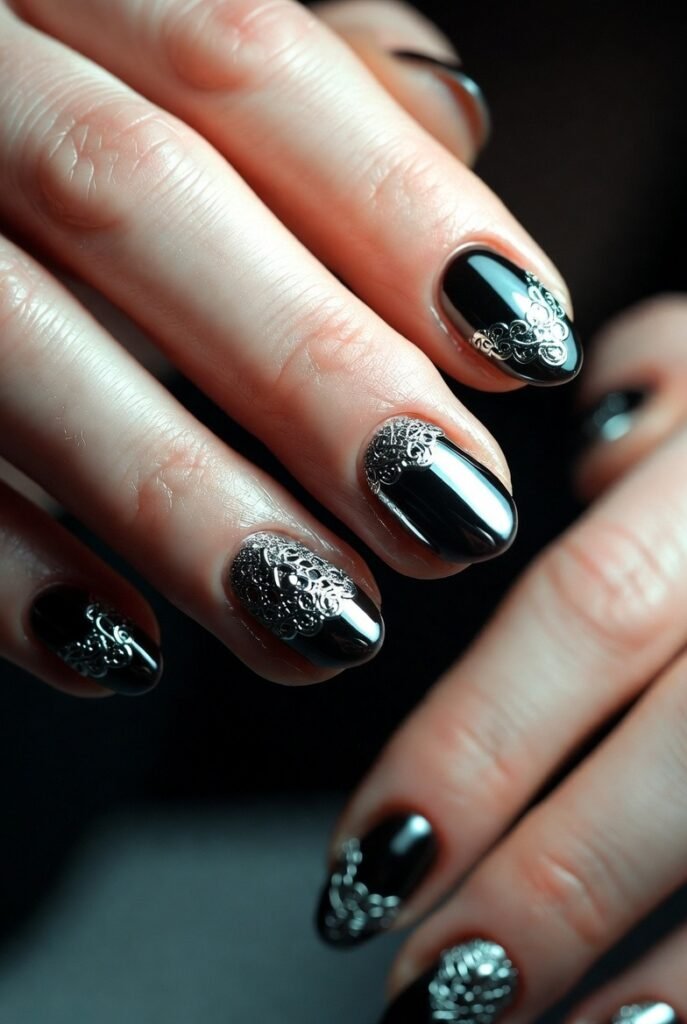
Silver Lace Filigree on Black Chrome Base
Combine two high-impact finishes by starting with a black chrome or mirror-shine base, then layering silver lace filigree on top. The chrome base reflects light like a disco ball, while the silver lace adds intricate, old-world detailing. This juxtaposition of futuristic shine and vintage pattern creates a manicure that looks like it belongs in a sci-fi film about Victorian vampires. To achieve the chrome effect, use a black gel polish and rub in chrome powder before curing. Then, paint the silver lace using a metallic acrylic paint for better control.
Because this design is so visually busy, limit the lace to just two or three swirls per nail rather than full coverage. The high shine of the chrome will already draw attention, so the lace serves as an accent rather than the main event. This is one of the few black lace nails designs that actually looks better on shorter nails, as the chrome reflection is more concentrated. Seal everything with a no-wipe gel top coat to prevent the chrome from dulling.
Blood Red Lace Veins Over Black
For a truly daring take, paint your nails in a pitch-black creme, then use a deep blood red to paint lace patterns that resemble veins or organic root systems. The red should be slightly translucent so it looks like it’s glowing from within the black. This design leans into gothic horror aesthetics, making it perfect for Halloween parties or rock concerts. However, when done with precision, it can also read as high fashion—think Alexander McQueen runway looks. The key is keeping the red lines thin and random rather than perfectly symmetrical.
Wear this manicure with stiletto nails to accentuate the sharp, dangerous vibe. The red lace will appear to crawl up from the tip toward the cuticle, creating a directional flow that feels alive. Because red and black are both high-contrast against fair skin, this design also looks stunning on deeper skin tones where the black may blend more. To avoid looking like a special-effects makeup test, ensure your red lace lines stay elegant—no splatters or chaotic tangles. A satin top coat will soften the overall effect.
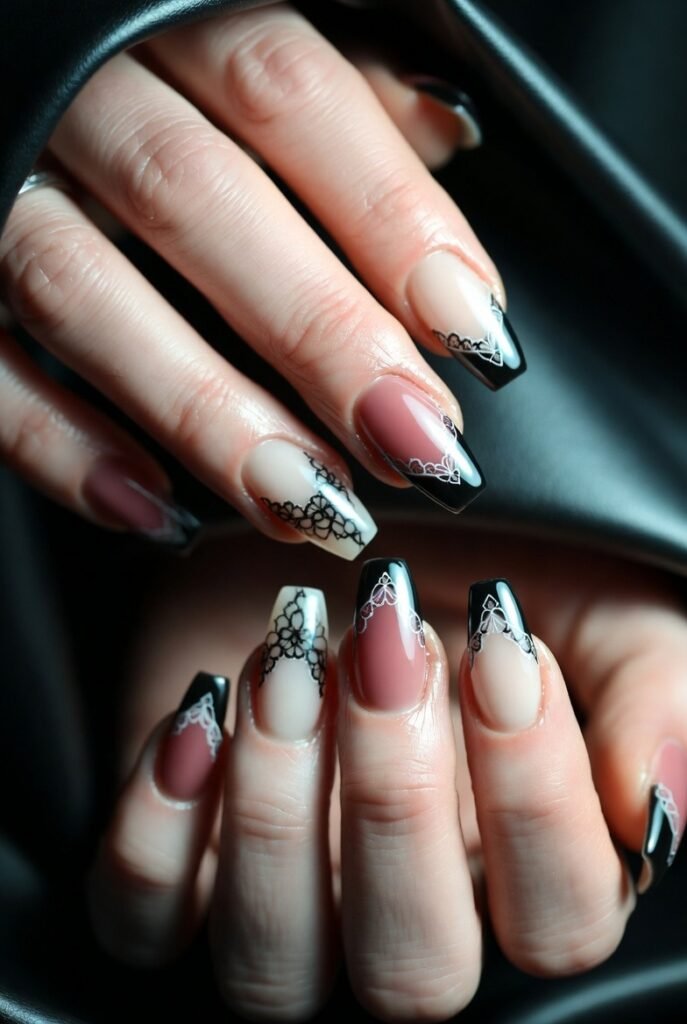
Dusty Rose and Black Lace on Coffin Nails
Softening the drama of black lace nails designs is as easy as introducing a dusty rose or mauve base. Paint all nails in a muted, grayish-pink that feels modern and moody rather than bubblegum sweet. Then, use a small detail brush to paint black lace only on the lower third of each nail, near the cuticle, leaving the rest of the nail clean. This placement mimics the look of lace trim on a blouse cuff, delicate and refined. The coffin nail shape provides a flat, wide canvas that shows off every lace detail perfectly.
This combination is ideal for bridesmaids or brunch dates because it is romantic without being saccharine. The dusty rose warms up the black lace, making it feel approachable rather than severe. If you have trouble painting freehand, use a lace nail stencil and dab black polish through it with a makeup sponge for a soft, diffused edge. Finish with a pearl-finish top coat to add a subtle iridescence that catches the light without competing with the pattern.
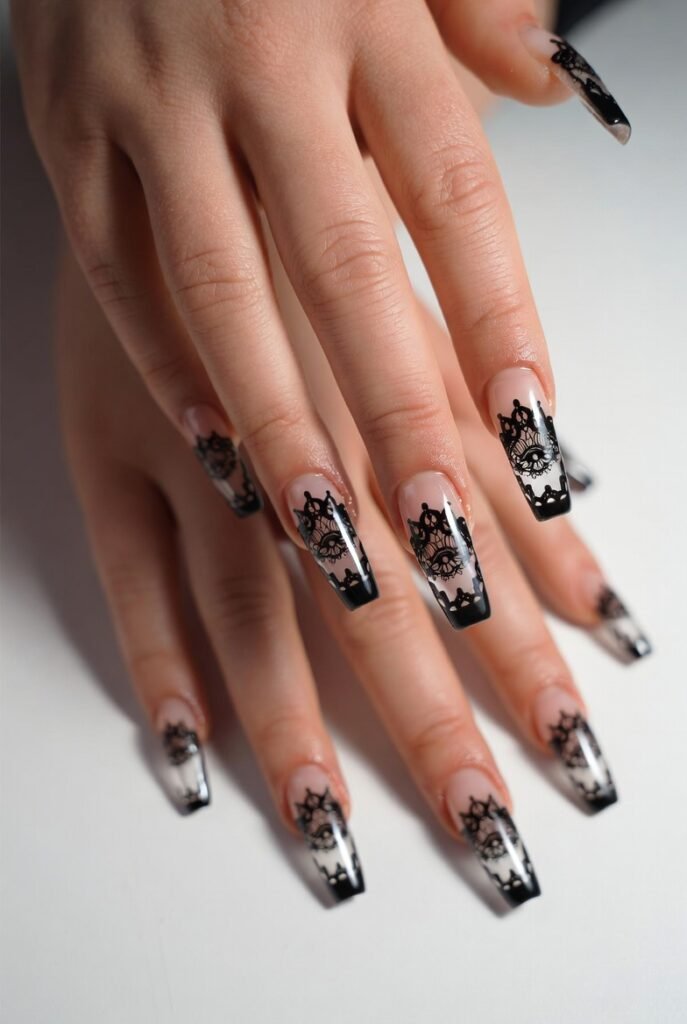
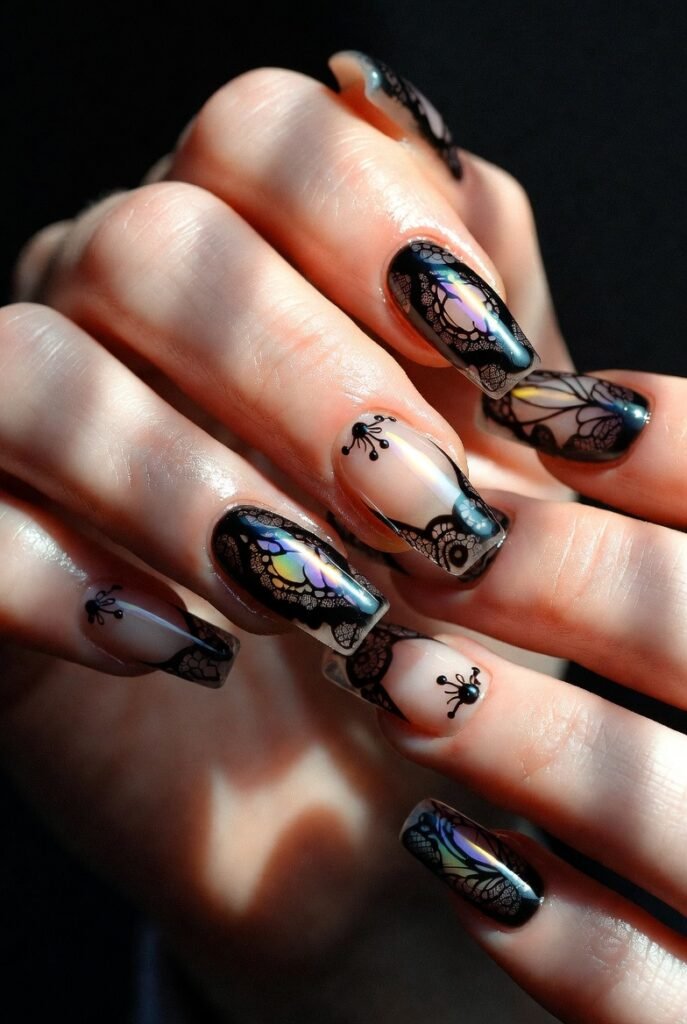
Black Lace Tips on Clear Acrylic Extensions
When you want maximum length and drama, clear acrylic extensions provide the perfect canvas for floating black lace tips. Keep the entire nail clear except for the very tip, where you encapsulate a piece of real lace or a detailed lace decal inside the acrylic. This creates a 3D effect where the lace appears to hover inside the nail like a preserved specimen. The clear base makes your natural nail bed visible, so the manicure looks almost ethereal. This technique requires a skilled nail technician because encapsulating materials without bubbles is challenging.
The advantage of this design is longevity. Because the lace is sealed inside acrylic, it will never chip or fade. You can also combine multiple lace colors in one tip, like black and silver layered together. Wear these with extra-long stiletto or almond shapes for a truly editorial look. Keep the rest of your outfit minimal—these nails are a conversation starter all on their own. To maintain clarity, avoid acetone-based removers and always use a gel-based top coat over the acrylic.
Asymmetrical Lace on Mismatched Nude Tones
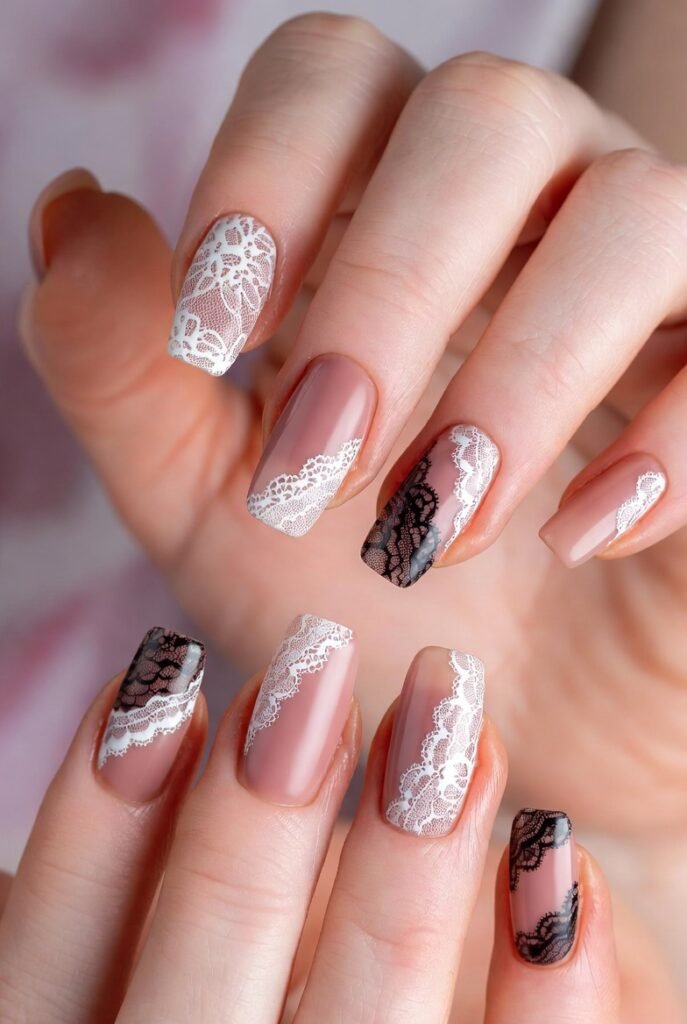
Break the rules of symmetry by painting each nail a slightly different nude tone—one nail in beige, another in tan, a third in peach, and so on. Then, paint a small black lace motif on each nail, but place the lace on a different side of every nail. Some nails get lace on the left edge, others on the right, and a few centered at the tips. This chaotic but curated approach makes your black lace nails designs feel modern and artistic. It also cleverly hides any mistakes, since asymmetry is the goal.
This style works beautifully for creative professionals or anyone tired of matchy-matchy manicures. The varied nude bases ensure the black lace stands out on each nail without clashing. To keep the look cohesive, use the exact same lace pattern across all nails—just change the placement. A suede-effect matte top coat will mute the nudes and make the black lace appear softer. Apply cuticle oil daily to keep the different nude polishes from emphasizing dry skin around the edges.
Violet Velvet Lace with Black Outline
Combine texture and color by using a velvet-effect magnetic polish in deep violet as your base. After magnetizing the polish to create a cat-eye effect, paint a thick black outline of a lace pattern over the top. The velvet base catches light from within, while the black lace outlines sit on the surface like a window frame. This 3D effect is mesmerizing, as the lace seems to float above a sea of shifting purple shimmer. Magnetic polishes work best on round or oval nails where the curve of the nail reflects the magnetic particles evenly.
This design is surprisingly versatile—the violet base can lean cool or warm depending on the angle, while the black lace keeps it grounded. For an evening out, add a single black rhinestone at the center of each lace flower. Avoid using a regular top coat over magnetic polish until the pattern is fully set, or you’ll disrupt the velvet effect. A no-touch curing lamp with a low heat setting will lock in the magnetism without burning your fingers.
Holographic Lace Over Blackened Tips
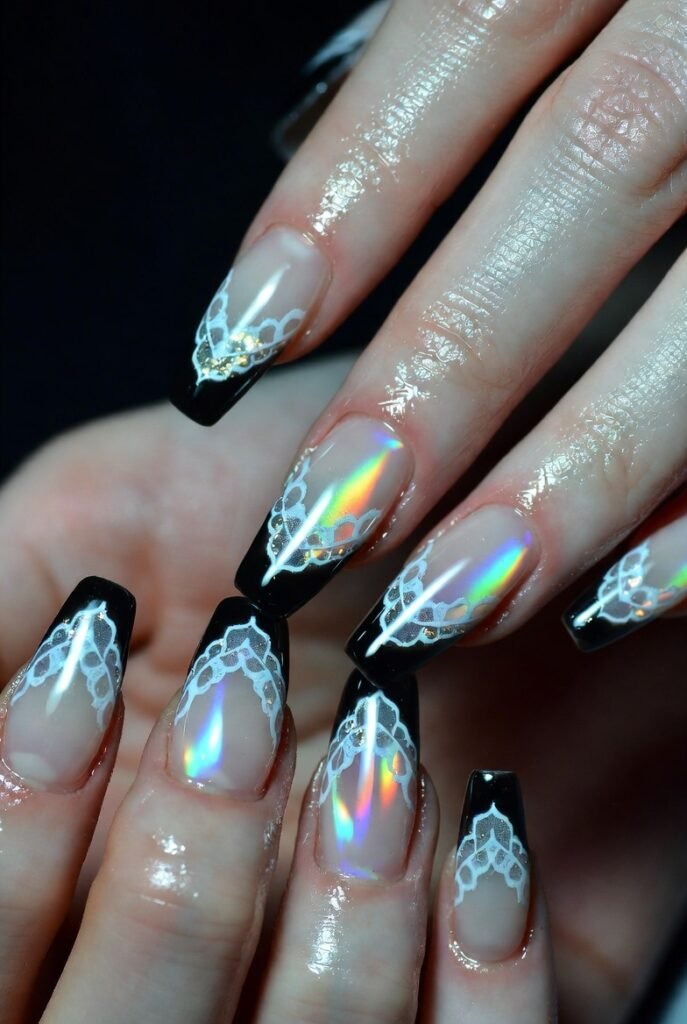
For a festival-ready or club-friendly look, paint your nails with a blackened base that has subtle green or blue undertones. Then, use a holographic silver polish to paint the lace pattern, but only on the top half of each nail. The holographic particles will catch every light source, flashing rainbow colors against the dark background. This version of black lace nails designs is pure energy—it moves and changes as you gesture. The key is using a holographic polish with fine particles so the lace pattern remains recognizable.
This design thrives on long, stiletto nails where the light-catching surface area is maximized. To prevent the holographic effect from overwhelming the lace shape, outline each lace loop with a thin line of black polish first, then fill with holographic. This creates a stained-glass effect. Seal with a thick gel top coat to smooth over any texture from the holographic particles. Wear these nails to concerts, pride events, or anywhere you want to be seen from across the room.
Black Lace Waterfall on Nude Ombré
The final design in our collection is the black lace waterfall—a vertical cascade of lace loops running down the center of each nail. Start with a nude-to-white ombré gradient that is lightest at the tips and darkest at the cuticles. Then, using a fine brush, paint a single continuous line of connected lace ovals from the cuticle straight down to the tip, like dripping water. This elongates the nail visually, making short nails appear longer and long nails appear elegant. Leave the sides of each nail completely bare.
This minimalist lace pattern is the easiest to freehand for beginners, as you’re only drawing one vertical line of repeated shapes. The nude ombré underneath keeps the overall look soft, so the black lace stands out as the main feature. Finish with a glossy top coat to blend the ombré seamlessly. This is the perfect everyday black lace nail design for women who want something edgy but professional. Reapply top coat every two days to prevent the ombré from separating.
Gold Lace Filigree on Deep Black Base
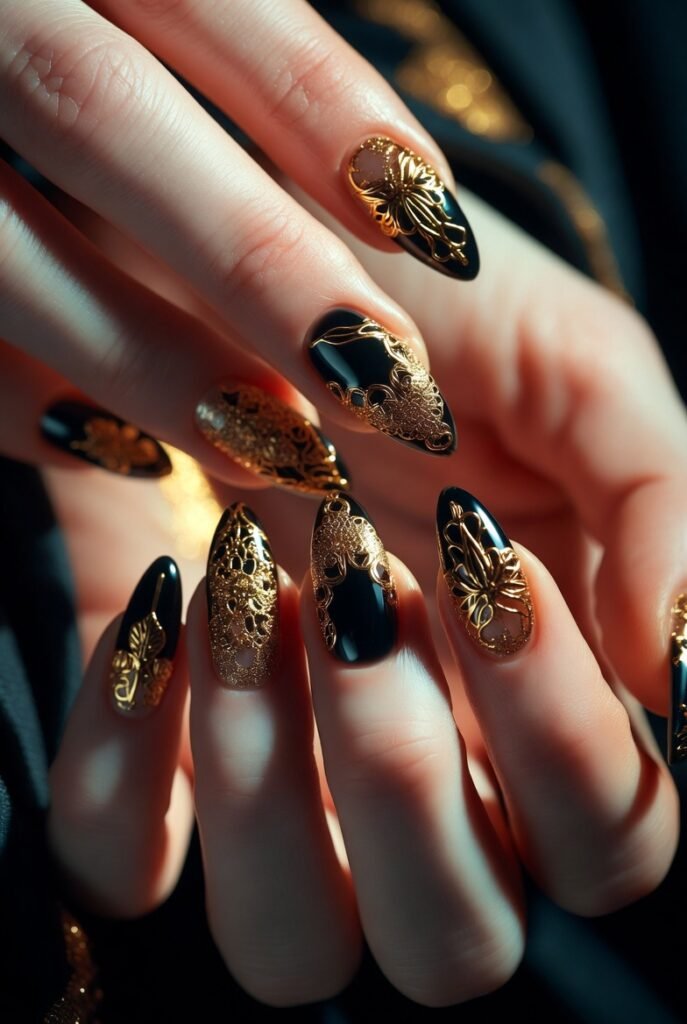
Nothing says luxury quite like the combination of black lace nails designs with gold filigree accents. Start with a deep, pitch-black creme polish that provides a flawless, velvety canvas. Then, using a fine detail brush or a stamping plate, paint intricate gold swirls and loops that mimic the look of antique metalwork. The warmth of the gold against the cold black creates a regal, almost royal aesthetic that elevates any evening gown or cocktail dress. This design is especially stunning during the holiday season or for black-tie events where you want your hands to look as polished as your jewelry.
The secret to making gold lace pop is layering. Apply a thin gold base for the lace pattern first, let it dry completely, then go over the same lines with a metallic gold that has larger shimmer particles. This two-step process gives the lace depth and dimension, catching light from different angles. To avoid a muddy look, never mix yellow gold with white gold accents on the same nail. Keep all the lacing in the same warm or cool gold family. A high-gloss gel top coat will seal the design and make the gold reflect like a mirror.
Ombre Black to Grey with White Lace
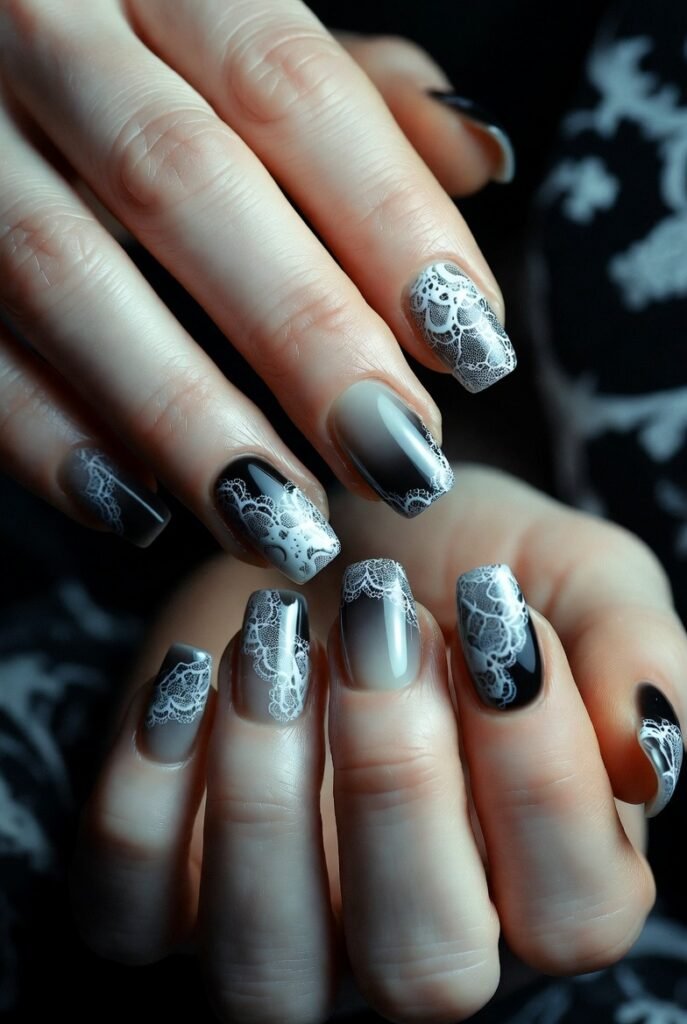
For a softer, smoky interpretation of black lace nails designs, create an ombre effect that fades from solid black at the cuticle to a soft dove grey at the tip. This gradient alone is already elegant, but adding white lace over the entire nail transforms it into a misty, ethereal masterpiece. The white lace stands out most vividly against the black portion of the nail, then gradually becomes more subtle as it reaches the grey tip, creating a fading illusion. This design works beautifully on almond or oval nails where the curved shape enhances the gradient.
The emotional effect of this manicure is one of mystery and quiet confidence. It is less aggressive than full black lace but far more interesting than a standard grey polish. To achieve a seamless ombre, use a sponge gradient technique with a latex barrier around your nails. Once the ombre is dry, stamp or paint your white lace pattern, keeping the lines thinner near the cuticle and slightly thicker toward the tip for balance. Finish with a matte top coat to give the whole look a chalky, artistic finish that feels modern and sophisticated.
Black Lace with Crimson Rose Accents
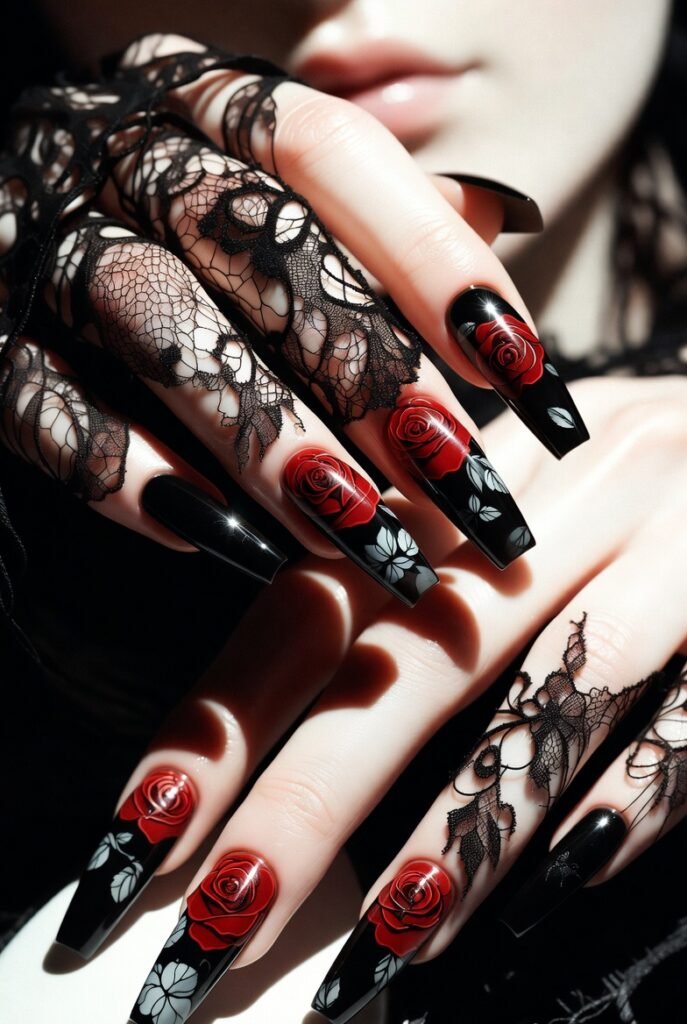
Combine two romantic motifs by pairing black lace nails designs with hand-painted crimson roses. Paint your base in a sheer black tinted polish that looks almost like darkened glass. Then, on each ring finger and thumb, paint a single, detailed red rose surrounded by delicate black lace vines. On the remaining nails, stick to pure black lace over the sheer base. The contrast between the organic, velvety rose petals and the geometric, repetitive lace pattern creates visual tension that is both dramatic and beautiful.
This design tells a story of passion and restraint, making it perfect for date nights or anniversary celebrations. The red roses should be painted with a small round brush using a layering technique—start with a dark red base, add a medium red middle layer, and finish with bright red highlights. The surrounding black lace vines should be thinner than the rose petals so they don’t compete for attention. A glossy top coat will make the roses look wet and fresh, while the lace remains crisp. Avoid adding green leaves, as they distract from the black and red color story.
Black Lace Negative Space Half-Moons
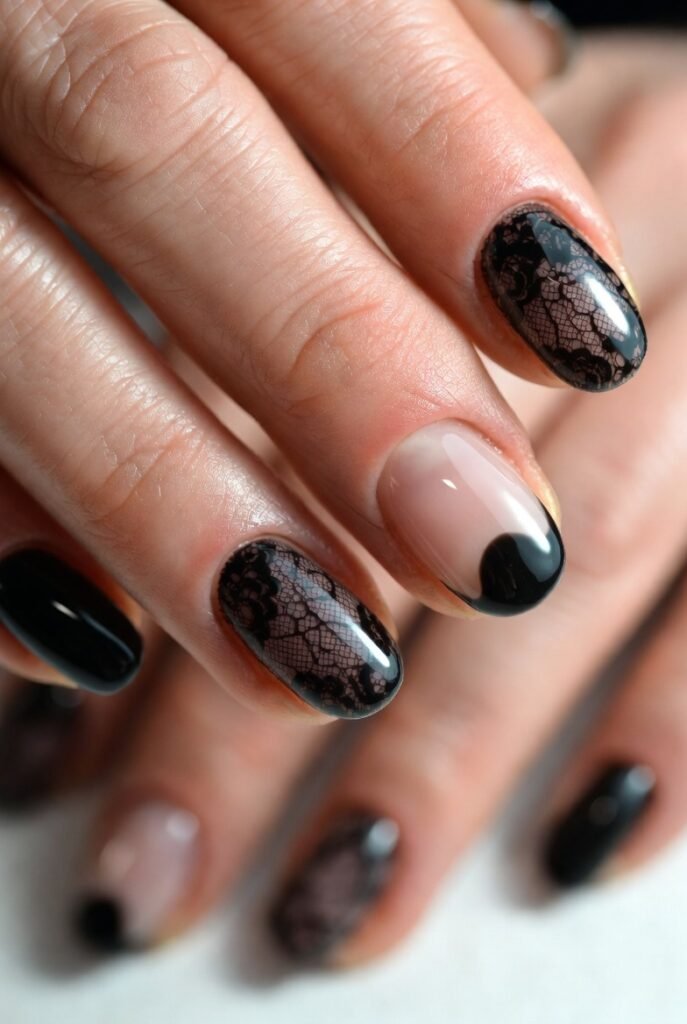
Revisit the negative space trend with a unique half-moon twist on black lace nails designs. Leave the crescent area near your cuticle completely bare, revealing your natural nail. Paint the rest of the nail in a solid black polish, then cover the black portion with a delicate white or silver lace pattern. The bare half-moon acts as a visual breather, preventing the design from feeling too heavy or overwhelming. This placement also draws attention to your nail bed shape, so keep your nails filed in a uniform squoval or round shape for the most flattering effect.
The genius of this design is how it makes black lace feel fresh and modern rather than gothic. The exposed half-moon mimics the look of a reverse French manicure, grounding the drama of the lace in something familiar. Because the lace only covers the top two-thirds of the nail, you use less polish and spend less time on intricate details. To keep the bare half-moon looking clean, apply a latex peel-off barrier around your cuticles before painting. A satin top coat over the entire nail will unify the bare and painted sections without adding unwanted shine.
Silver Holographic Lace on Navy Black Base
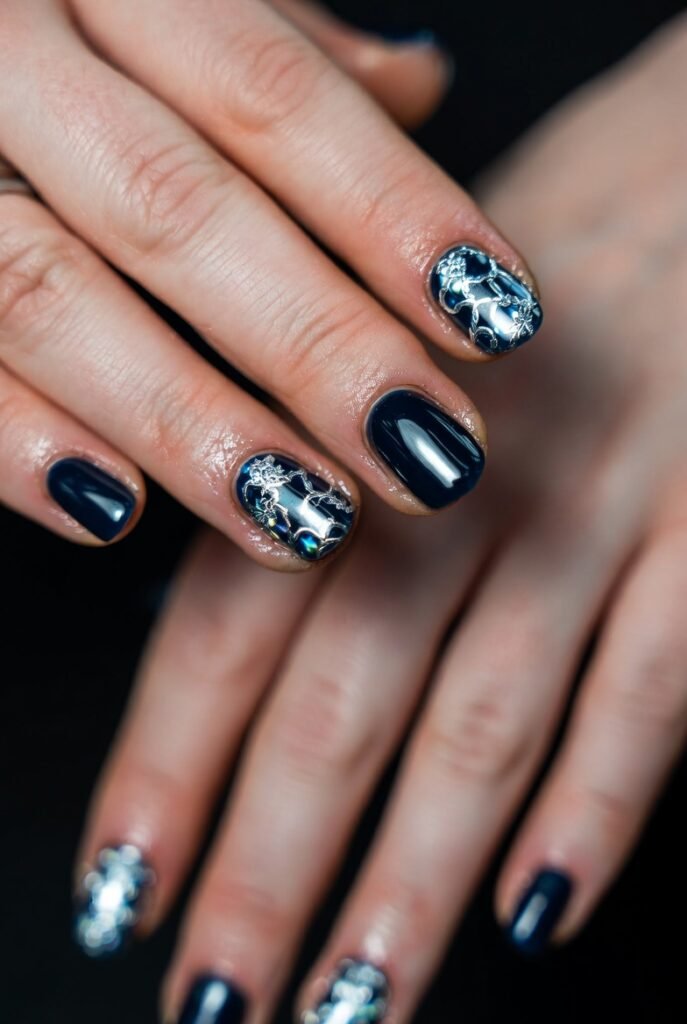
Step away from true black and into the deep, inky depths of navy black—a shade so dark it reads as black but reveals blue undertones in direct light. Over this base, paint your lace pattern using a silver holographic polish that scatters rainbow sparks. The combination of navy blue darkness and rainbow-flecked silver creates a celestial, starry-night effect that feels magical and otherworldly. This is one of those black lace nails designs that looks different every time you move your hands, keeping people guessing.
This manicure excels in club lighting or anywhere with multiple colored light sources. The holographic particles will catch red, blue, and green light, making your nails appear to change color. To maximize the effect, apply the holographic lace in thicker, bolder strokes rather than ultra-fine lines—the larger surface area reflects more light. Pair this design with coffin or stiletto nails to give the holographic elements more space to dance. A no-wipe gel top coat ensures no dulling of the holographic finish, keeping every sparkle razor-sharp.
Black Lace Over Blood Orange Base
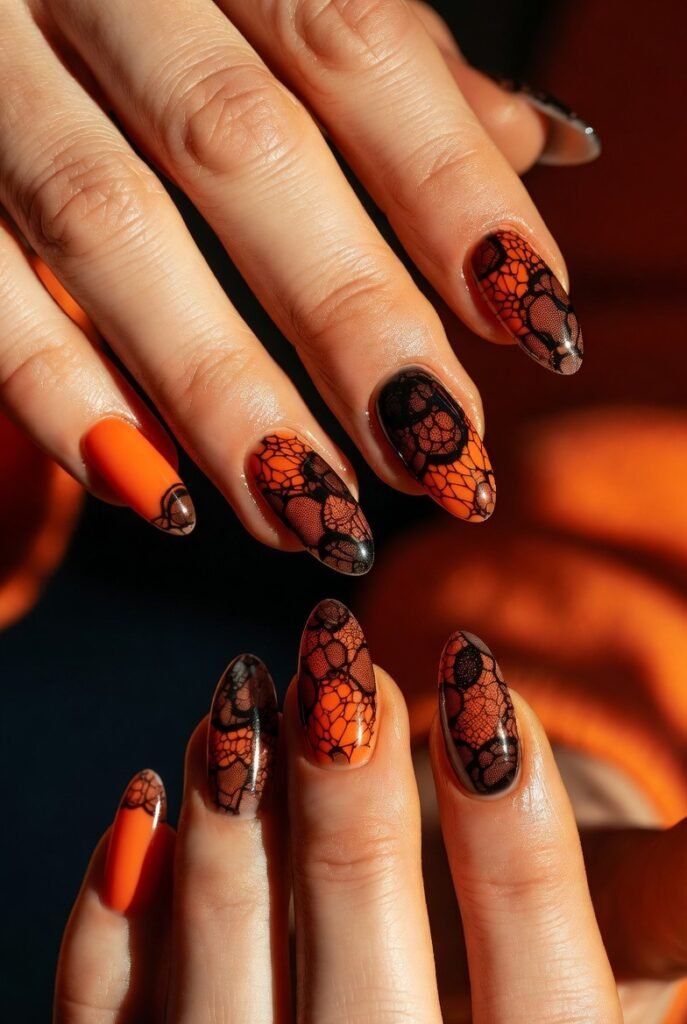
For a bold, unexpected color combination, paint your nails in a vibrant blood orange creme that practically glows against your skin. Then, add black lace over the entire nail, using a medium-thick line weight so the pattern is clearly visible. The warm, fiery orange underneath transforms the black lace from something gothic into something tropical and daring. This pairing is perfect for summer vacations, music festivals, or any time you want to break free from traditional dark nail expectations.
The psychological impact of orange and black together is energetic and playful, unlike the serious romance of red and black. To keep the design from looking like Halloween, choose an orange with red undertones rather than yellow ones—think burnt orange or terracotta rather than pumpkin. Apply the black lace using a stamping plate for consistent results, as freehand lines can get lost against such a bright base. A glossy top coat will make the orange glow from underneath the lace, creating depth and richness. Finish with a tiny gold dot in the center of each lace flower for a polished, expensive look.
White Lace Veil Over Black with Crystal Drops
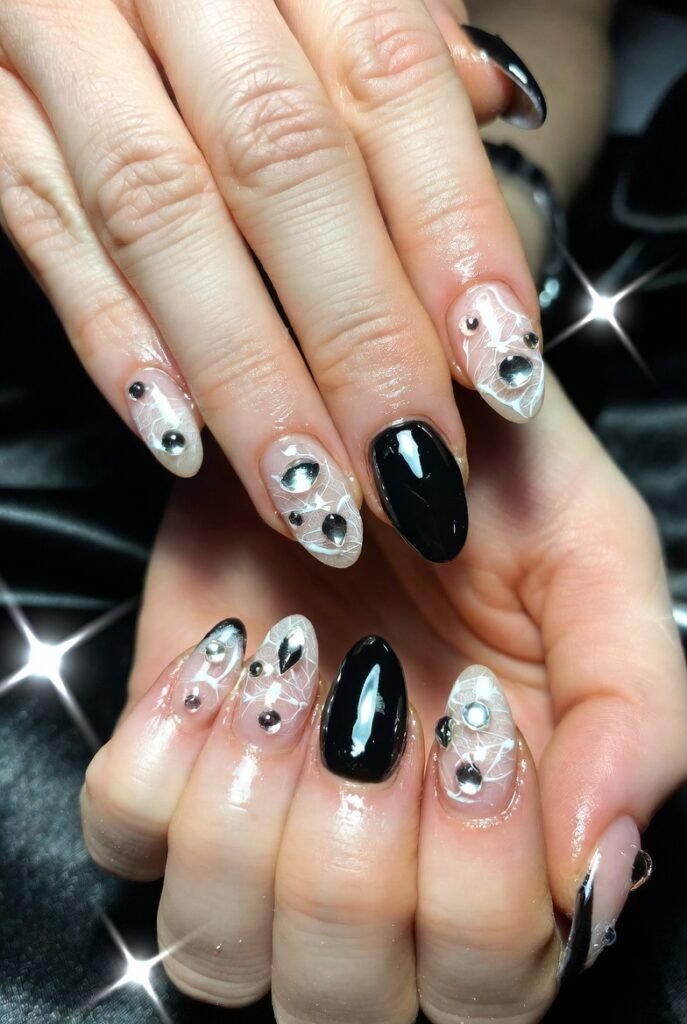
Elevate simple black lace nails designs into something truly bridal or red-carpet worthy by adding crystal drops to the lace pattern. Start with a solid black base, then paint an extremely fine white lace pattern across all nails. Once the lace is dry, use nail glue and tiny clear crystals or Swarovski flatback gems to place a single crystal at every intersection of the lace web. The crystals catch light like dewdrops on a spiderweb, adding a three-dimensional, luxurious texture that cannot be achieved with polish alone.
This design is not for everyday wear, but it is stunning for weddings, galas, or milestone birthdays. The white lace alone against black is already striking, but the crystal drops take it into heirloom territory. Because the crystals add physical height, you must apply a thick gel top coat over everything to seal the gems and prevent snagging on clothing. Use a wax pencil to place each crystal precisely, and work on one nail at a time so the glue does not dry before you finish. Expect this manicure to take two to three hours, but the results are absolutely worth it.
Muted Teal and Black Lace Combo
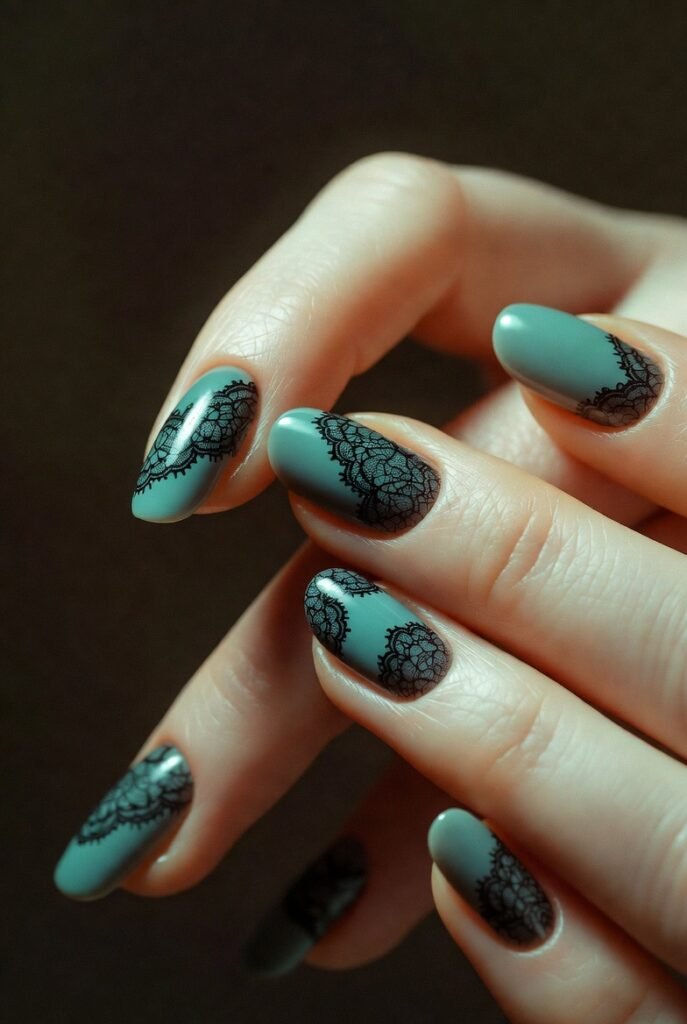
For those who love color but shy away from brightness, a muted teal base offers the perfect compromise. Choose a teal that is heavily grayed-down, almost dusty in appearance, sitting somewhere between sage green and slate blue. Paint all nails in this sophisticated, subdued hue, then add black lace only on the middle finger and ring finger of each hand. The teal provides a cool, calming backdrop that makes the black lace feel intentional rather than aggressive, like charcoal drawing on tinted paper.
This version of black lace nails designs is incredibly wearable for office environments or conservative settings where black alone might feel too harsh. The teal reads as professional and creative at the same time, signaling confidence without shouting. To enhance the dusty quality of the teal, apply a matte top coat over everything, which also softens the black lace so it blends rather than cuts sharply. Keep your nail shape round or squoval to reinforce the gentle, approachable vibe. A single coat of cuticle oil buffed into the skin around your nails will complete this understated, elegant look.
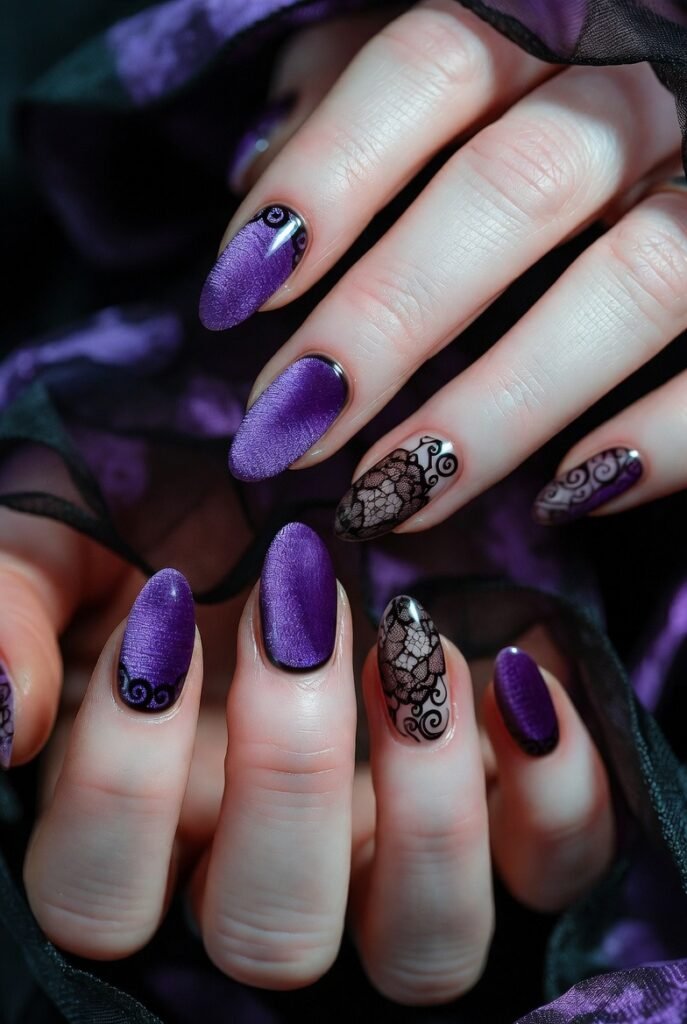
Purple Velvet Black Lace on Stiletto Nails
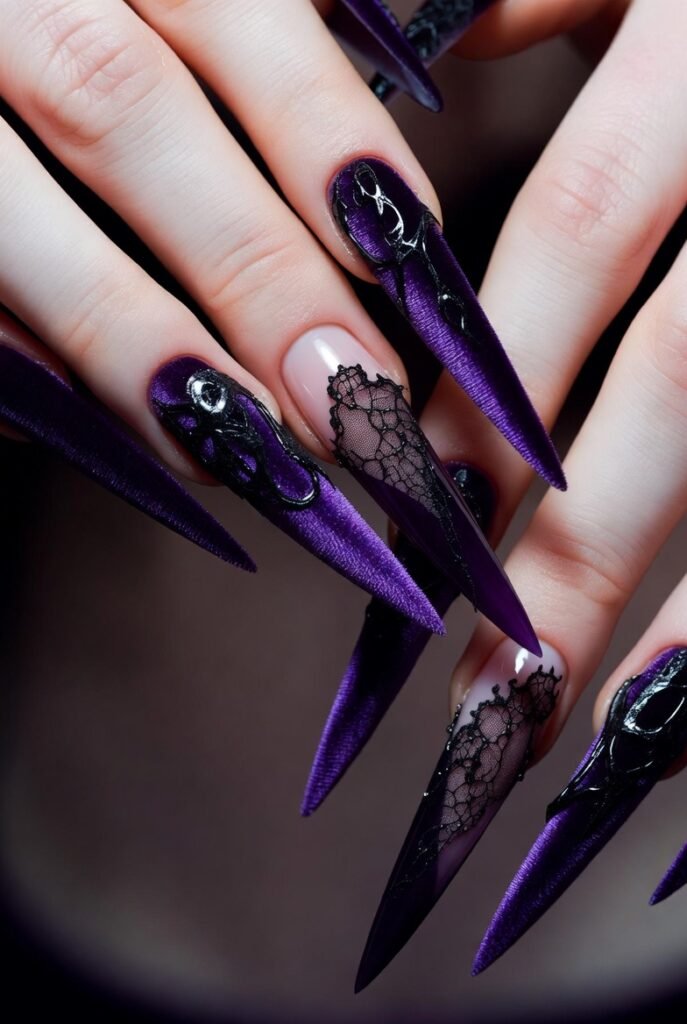
Combine two showstopping trends—velvet nails and black lace—into one unforgettable manicure. Start with a purple velvet magnetic polish in a deep, royal aubergine shade. Use a strong magnet to create a cat-eye effect that shifts as you tilt your hand. Once cured, paint black lace over the velvet base, but keep the lace pattern sparse and large-scale so the velvet shimmer still shows through. The stiletto nail shape provides the perfect sharp, dramatic canvas for this regal combination, mimicking the look of a velvet gown trimmed in black lace.
The texture contrast here is everything. The velvet base has a soft, diffused shimmer, while the black lace is crisp and flat. Together, they create a manicure that feels both opulent and edgy. To prevent the lace from overwhelming the velvet, use a stamping plate with a very open, airy pattern rather than a dense, tightly packed one. Apply a matte top coat to the black lace only, leaving the velvet base glossy, or vice versa—either choice emphasizes the contrast. This design demands long stiletto nails to show off both elements properly, so consider extensions if your natural nails are short.
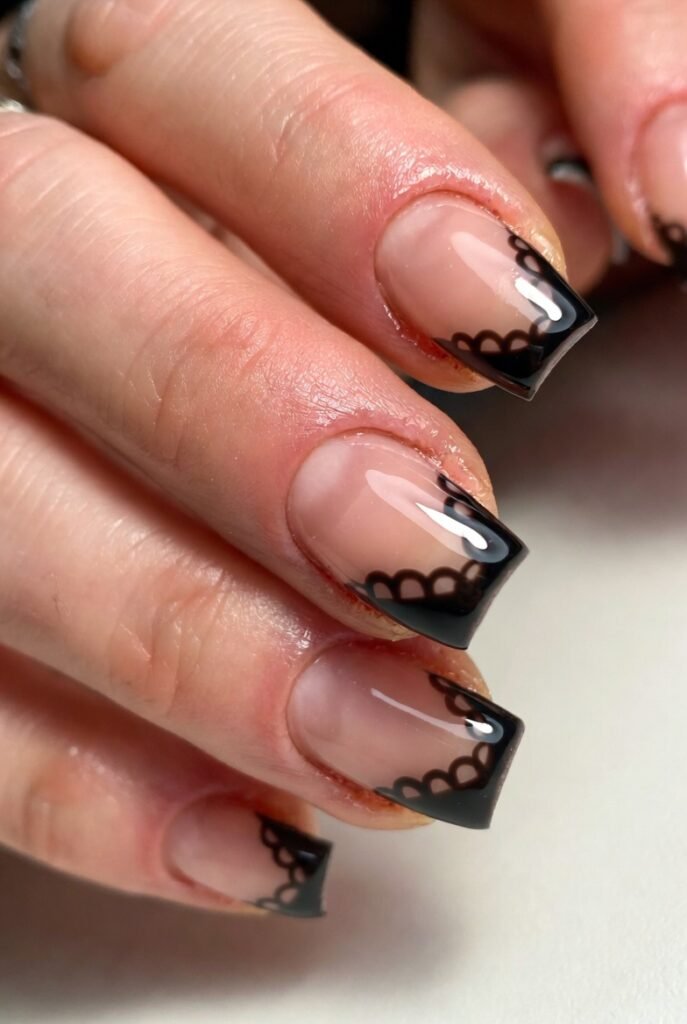
Black Lace French Fade on Short Nails
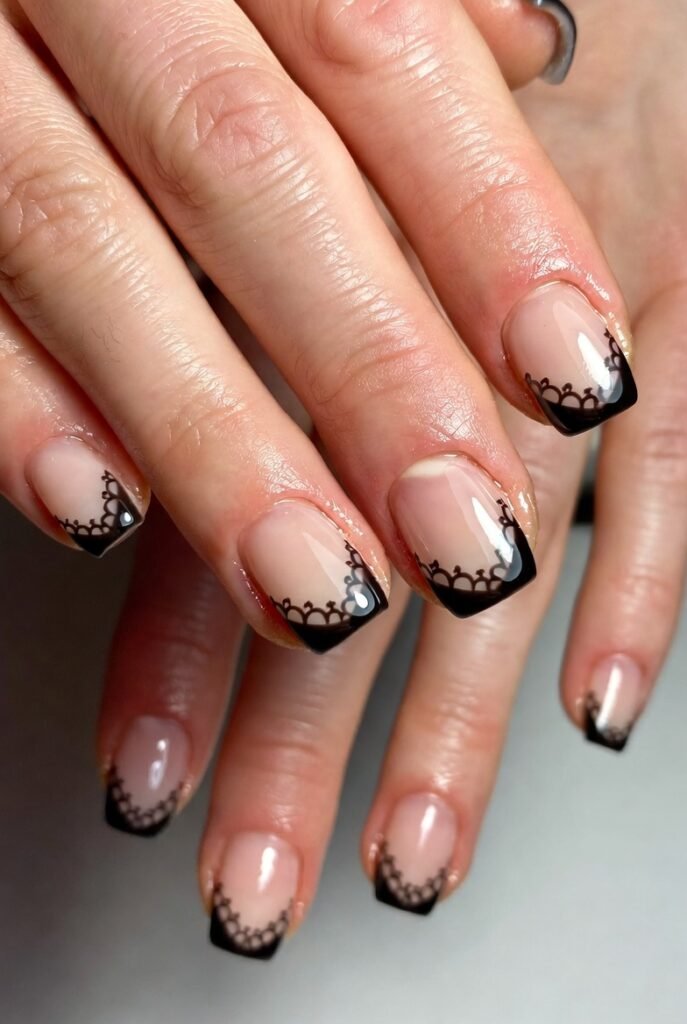
Prove that black lace nails designs work beautifully on short nails with the French fade technique. Instead of a traditional French tip, create a soft, diffused black fade that starts opaque at the free edge and gradually becomes sheer toward the cuticle. Over this faded black tip, paint a delicate white or silver lace pattern that lives entirely within the opaque black zone. The sheer portion of the nail remains completely bare or with a single coat of nude polish. This placement respects the proportions of short nails, keeping the design from looking cramped or busy.
The beauty of this approach is its practicality. Short nails chip less often, and the sheer base means regrowth is invisible for weeks. The lace pattern, confined to just the tips, acts as a decorative trim rather than an overwhelming overlay. To achieve the French fade, use a makeup sponge to dab black polish onto just the tips, building opacity gradually. Then, use a fine-liner brush to paint tiny lace scallops along the edge where the black meets the sheer. A glossy top coat will blend the fade seamlessly and make your short nails look polished and expensive.
Black Lace and Pearl Embellishments
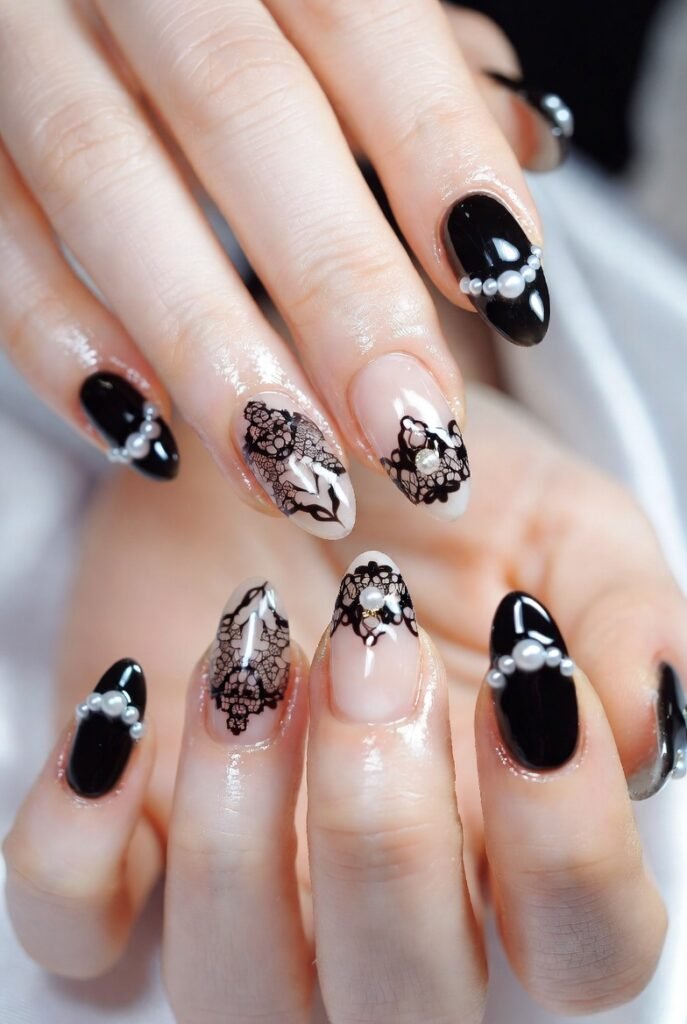
For a design that whispers vintage glamour, pair black lace nails designs with pearl embellishments instead of crystals. Paint your nails in a sheer, milky white base that mimics the color of natural pearls. Then, paint black lace in a large, looping pattern that leaves plenty of empty space. Finally, using nail glue, attach small half-pearl beads at the intersections of your lace pattern. The combination of soft, iridescent pearls against stark black lace creates a 1920s flapper vibe that is romantic, nostalgic, and utterly feminine.
This design is perfect for bridal showers, engagement parties, or any event where you want to feel like old Hollywood royalty. The pearls should be placed sparingly—no more than three per nail—to avoid looking cluttered. Use half-pearls rather than round ones, as they sit flatter against the nail and snag less on hair and clothing. Seal the pearls in place with a drop of gel top coat around each one, but avoid coating the pearl itself, which can dull its luster. Pair this manicure with a round or oval nail shape to reinforce the soft, romantic feel.
Crimson and Black Lace Negative Space
Return to negative space but with a crimson twist on black lace nails designs. Leave the center of each nail completely bare, exposing your natural nail in a vertical stripe. Paint the left side of the nail in crimson red and the right side in solid black. Then, paint a single continuous lace pattern that starts in the red zone, crosses over the bare negative space stripe, and finishes in the black zone. The lace acts as a bridge between the two colors, unifying them into a single cohesive design.
The drama of this manicure comes from the tension between the passionate red, the stark black, and the vulnerable bare nail. It is a design that demands attention and works best on long almond or coffin nails where there is enough surface area for the lace to cross the negative space without breaking. Use a stamping plate for the lace to ensure the pattern remains consistent across the color boundary. A glossy top coat over everything, including the bare nail stripe, will protect your natural nail and make the colors pop. Avoid this design if your natural nails are stained or uneven, as the bare stripe will expose every imperfection.
Black Lace Stained Glass with Cellophane
Push the boundaries of black lace nails designs by incorporating cellophane flakes for a stained glass effect. Paint your nails in a clear or sheer black-tinted base. While wet, press small pieces of iridescent cellophane into the polish, creating a patchwork of colors. Once dry, paint a thick, bold black lace pattern over the entire nail, using the lace lines to separate the cellophane pieces like lead in a stained glass window. The cellophane will catch light and flash pink, blue, and gold through the openings in the lace.
This avant-garde design is not for the faint of heart, but it is a guaranteed conversation starter. The cellophane flakes should be iridescent rather than holographic for a softer, more organic light play. Apply the lace using a liner brush with a steady hand, making the lines thick enough to visually separate the colors but thin enough not to overwhelm them. A thick gel top coat is mandatory here, as the cellophane pieces can have sharp edges. Expect to spend extra time filing and smoothing the surface before the top coat. Wear this design to art openings, themed parties, or anywhere creative expression is celebrated.
Black Lace Minimalist Lines on Sheer Pink
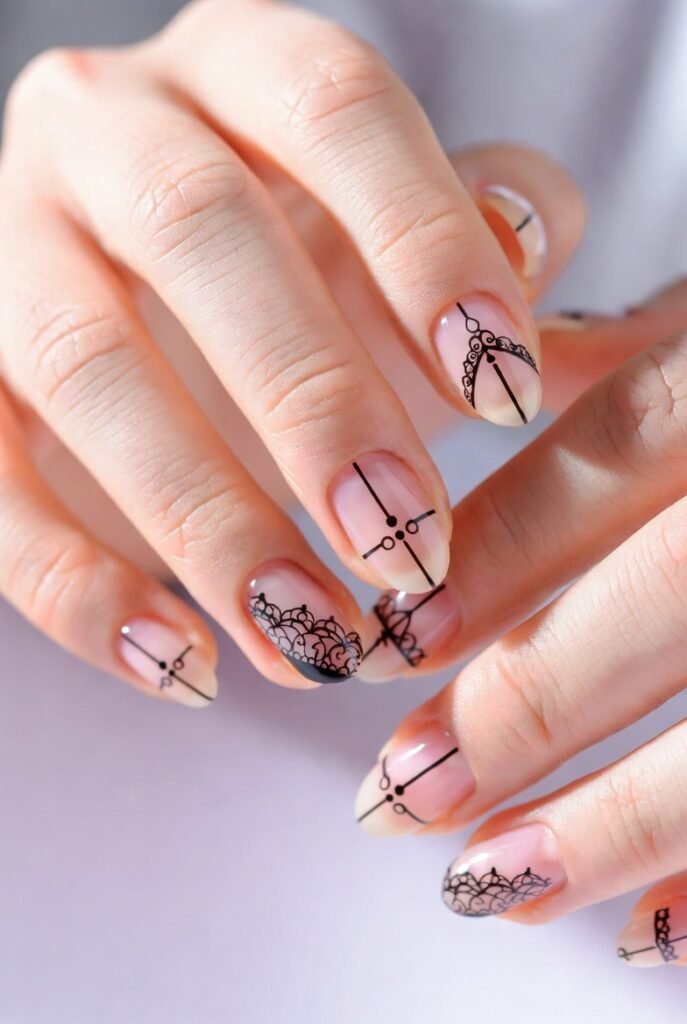
Circle back to simplicity with the most wearable version of black lace nails designs: minimalist black lines over a sheer pink base. Paint all nails in two coats of a translucent, jelly-like pink that lets your natural nail moon shine through. Then, instead of dense, elaborate lace, paint just three or four thin, curving black lines on each nail that suggest lace without fully depicting it. Leave most of the nail bare. The result is a whisper of lace, an implication rather than a declaration, perfect for minimalists who love the idea of lace but not the busyness.
This design proves that black lace does not have to be gothic or dramatic to be effective. The sheer pink base keeps the overall look fresh, young, and clean, while the minimalist black lines add just a touch of edge. Use a micron pen or the thinnest liner brush you own to achieve lines that are almost hair-fine. Keep the lines asymmetrical and organic—no two nails should have the exact same curve pattern. A glossy top coat will blend the lines into the sheer base and give your nails a healthy, just-manicured shine. This is the black lace nail design you can wear to a job interview, a family dinner, or a first date without worrying about judgment.
Conclusion
From velvety matte finishes to holographic pops of rainbow light, 16 black lace nails designs offer endless possibilities for self-expression. Whether you prefer the whisper-thin lines of a minimalist sheer pink look or the opulent drama of gold filigree on a jet-black base, there is a lace design here that fits your personality, your outfit, and your moment. The key is to embrace the contrast—soft meets sharp, romantic meets rebellious, delicate meets dark. So pick your favorite variation from this collection, book that nail appointment or pull out your detail brush, and let your nails do the talking. After all, a touch of black lace is never just a detail. It is a statement.