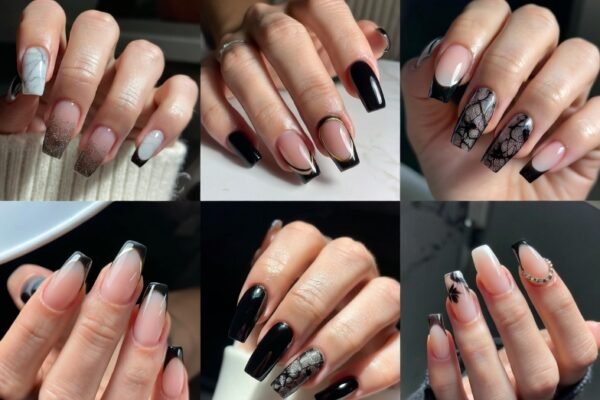
Tired of staring at the same neutral polish week after week? Your nails are tiny canvases waiting to tell a story, boost your mood, and even help you unwind. Exploring fresh creative nail designs doesn’t require a salon visit or hours of frustration. Instead, it’s about discovering small, joyful changes that make you glance at your hands and smile. Whether you want to banish boredom or simply treat yourself to a moment of artistic play, these ideas will turn your next manicure into a relaxing, rewarding ritual.
1. Marble Swirls That Capture Serene Movement
Imagine the peaceful drift of ink through water, frozen right on your nails. Marble swirl nail designs create that gentle, flowing look using just two or three complementary shades. Start with a white or pale base, then dab tiny dots of your chosen colors onto the nail while the base is still tacky. Swirl them together with a fine brush or even a toothpick—no perfect pattern required. The beauty comes from letting the lines wander naturally, like soft currents in a stream. Each nail ends up unique, which means zero pressure to match them all perfectly. People often find the swirling motion itself calming, turning a simple manicure into a mindful break from the daily rush.
Once you master basic marbling, you can adapt it to any season or mood. Pastel pinks and lilacs feel dreamy for spring, while deep navy with silver swirls mimics a starry winter sky. The technique also hides small mistakes beautifully because organic blobs just look like part of the design. For extra depth, try translucent marbling by mixing clear polish with a drop of color before swirling. This produces a stained-glass effect that catches light differently throughout the day. Remember to seal everything with a glossy top coat so those soft swirls stay protected and shiny for over a week.
2. Negative Space Accents That Breathe With You
Letting part of your natural nail show through isn’t lazy—it’s a deliberate, modern choice called negative space nail art. Think of it as giving your nails room to breathe while still looking intentionally styled. A simple way to start is painting a bold stripe down the center of each nail, leaving both sides bare. Or try a tiny geometric shape near the cuticle, like a half-moon or a small triangle, while the rest of the nail stays clear. This approach cuts down drying time and makes your manicure last longer because there’s less polish to chip. Plus, when your nails grow out, the design still looks purposeful rather than overdue for a fill.
You can play with negative space by using stencils or even strips of tape to block off certain areas before painting. Metallic gold or silver works beautifully against the natural pink of your nail bed, giving a luxurious but minimalist feel. For a bolder look, paint only the tips in a V-shape, leaving the middle of the nail naked. This style pairs especially well with shorter nails because it visually lengthens the finger without needing long talons. The best part? You only need one polish color and some patience with tape, making it one of the most accessible creative nail designs for beginners.
3. Gradient Ombré That Blends Like a Sunset
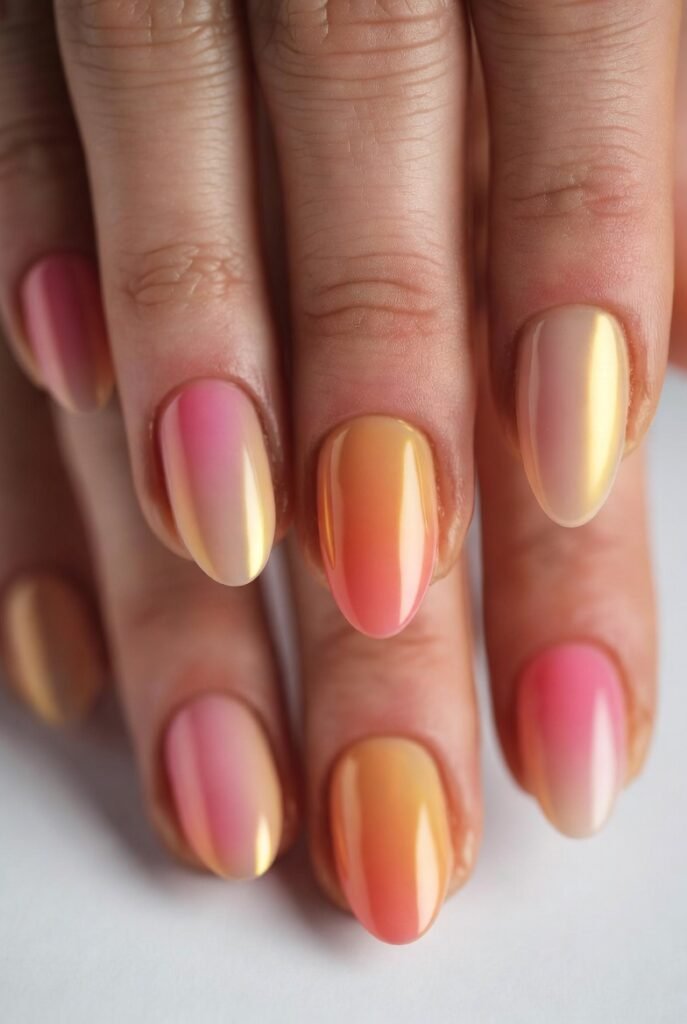
There’s something hypnotic about watching one color melt into another, and ombre nail designs deliver that exact magic. Instead of harsh lines, you get a soft, dreamy transition from light to dark or from one hue to its neighbor on the color wheel. The classic method uses a makeup sponge: paint two or three stripes of polish onto the sponge, then dab it gently onto your nail. Yes, it gets messy around the edges, but that washes off easily after a shower. The result looks like a professional airbrush job even if you’ve never considered yourself artistic. People often choose pink fading to peach for a romantic vibe, or blue fading to violet for a cooler, mysterious energy.
Once you feel confident with sponging, try a reverse ombré where the darker color starts at the cuticle and fades toward the tip. This anchors the design and draws attention to your nail shape. Another playful twist is using glitter polish as one of your gradient layers—sponge it only near the tips so the sparkle becomes more intense at the ends. Matte top coat over an ombré creates a velvety, almost unreal finish that looks expensive. Because each dab of the sponge creates tiny variations, no two nails will ever look identical, which feels refreshingly authentic in a world of perfect press-ons.
4. Abstract Brush Strokes That Celebrate Imperfection
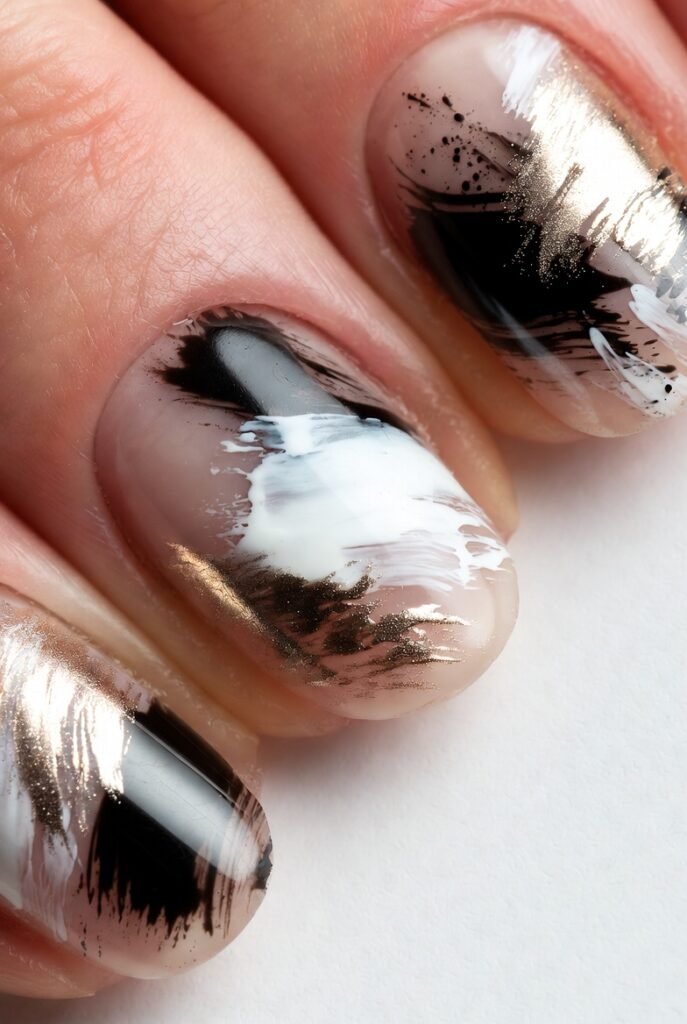
Forget trying to paint tiny flowers or precise lines. Abstract brush stroke nails free you from all rules, turning random sweeps of color into a deliberate, gallery-worthy look. Grab a liner brush or even an old eyeliner brush, dip it in a color, and drag it across your nail in one confident motion. Overlap strokes in different directions, using contrasting shades like coral, turquoise, and cream. The key is speed—hesitation creates muddiness, while swift strokes keep each color distinct. Think of it as finger painting for adults, where the messier the crossing lines, the more intentional the design appears.
What makes abstract strokes so freeing is that there’s no wrong way to do them. You can leave wide gaps of negative space, fill the entire nail, or keep the strokes clustered on one side like a minimalist painting. Contrasting textures also add interest: use a creamy polish for one stroke and a metallic for the next. Many people find this technique therapeutic because it forces you to stop overthinking and simply move your hand. Seal everything under a thick gloss top coat, and suddenly those random scribbles look like modern art. Wear them to work, and colleagues will ask which boutique painted them.
5. Matte Finish Over Anything Familiar
You probably own a dozen shiny polishes, but have you tried a matte top coat? This single product transforms any ordinary color into something unexpectedly sophisticated. A classic red becomes looks like velvet ribbon. A pastel blue turns powdery and soft, like candy dust. Even black polish feels edgier and more expensive when it dries flat instead of glossy. The trick is applying the matte top coat over completely dry color—if the base is even slightly tacky, the matte finish can appear patchy. Work in thin layers, and don’t shake the bottle (roll it between your palms instead) to avoid bubbles that show up more clearly on a non-shiny surface.
Beyond solid colors, matte finishes breathe new life into layered creative nail designs. Try painting a glossy geometric shape like a heart or stripe over a matte background. The contrast between shine and flatness is subtle but deeply satisfying. You can also do the reverse: matte over a glossy design, leaving only certain details shiny by applying a regular top coat with a fine brush. Consider this your secret weapon for making simple ideas feel fresh again. A matte finish also hides small surface imperfections better than gloss, so it’s forgiving if your painting hand isn’t perfectly steady.
Read Also: 13 Bitten Nails Ideas: Restore Your Confidence with Gentle, Effective Solutions
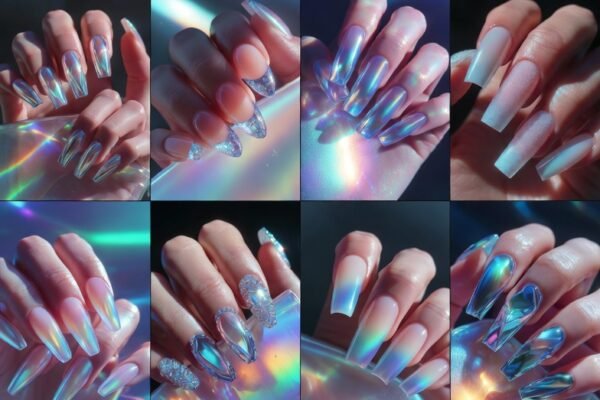
6. Foil Flakes That Catch Random Light
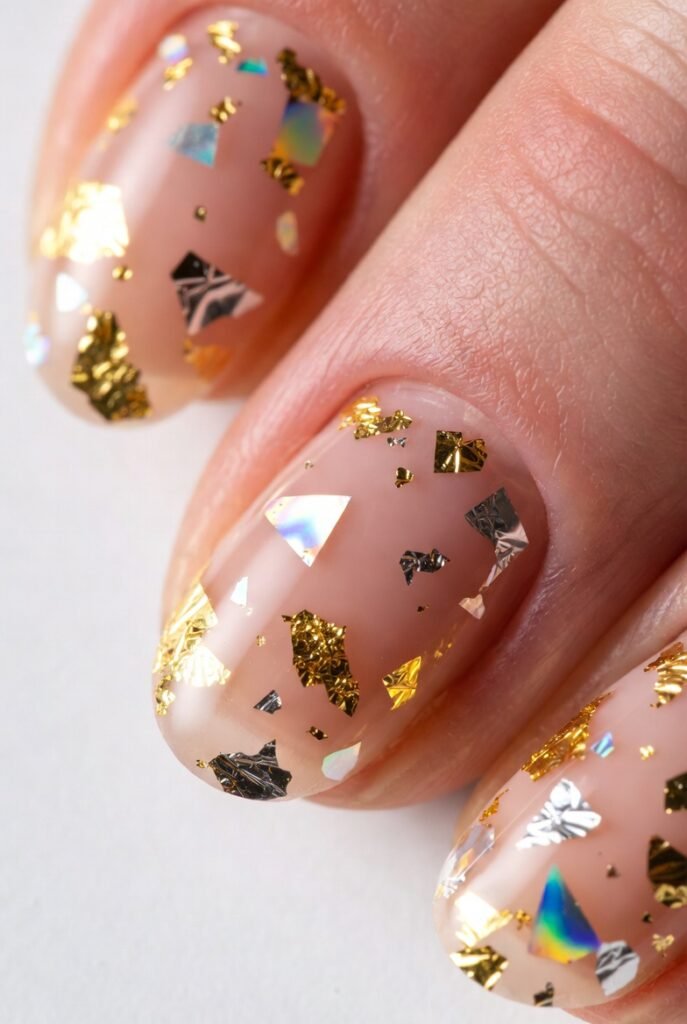
Metallic foil flakes offer a chaotic, joyful glitter that’s nothing like standard sparkle polish. Nail foil flakes come as tiny crinkled pieces that you press onto a tacky base coat, creating an irregular, shattered-glass effect. Unlike glitter, which feels uniform, foil flakes reflect light from different angles on each nail. Start with a dark base like navy or plum so the silver or copper flakes pop dramatically. Paint a thin layer of foil adhesive (or any clear polish that stays sticky for a minute), then gently dab the flakes onto your nail with a dry brush or your fingertip. Press them down, then seal with two coats of top coat to smooth the edges.
The beauty of foil flakes is how they transform a simple manicure into something that looks intricate with almost no effort. You can cover the entire nail for a disco-ball effect or place just a few flakes near the cuticle for a delicate accent. Mix gold and rose gold flakes together for warmth, or use holographic flakes for rainbow flashes. Because the flakes lie flat but not perfectly even, they hide chips better than solid polish. People often reach for this design before vacations or parties—it photographs beautifully and matches any outfit without clashing, since the metallic tones remain neutral while still feeling festive.
7. Dot Tool Polka Patterns With Personality
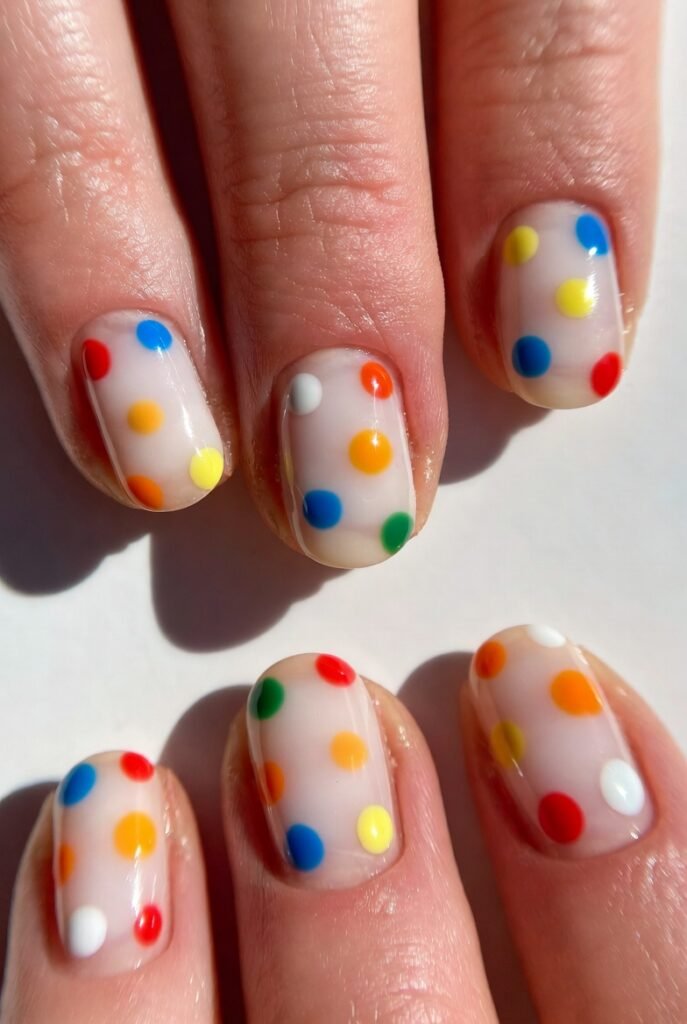
A simple dotting tool (or the back of a bobby pin) opens up endless polka dot nail designs that feel playful but never childish. Instead of covering the whole nail in uniform dots, try clustering three small dots at the base like a tiny flower, or placing a single large dot near the tip for a mod 1960s look. Varying the dot sizes adds depth: use a larger tool for the center dot and smaller ones around it. The trick to clean circles is dipping the tool into polish, wiping off the excess on the bottle rim, then pressing straight down without dragging. Lift straight up, and you’ll leave a perfect round bead every time.
You can turn dots into stories—for example, white dots over a pale pink base mimic a vintage kitchen tile, while neon yellow dots over black feel like a pop art explosion. Offset dots that march diagonally across the nail look more modern than straight rows. For a romantic mood, create tiny heart shapes by placing two dots close together and pulling the bottom of each inward with a toothpick. Because dots are so forgiving, they’re ideal for practicing steadier hand control. Spend fifteen minutes making dots while listening to a podcast, and you’ll walk away with a finished manicure and a noticeably calmer mind.
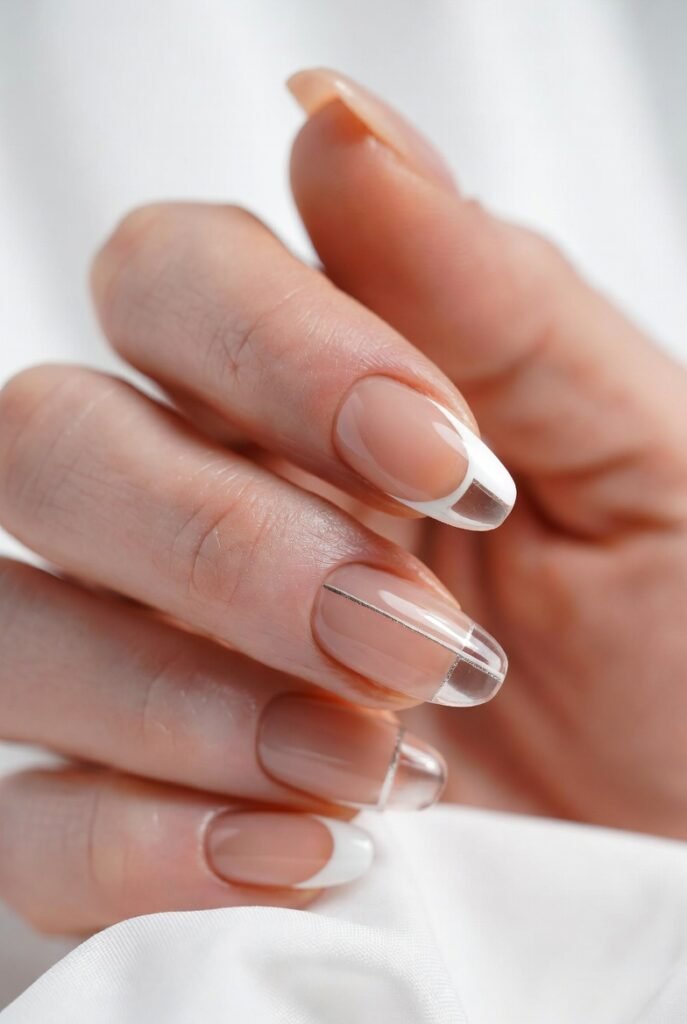
8. French Tips With Unexpected Color Twists
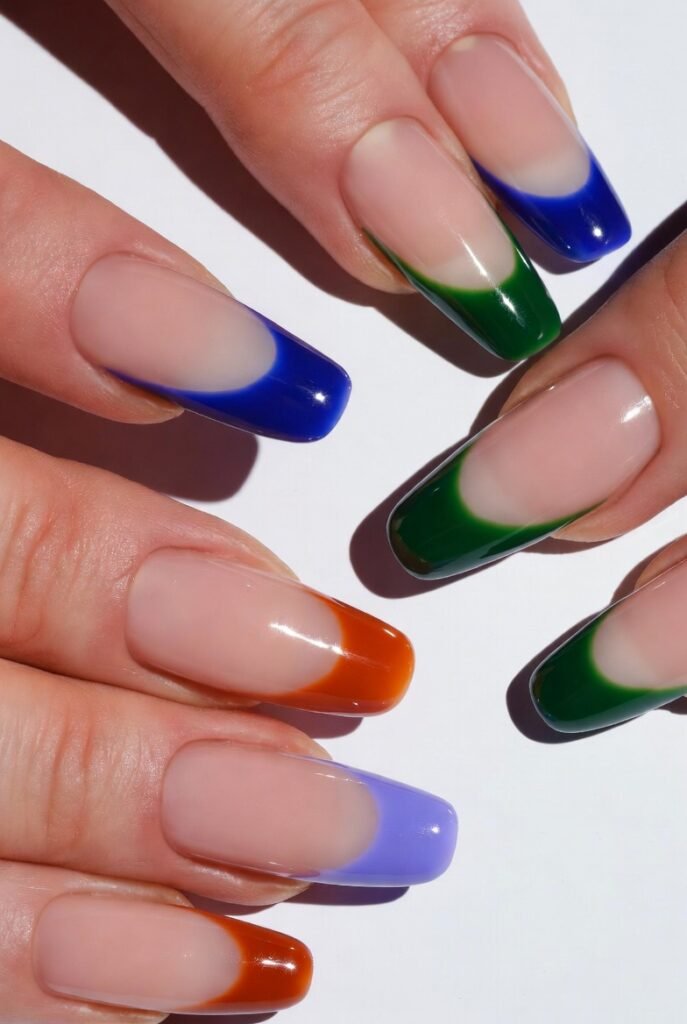
The classic French manicure—white tips on a nude base—has evolved into something far more exciting. Colorful French tip designs replace the predictable white with bright coral, deep emerald, or even neon yellow. You can also swap the nude base for a sheer lavender or a soft gray, creating a completely new mood. Painting clean tips without guides takes practice, but you can use sticker guides or even thin hair elastics wrapped around your finger as a straight edge. For a modern take, paint the tips as a curved V-shape rather than a straight smile line, or make the tips extra thick and uneven on purpose for an artistic, hand-drawn feel.
Double French tips layer two colors side by side along the tip edge—for instance, a thin line of gold next to a thicker line of white. Reverse French flips the idea entirely: paint the color near your cuticle in a half-moon shape and leave the tip bare. This looks especially striking with jewel tones like sapphire or amethyst. Another playful variation uses glitter polish only on the tips while keeping the rest matte. Because French tip designs naturally draw the eye to your nail edges, they make shorter nails appear longer and cleaner. You’ll feel polished enough for a boardroom but creative enough for a weekend art fair.
9. Pressed Dried Flowers For Eternal Spring
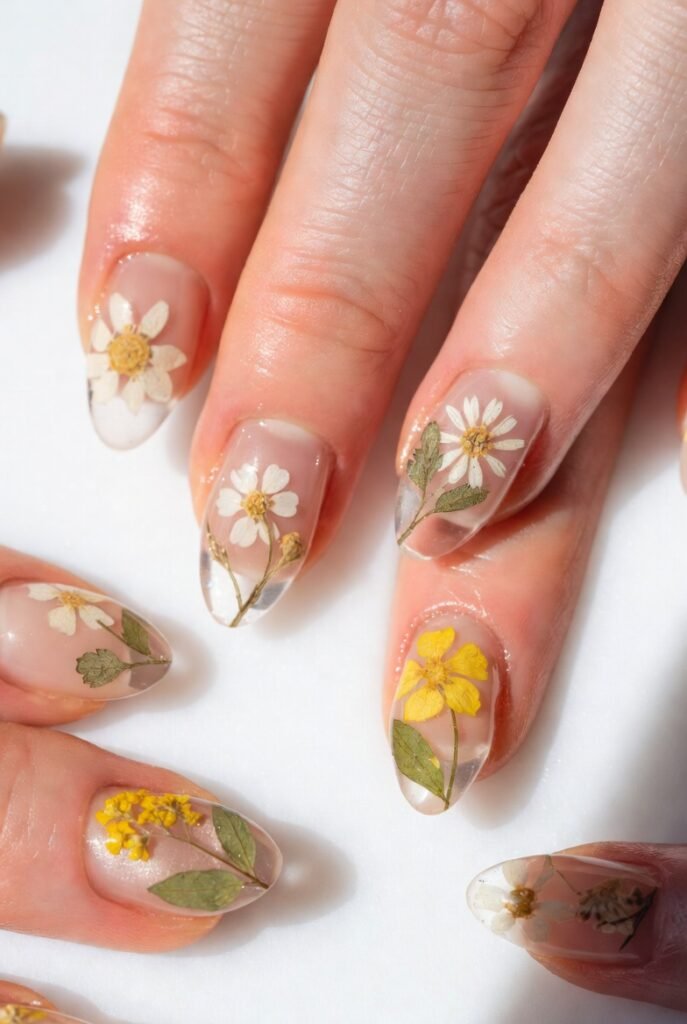
Bringing real dried flowers onto your nails sounds delicate, but it’s surprisingly sturdy and romantic. Pressed flower nail art uses tiny dried blooms—often baby’s breath, lavender buds, or miniature daisies—that you sandwich between a base coat and two thick top coats. Start with a sheer or white base so the flower colors glow. While the base is still tacky, use tweezers to place each flower gently onto the nail. Press it down with a silicone tool or your clean fingertip so no edges stick up. Then seal immediately with a generous layer of gel-like top coat, making sure to cap the free edge. The flowers stay flat and vibrant for up to two weeks.
This design connects you to nature in a quiet, charming way. You can buy packs of assorted dried flowers online, or press your own from garden herbs like coriander flowers or small ferns. Single flower placement on the ring finger as an accent feels elegant, while scattering multiple tiny blooms across all nails creates a secret garden effect. The flowers also pair wonderfully with negative space—leave parts of the nail bare so the botanical shapes stand out without competing. Friends will marvel at how three-dimensional your nails look, especially under sunlight. It’s one of those creative nail designs that feels deeply personal and impossible to replicate exactly the same way twice.
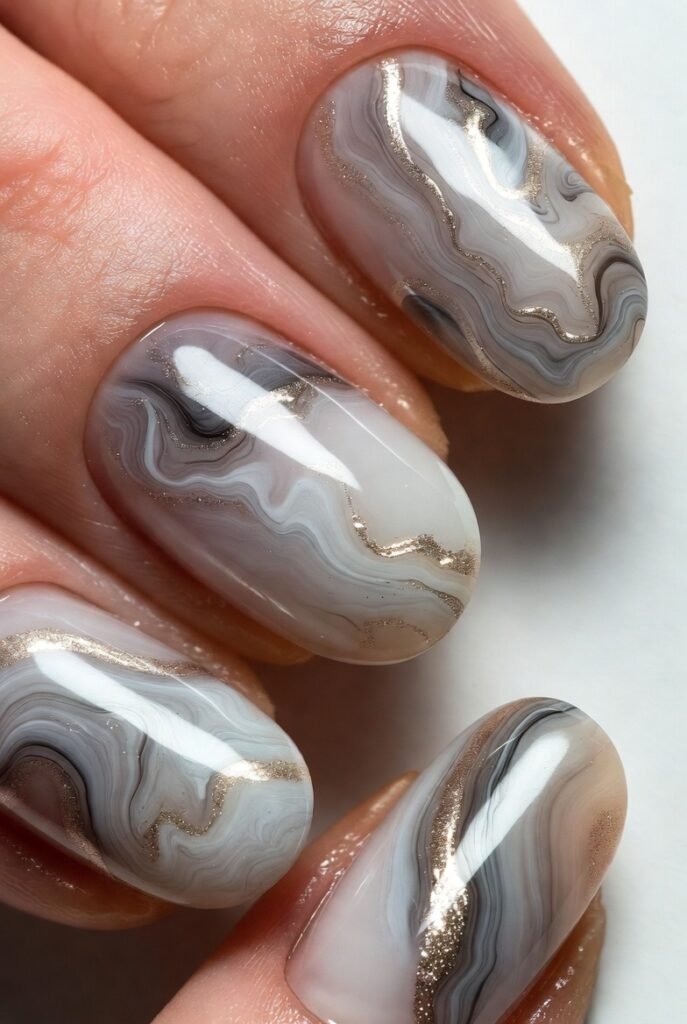
10. Tortoiseshell Patterns That Feel Warm And Vintage
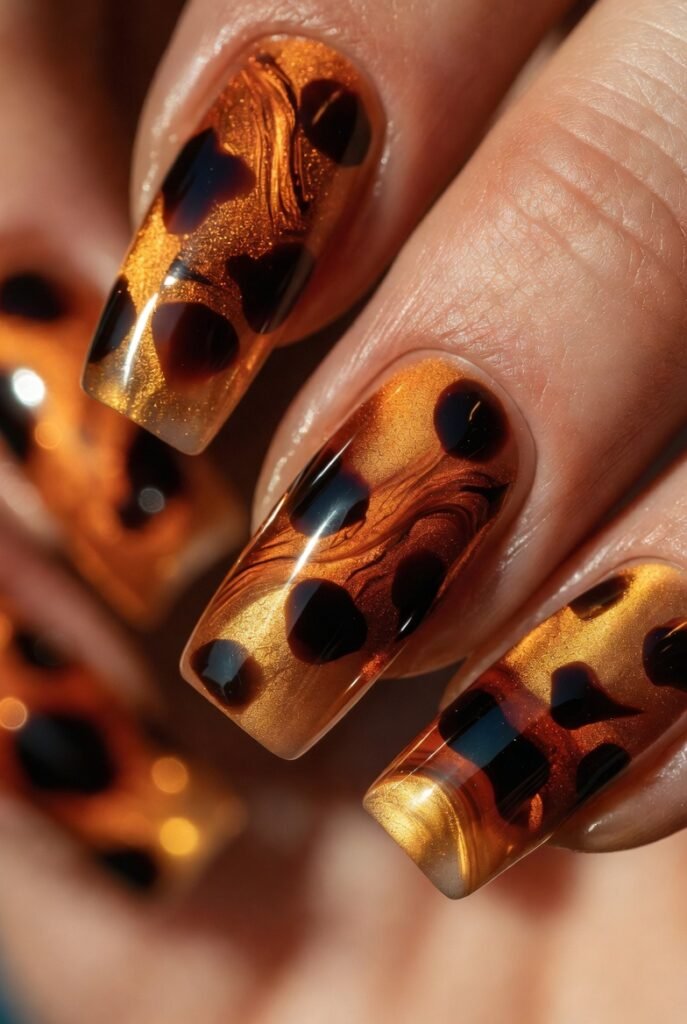
Tortoiseshell nails channel the rich, amber-brown swirls of classic hair accessories and sunglasses. Despite looking intricate, tortoiseshell nail designs rely on just three colors: a warm caramel brown, a translucent orange-amber, and a deep black-brown. Start with a sheer amber or yellow base. While it’s wet, drop small dots of caramel brown and black-brown randomly across the nail. Use a clean brush to gently swirl the dots together—don’t overmix or you’ll get mud. The goal is distinct blobs that melt into each other at the edges. A final thin wash of amber over everything unifies the pattern.
This design works beautifully on both short oval nails and long almond shapes. The warm brown tones complement every skin color and make your hands look instantly more elegant. Tortoiseshell plus gold foil amplifies the vintage luxury vibe: after swirling the browns, press a few tiny gold foil flakes onto the still-tacky surface. Another variation uses olive green instead of black-brown for an earthy, almost reptilian look. Because tortoiseshell naturally has irregular blotches, any unevenness only adds authenticity. Seal with a glossy top coat to mimic the deep shine of polished amber. You’ll notice people staring at your hands during coffee dates, trying to figure out how you did it.
11. Sweater Texture With Matte Dots And Lines
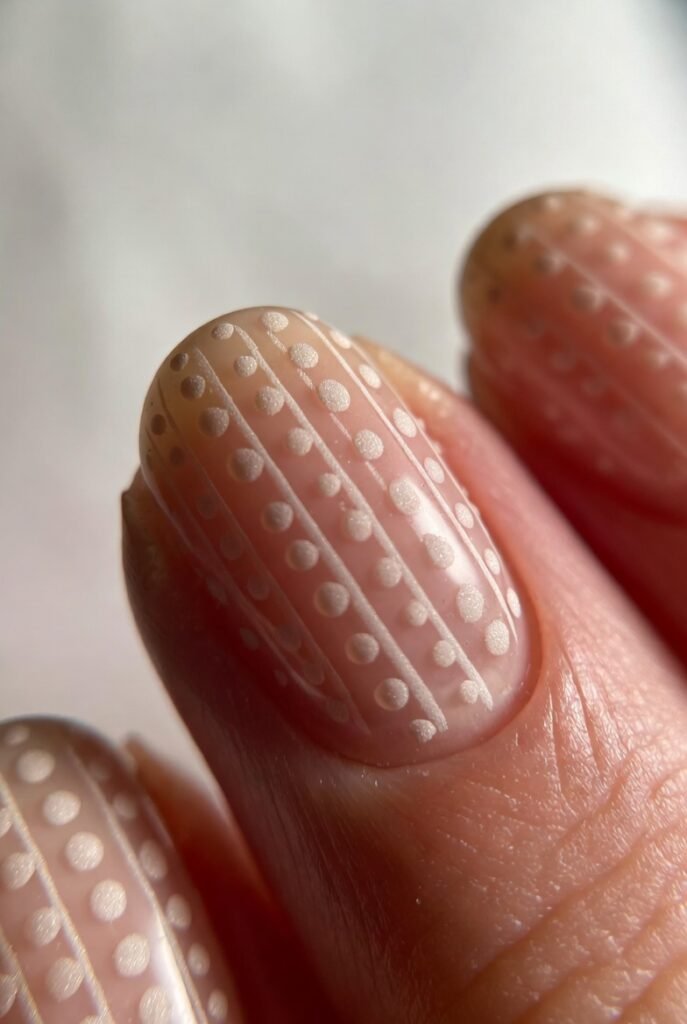
Winter doesn’t mean dull nails. Sweater texture nail art mimics the feel of cable-knit wool using a matte base and raised dots or lines. This design is best done with thick gel polish or a special 3D sculpting gel, but you can also layer regular polish by letting each raised dot dry fully before adding another. Paint a matte base color like cream, heather gray, or deep forest green. Then use a dotting tool or the tip of a thin brush to apply slightly thicker polish in repeating patterns: rows of small dots, chevron zigzags, or vertical dashes. The raised texture catches light differently, casting tiny shadows that look exactly like knitted stitches.
What makes sweater nails so satisfying is the tactile element. You’ll find yourself unconsciously rubbing your thumb over the ridges like a worry stone. Cable-knit patterns work best on longer nails because you need surface area for the repeating motifs. Keep the design to just one or two accent nails per hand—covering all ten in full texture can feel too heavy. The contrast between matte background and slightly glossy raised bumps adds a cozy, hygge energy perfect for colder months. Pair with a chunky wool sweater and a hot drink, and your whole vibe becomes fall-themed. Unlike many creative nail designs, this one actually protects your nails from minor bumps because the raised dots act like tiny bumpers.
12. Galaxy Nebulas With White Speckles
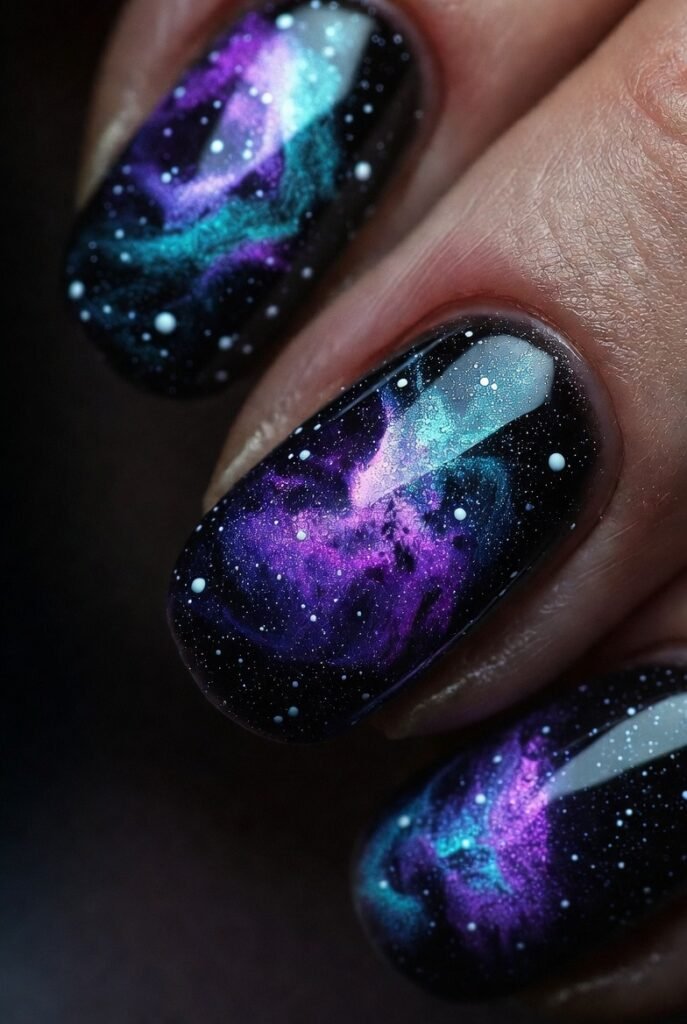
Bring the cosmos to your fingertips with galaxy nail art that looks like swirling stardust and distant nebulas. Start with a deep black or midnight blue base. While it’s still wet, sponge on small patches of purple, magenta, and teal in random clusters. Don’t blend them fully—the magic happens in the chaotic overlaps. Then dip an old toothbrush into white polish and run your thumb across the bristles to spray tiny white speckles across the nail, mimicking faraway stars. For larger stars, use a dotting tool to place a few white dots of varying sizes, then add an even smaller black dot slightly offset from each to create a glowing halo effect.
People love galaxy nails because no two nails ever look the same, and mistakes just read as cosmic anomalies. Holographic top coat over the finished galaxy adds a shimmer that shifts as you move your hands, like starlight refracting through space dust. You can also incorporate a crescent moon on one accent nail using a thin brush and white polish. The dark base makes this design excellent for hiding chips at the tips—even after a week of wear, the chaos of colors camouflages small imperfections. Galaxy nails work for any nail length, but short square nails feel especially modern and unexpected with this detailed look.
13. Striped Tape Designs That Demand Precision
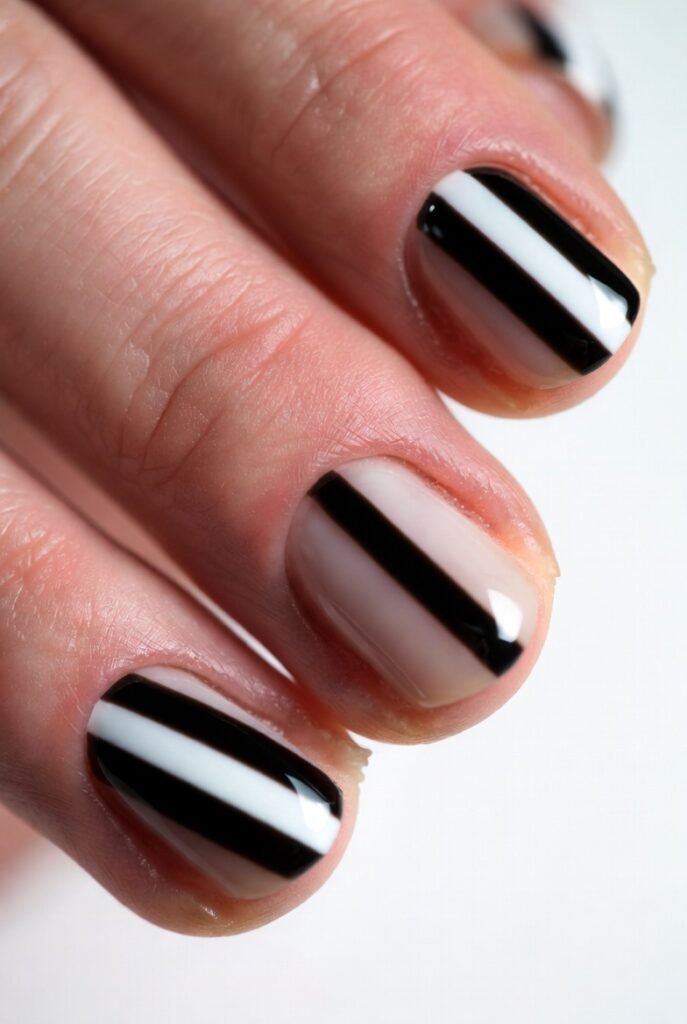
Painting straight stripes freehand is frustrating, but stripping tape (thin vinyl rolls) gives you razor-sharp lines every time. Apply your base color and let it dry completely. Cut small strips of tape and lay them across the nail in any pattern: parallel lines, a crisscross grid, or a single diagonal stripe. Paint over everything with a contrasting color, wait thirty seconds for it to become tacky, then gently peel off the tape. The result is a perfect, crisp line of the under-color showing through. This technique works best when the top color is opaque enough to cover the base completely—neon over white, or black over silver.
For color-blocked stripes, use multiple tape placements and different colors in layers. For example, lay two vertical strips of tape, paint a yellow stripe between them, then remove the tape. After drying, lay new tape perpendicular to the yellow stripe and paint a blue stripe across. Each layer builds a graphic, almost architectural design. The clean lines feel satisfyingly orderly, making this a favorite for people who crave precision over organic patterns. Because tape removes so cleanly, your manicure looks factory-made. Seal with a quick-dry top coat to avoid smudging those sharp edges, and you’ll feel like a professional nail tech for under five dollars in supplies.
14. Watercolor Wash With Alcohol Blending
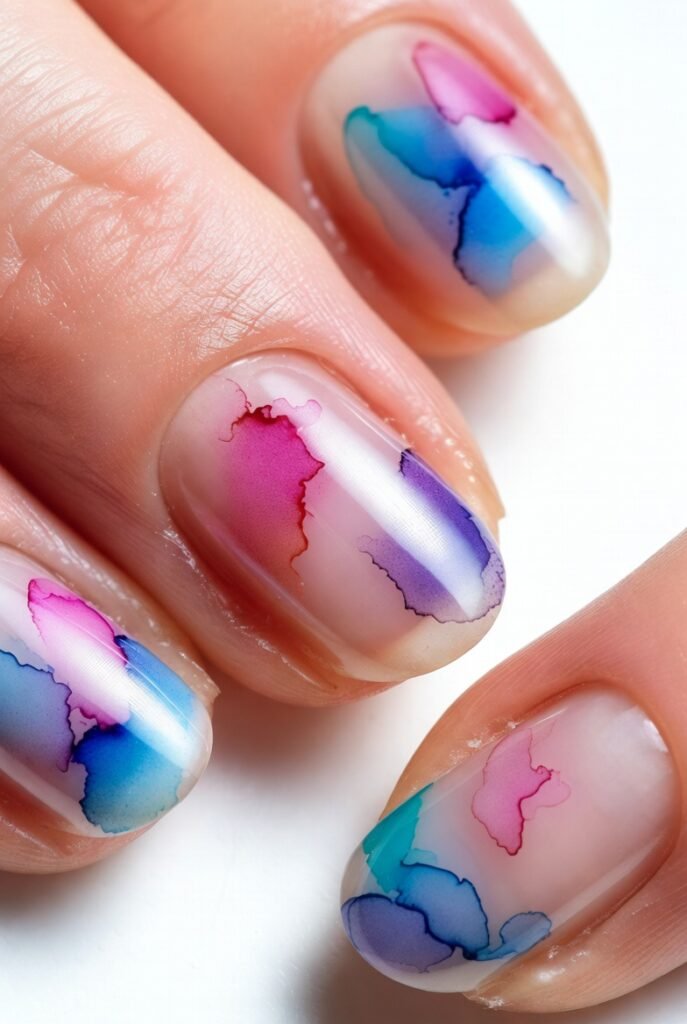
Real watercolor nails use alcohol instead of water to move pigments around, creating dreamy, transparent washes. Watercolor nail art starts with a white or very pale base. Paint small blobs of highly pigmented polish (neon or pastel shades work best) onto the nail. Before they dry, dip a small brush in rubbing alcohol and touch it to the edge of each blob. The alcohol dissolves the polish and pushes it outward in soft, feathery tendrils. Keep adding alcohol until the color spreads into a faint halo. You can layer multiple colors this way, letting each dry slightly before adding the next so they don’t turn to mud.
The transparent, layered effect looks like a botanical painting or a sunset reflection on water. Watercolor over negative space is especially striking: leave the center of the nail bare and paint color only around the edges, then blend inward. Because the alcohol technique is unpredictable, every nail becomes a one-of-a-kind art piece. This design feels meditative—you’re not controlling the paint so much as guiding it. Use a matte top coat to preserve the paper-like texture, or glossy to make the colors look like stained glass. Plan for a longer drying time between layers, but trust that the ethereal result is worth the patience.
15. Cracking Concrete Effect For Edgy Texture
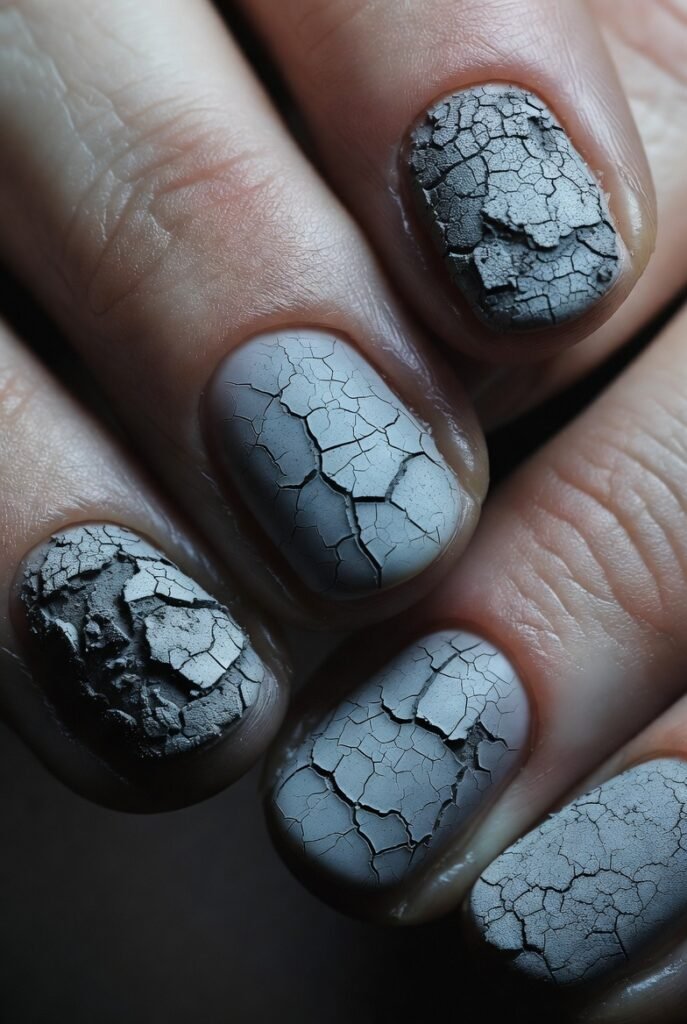
For days when you want your nails to look tough and imperfect on purpose, concrete crackle nails deliver industrial attitude. You can buy crackle polish that splits apart as it dries, but you can also create a controlled cracked effect using a thin brush and dark grey polish over a lighter grey base. Paint the light grey base and let it dry fully. Then use a fine liner brush to draw irregular, branching lines across the nail like dried mud or broken pavement. Fill in some of the sections with a slightly darker grey, leaving others as the original base color. The key is keeping the cracks angular and organic—no smooth curves.
To make it look like aged, peeling concrete, add a few tiny patches of pale beige or rust orange within the cracks. A matte top coat is essential here because shine would ruin the illusion of rough stone. This design pairs perfectly with leather jackets, silver rings, and minimalist black clothing. People will assume you paid for a high-end specialty manicure when all you did was draw squiggly lines. Concrete nails also hide wear brilliantly because new chips just look like additional cracking. For a softer version, use white and pale pink cracks over a nude base—it reads as delicate porcelain rather than construction material.
16. Mix-And-Match Accents Across All Ten Fingers
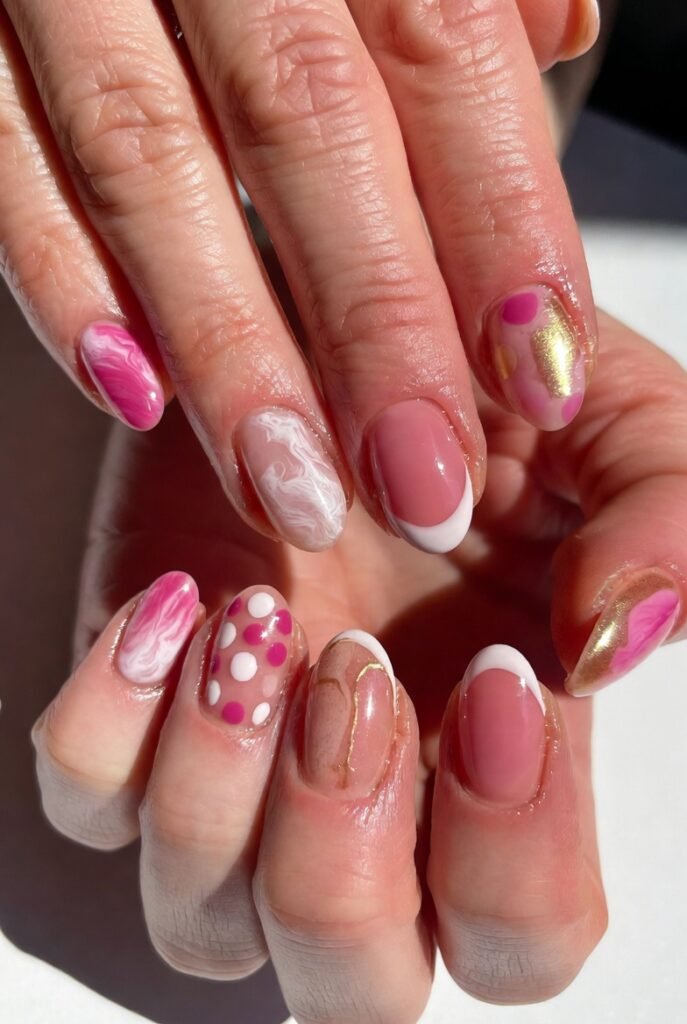
Why commit to one design when you can do something different on every nail? Mix-and-match nail art embraces variety, turning your hands into a sampler of all the creative nail designs you love most. Choose a unifying element—perhaps a consistent color palette, like all pastels, or a repeated texture, like matte finishes—then let each nail go its own way. One nail gets marble swirls, another gets a gold foil accent, a third shows negative space stripes, and a fourth displays tiny dots. The ring finger might feature a single pressed flower while the pinky shows a galaxy speckle. The chaos feels intentional because your chosen palette ties everything together.
This approach solves the problem of decision fatigue: you never have to pick just one idea. Seasonal mix-and-match works especially well—for autumn, mix tortoiseshell, sweater texture, burnt orange ombré, and gold foil on different nails. For summer, combine neon dots, watercolor washes, colorful French tips, and abstract strokes. The only rule is keeping the overall vibe balanced; too many bright competing colors can feel messy, so stick to three or four shades across the set. Mix-and-match also extends the life of your manicure because when one nail chips, it doesn’t ruin a cohesive pattern. You’ll find yourself staring at your own hands like a gallery visitor, enjoying a different favorite with every finger.
Conclusion: Your Nails, Your Canvas, Your Calm
Creative nail designs aren’t about perfection or expensive tools. They’re about giving yourself permission to play, to mess up, and to try again. Each of these sixteen ideas offers a different doorway into that playful headspace—whether you crave the chaos of abstract strokes, the precision of tape stripes, or the nostalgia of pressed flowers. The next time you feel rushed or stressed, set aside an hour, pick one design that makes you curious, and let your hands become the project. You’ll walk away not just with beautiful nails, but with a quieter mind and a small, confident smile every time you reach for your coffee or type a message. So go ahead—grab that bottle you’ve been saving, make a happy mess, and wear your creativity proudly.