Let me take you back to a Tuesday evening about five years ago. There I was, standing in my kitchen, staring at a packet of sad-looking chicken breasts and some wilting bell peppers that had definitely seen better days. My family was expecting dinner in thirty minutes, and frankly, I was panicking. You see, I had promised them restaurant-style chicken fajitas after a long day at work, but honestly? I had absolutely no idea what I was doing.
I remember grabbing every spice from my cabinet—cumin, chili powder, paprika, garlic powder—and just throwing them at the chicken like I was seasoning a science experiment gone wrong. The result? Let’s just say my husband politely asked if we had any ketchup to “enhance the flavor.” That was the moment I realized I needed to master the art of the easy chicken fajita recipe.
Fast forward to today, and I’m thrilled to share that I’ve completely transformed my fajita game. After countless trials, errors, and way too many onions sacrificed in the name of culinary science, I’ve developed what I genuinely believe is the most foolproof chicken fajita method you’ll ever encounter. Therefore, whether you’re a complete beginner or someone who’s been burned by bland fajitas before, this guide is for you.
Why This Easy Chicken Fajita Recipe Will Become Your Go-To Dinner
Before we dive into the nitty-gritty details, let me explain why this particular recipe stands out from the thousands of fajita recipes floating around the internet. First and foremost, this recipe respects your time. Consequently, you won’t find any complicated techniques or ingredients that require a special trip to a gourmet grocery store. In addition, every single component can be found at your local supermarket, often for less than twenty dollars total.
Moreover, this easy chicken fajita recipe delivers on flavor without demanding hours of marination. While I’ll certainly discuss how longer marination times can enhance your results, the base recipe works beautifully even if you only have fifteen minutes to spare. For instance, last week when my in-laws showed up unannounced (don’t you love when that happens?), I had sizzling fajitas on the table in under thirty minutes using this exact method.
Another compelling reason to love this recipe is its incredible versatility. You can easily adjust the spice level, swap out proteins, or add extra vegetables based on what you have available. Similarly, the leftovers (if there are any) make phenomenal lunch wraps, salad toppers, or even breakfast burrito fillings. Consequently, you’re not just learning a single dish—you’re mastering a technique that will serve you well across countless meals.
The Complete Ingredient Breakdown for Perfect Chicken Fajitas
Let me walk you through everything you’ll need to create fajita magic in your own kitchen. I’ve organized these ingredients intentionally, starting with the absolute essentials and then moving to optional add-ons that can elevate your dish from great to unforgettable.
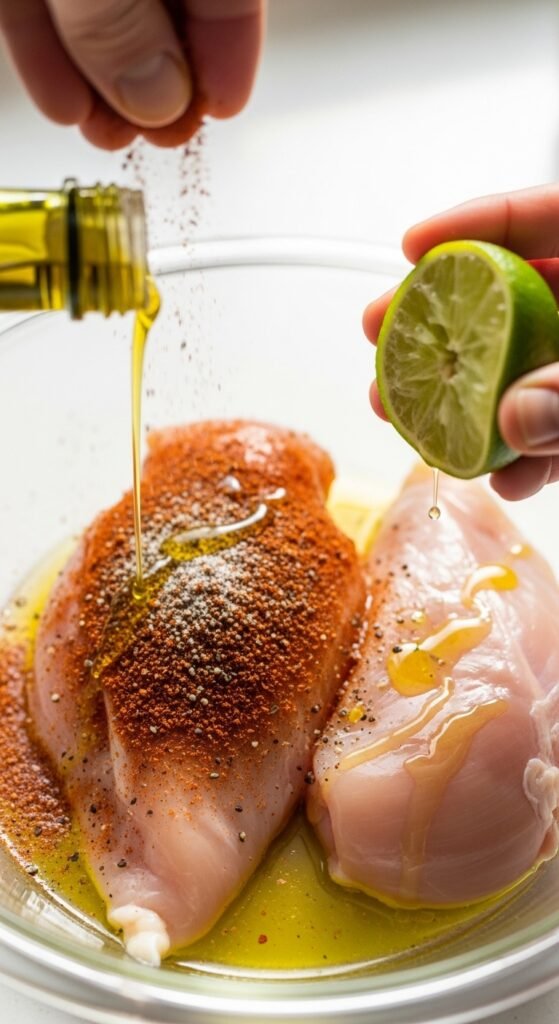
For the Fajita Chicken Marinade:
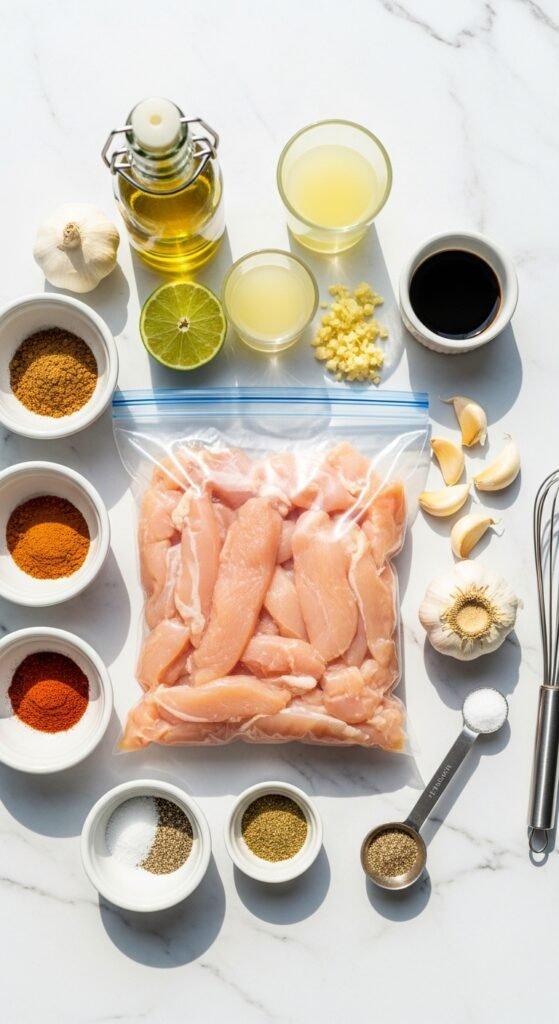
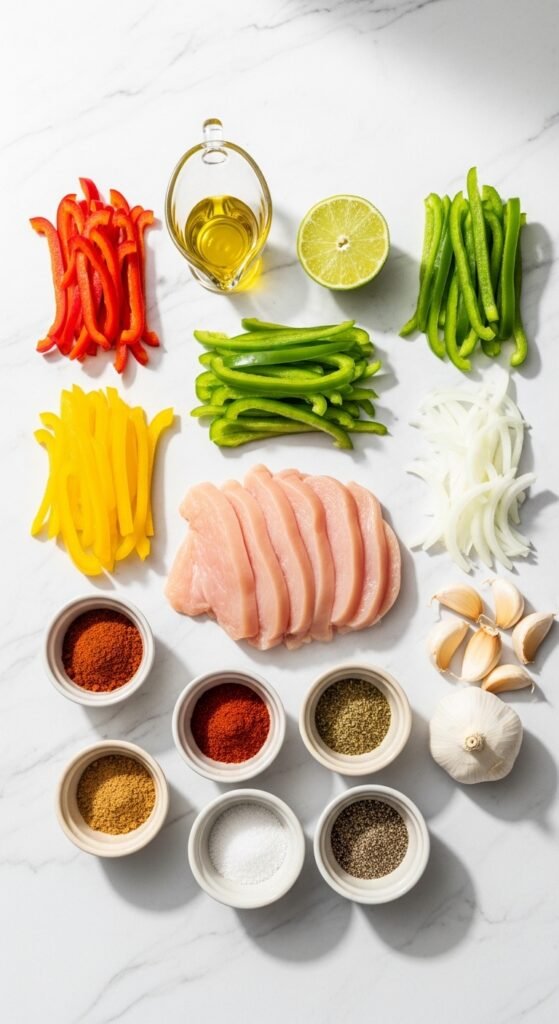
- 2 pounds boneless, skinless chicken thighs (I strongly prefer thighs over breasts because they stay incredibly juicy and are much more forgiving if you accidentally overcook them. However, chicken breasts work perfectly well if you’re watching your fat intake.)
- 3 tablespoons olive oil or avocado oil (These oils have high smoke points, which is crucial when you’re searing at high temperatures. Additionally, they won’t overwhelm your other flavors.)
- 4 cloves fresh garlic, minced (Please don’t use the jarred stuff here. Fresh garlic makes a tremendous difference in your final dish.)
- 2 tablespoons lime juice (Freshly squeezed is best. The acidity helps tenderize the chicken while adding brightness.)
- 1 tablespoon apple cider vinegar (This helps break down the chicken fibers slightly, resulting in more tender meat.)
Also Read: The Ultimate Guide to the Perfect Cheese Sauce Recipe: Creamy, Dreamy, and Foolproof
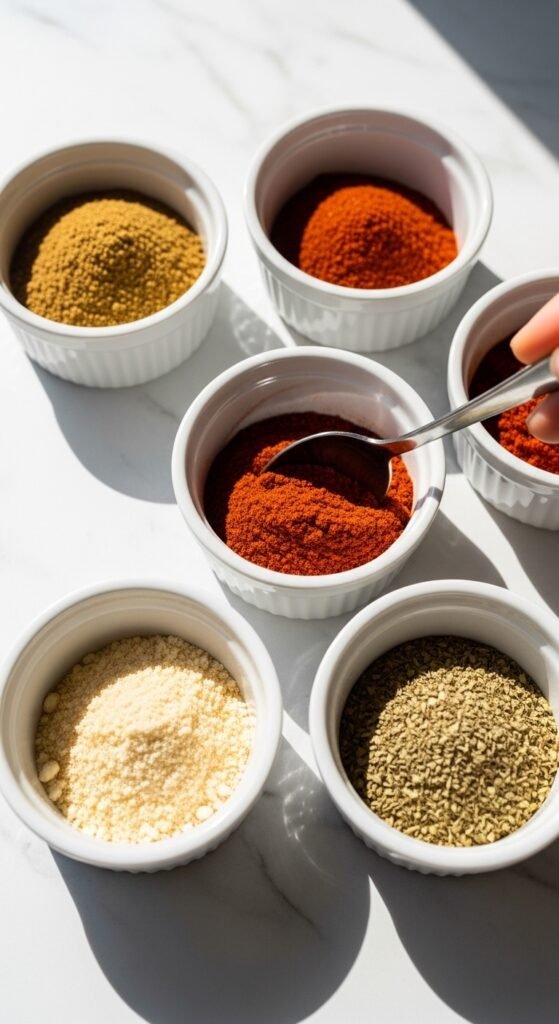
The Homemade Fajita Seasoning (Because Store-Bought Can’t Compare):
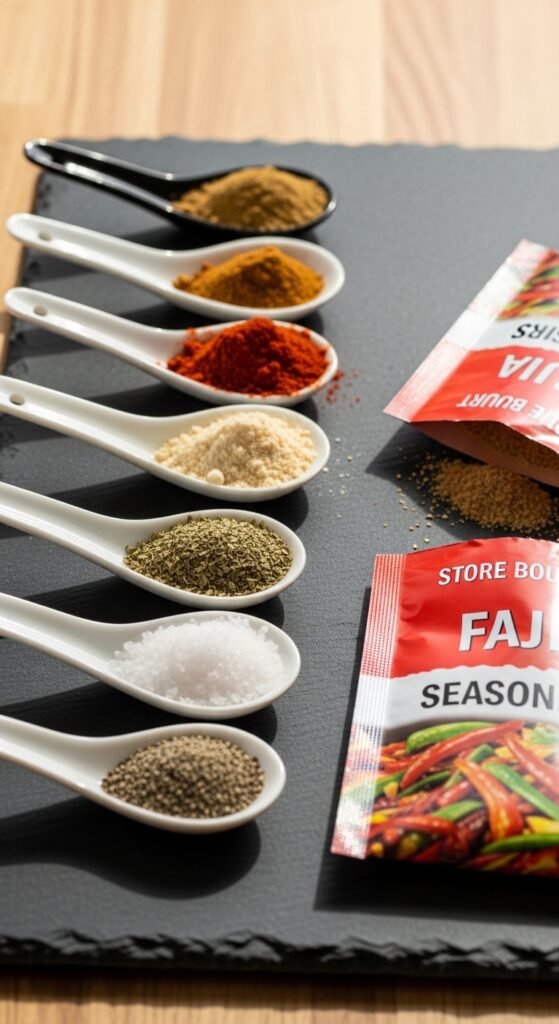
- 2 tablespoons chili powder (This forms the backbone of your seasoning. Look for pure chili powder without added salt.)
- 1 tablespoon ground cumin (That distinctive “fajita smell” largely comes from cumin. Don’t skip it!)
- 1 tablespoon smoked paprika (Smoked paprika adds an incredible depth that mimics grilling over an open flame.)
- 1 teaspoon garlic powder (Provides a more mellow, earthy flavor that complements rather than competes.)
- 1 teaspoon onion powder (Adds savory notes without the moisture of fresh onions.)
- 1 teaspoon dried oregano (Mexican oregano is ideal, but standard Mediterranean oregano works beautifully.)
- 1 teaspoon kosher salt (Distributes more evenly than table salt.)
- ½ teaspoon black pepper (Freshly ground makes a noticeable difference.)
- ¼ to ½ teaspoon cayenne pepper (Optional based on your heat preference. Start with less—you can always add more.)
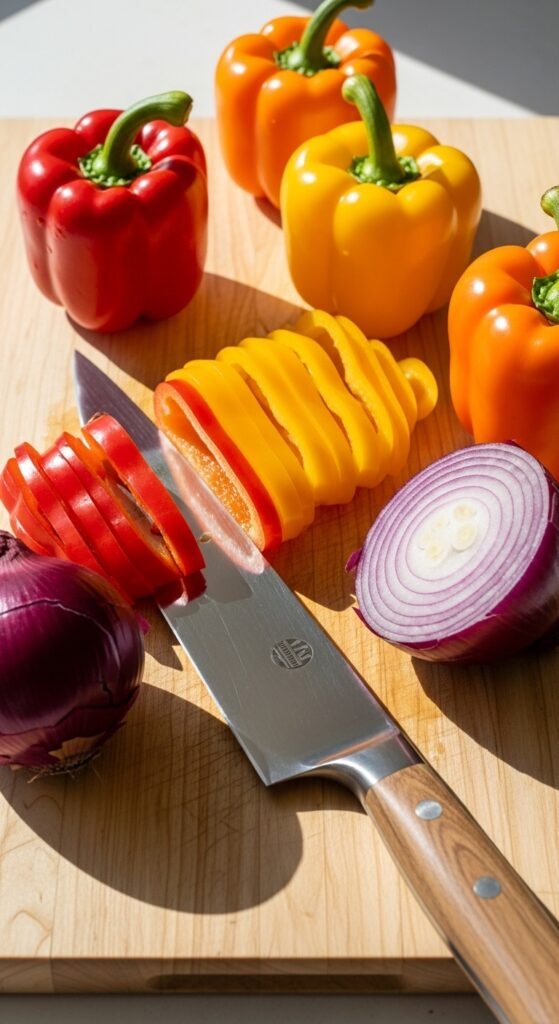
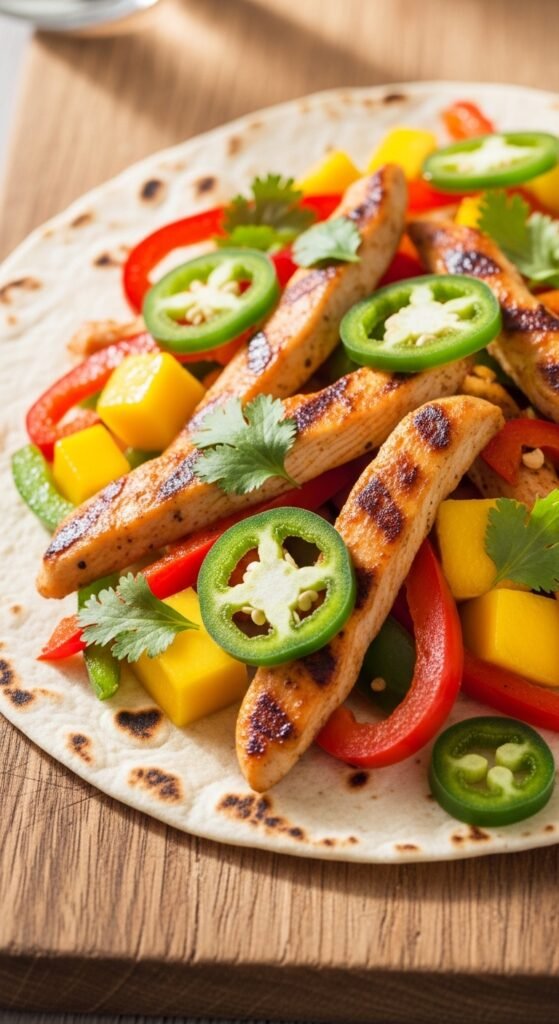
The Fajita Vegetables (That Beautiful Rainbow of Peppers and Onions):
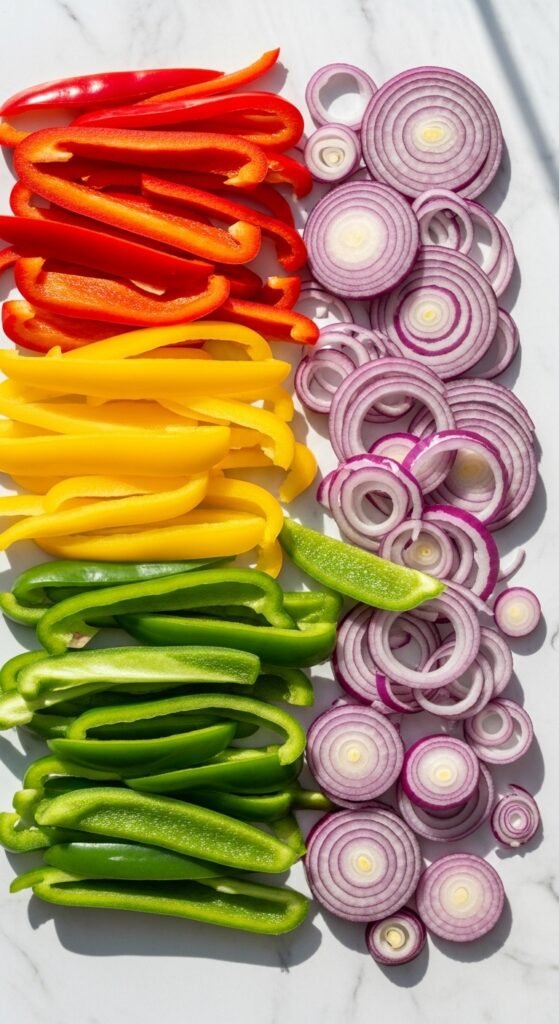
- 3 large bell peppers (I use one each of red, yellow, and orange for visual appeal.)
- 2 medium yellow onions (Yellow onions become perfectly sweet when caramelized.)
- 1 jalapeño or serrano pepper (Optional for heat lovers. Remove seeds and membranes for flavor without intense spice.)
For Serving Your Easy Chicken Fajitas:
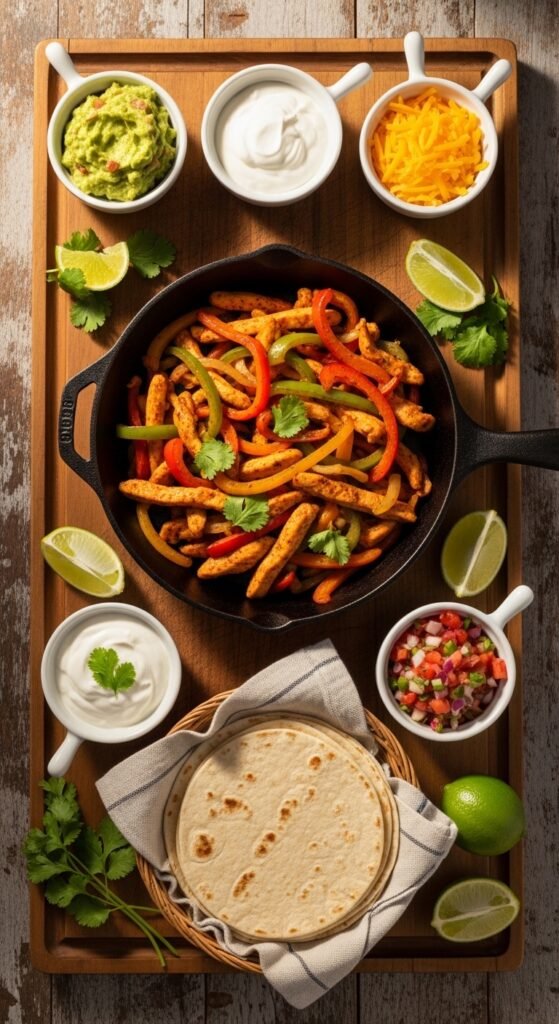
- 8-10 flour tortillas (Warm them properly—I’ll explain how later.)
- Toppings bar suggestions: Sour cream or Mexican crema, fresh guacamole or sliced avocado, pico de gallo or salsa, shredded cheese (cheddar, Monterey Jack, or a Mexican blend), fresh cilantro, additional lime wedges.
The Essential Equipment Guide (You Probably Already Own Everything)
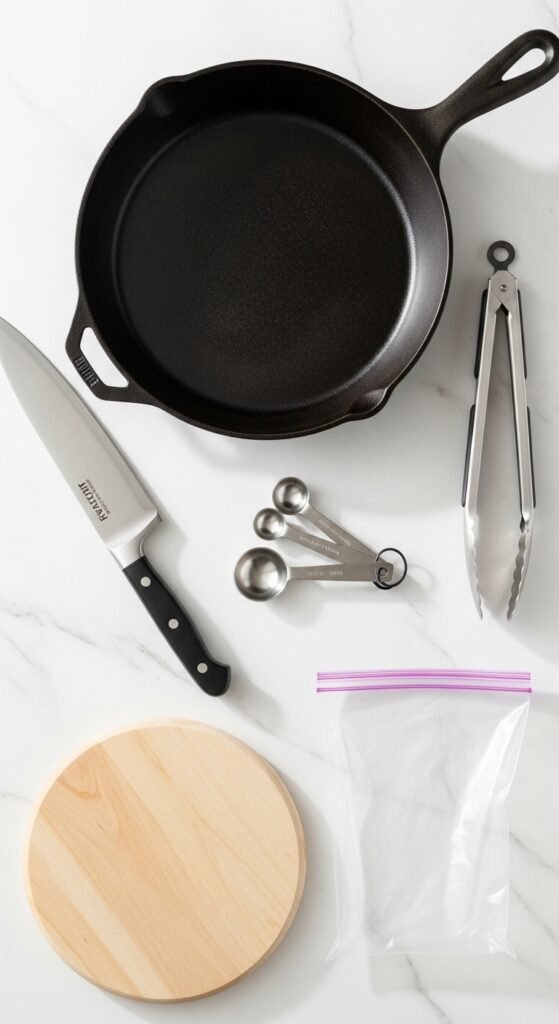
One of the beauties of this easy chicken fajita recipe is that it doesn’t require any fancy equipment. Nevertheless, using the right tools for specific steps will make your cooking experience smoother.
Must-Have Equipment:

- A large cast-iron skillet or heavy-bottomed pan (Cast iron retains heat exceptionally well, creating that beautiful sear. Any large skillet works—just avoid nonstick for the searing step.)
- A sharp chef’s knife (Dull knives are dangerous and make vegetable prep frustrating.)
- A large cutting board (Consider separate boards for raw chicken and vegetables.)
- Mixing bowls (One large bowl for marinating, plus a few small bowls for prepped ingredients.)
- Tongs (Give you better control than spatulas when flipping chicken and stirring vegetables.)
Nice-to-Have Equipment:
- A meat thermometer (Takes the guesswork out of chicken doneness. Chicken is safely cooked at 165°F internally.)
- A citrus juicer (Makes extracting lime juice much easier.)
- A tortilla warmer (Keeps tortillas soft and warm. Alternatively, wrap them in a clean kitchen towel.)
Step-by-Step Guide to Restaurant-Quality Chicken Fajitas at Home
Now we’ve arrived at the heart of this article. I’ll break down every single step with the level of detail I wish someone had given me during that disastrous first attempt. Consequently, please read each section carefully before you start cooking.
Step 1: Prepare Your Homemade Fajita Seasoning (2 minutes)
Before you touch any chicken or vegetables, mix your seasoning blend. This simple habit prevents cross-contamination and makes the entire process flow more smoothly.
In a small bowl, combine your chili powder, ground cumin, smoked paprika, garlic powder, onion powder, dried oregano, salt, black pepper, and cayenne if using. Whisk everything together with a fork until the spices are evenly distributed. Give the mixture a sniff—it should smell intensely aromatic, with the cumin and chili powder leading the way.
Pro tip: Make a quadruple batch of this fajita seasoning and store it in an airtight jar. Having pre-mixed seasoning on hand means you’re always fifteen minutes away from incredible fajitas. This homemade blend stays fresh for up to six months when stored in a cool, dark cabinet.
Step 2: Prepare Your Chicken for Marinating (5 minutes)
Pat your chicken thighs completely dry with paper towels. This step matters more than you might think because moisture on the surface prevents proper browning. As a result, wet chicken steams instead of sears, leading to gray, unappetizing meat.
If you’re using chicken breasts, consider butterflying them (slicing horizontally to create thinner, more even pieces). This ensures they cook quickly and evenly. For thighs, no special preparation is needed.
Place your dry chicken in a large bowl. Add the olive oil, minced garlic, lime juice, and apple cider vinegar. Toss to coat every piece thoroughly. Next, sprinkle your homemade fajita seasoning over the chicken—use about two-thirds of the mixture for the chicken and reserve the rest for your vegetables.
Using your hands (wear disposable gloves if preferred), massage the marinade into every inch of the chicken. This physical action helps the seasoning penetrate deeper than simply stirring. Cover the bowl with plastic wrap or transfer everything to a resealable bag.
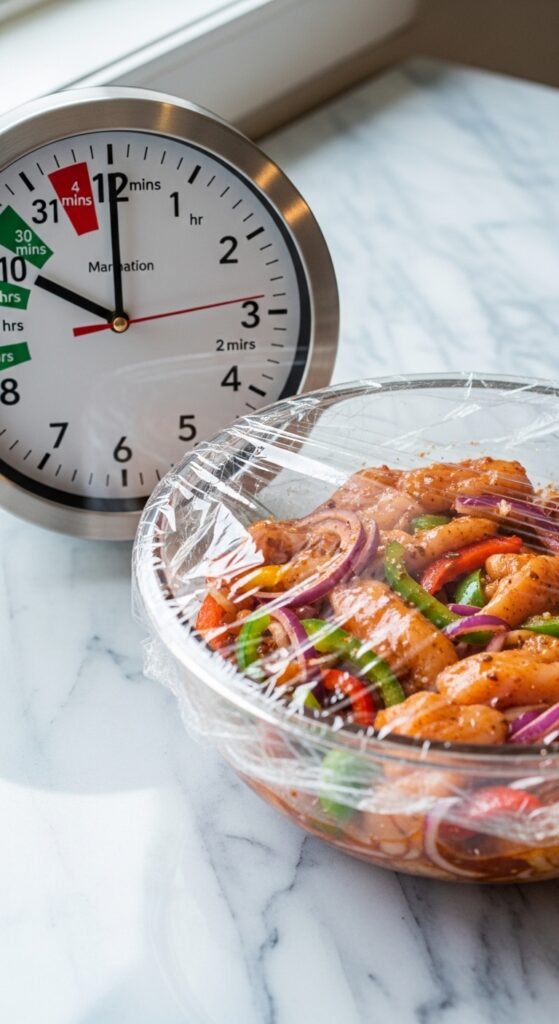
Step 3: The Marination Decision (15 minutes to 8 hours)
Here’s where you have choices based on your schedule. For the best results, I recommend marinating for at least 30 minutes, but let me be transparent about what different timeframes deliver:
- 15-30 minutes: Your chicken will have noticeable flavor on the exterior, but the inside will taste primarily like chicken. This still produces delicious results—honestly, I use this timeframe most weeknights.
- 1-4 hours: The seasoning penetrates deeper, and the acids begin tenderizing the meat. This is my sweet spot for flavor without advance planning.
- 4-8 hours (overnight): Maximum flavor penetration and tenderness. The chicken will taste infused from edge to edge. However, don’t exceed 8 hours because the acids can make the meat mushy.
While your chicken marinates, you can prep your vegetables or simply relax. That’s the beauty of this easy chicken fajita recipe—most of the active work happens upfront.
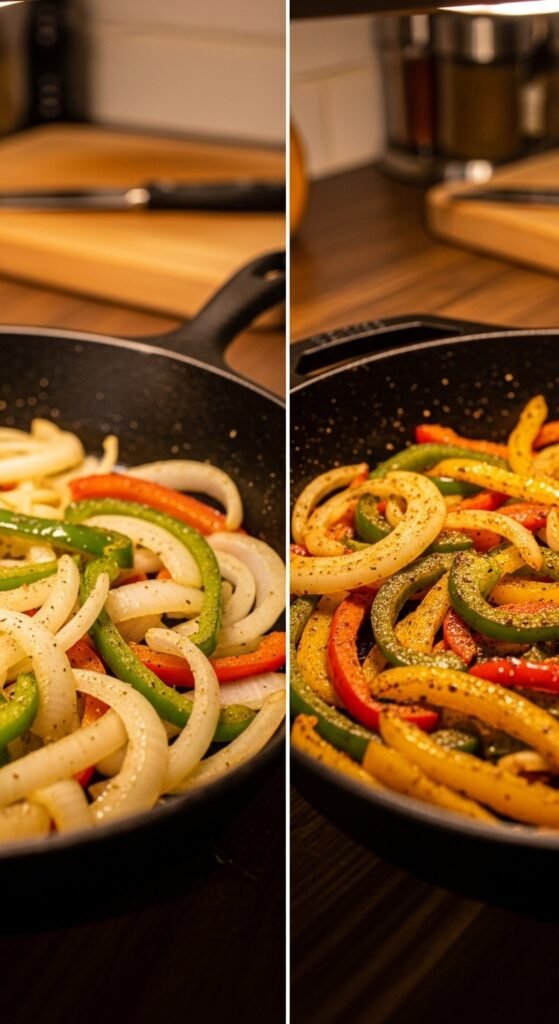
Step 4: Prep Your Fajita Vegetables Like a Pro (10 minutes)
The way you cut your vegetables dramatically affects how they cook and how they feel in your final fajita. Here’s the technique I’ve refined over years of trial and error:
For the bell peppers: Slice off the top and bottom, then cut down through one side to open the pepper flat. Remove the core and all white membranes (these are bitter). Lay the pepper flat and slice into ¼-inch strips. Each strip should be roughly the same thickness so they cook evenly.
For the onions: Cut off the stem end but leave the root end intact (this holds the onion together while you slice). Cut the onion in half through the root, peel off the papery skin, then slice into ¼-inch half-moons. The root end prevents the onion from falling apart into individual rings.
For the jalapeño (if using): Slice lengthwise, scrape out the seeds and white pith with a spoon (this is where most of the heat lives), then mince finely. Wash your hands thoroughly afterward—or better yet, wear gloves—because jalapeño oils can burn your eyes and skin.
Place your prepared vegetables in a bowl and toss with the remaining fajita seasoning plus a drizzle of oil. This ensures every pepper strip and onion slice gets coated in that signature flavor.
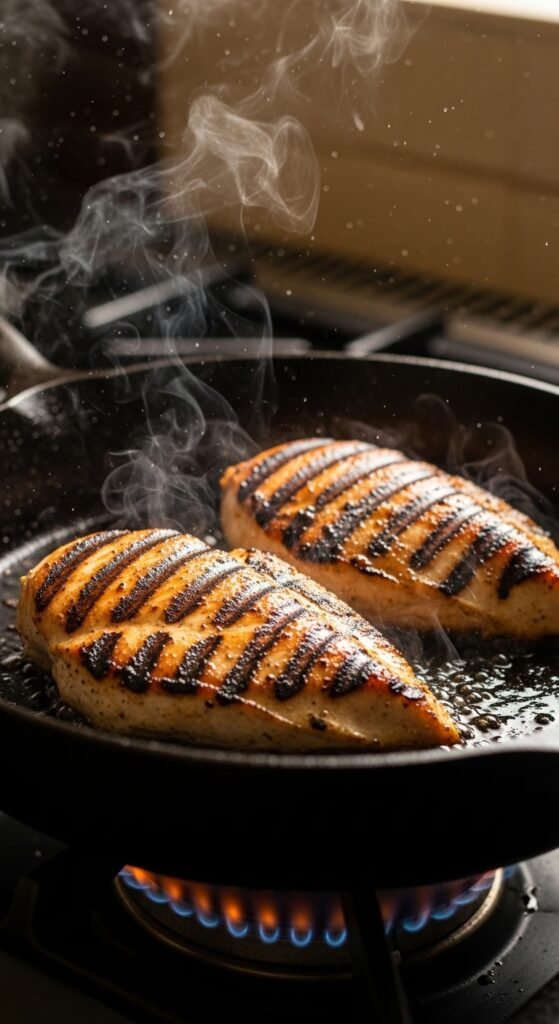
Step 5: The Critical Searing Process (8-10 minutes)
Place your largest skillet over medium-high heat and let it get hot for about 2 minutes. You’ll know it’s ready when you flick a drop of water onto the surface and it dances and evaporates immediately.
Add 1 tablespoon of oil to the pan and swirl to coat. Carefully place your marinated chicken in a single layer—don’t crowd the pan. If your skillet isn’t large enough, cook the chicken in two batches. Overcrowding drops the pan’s temperature instantly, resulting in steamed, pale chicken instead of beautifully browned fajita meat.
Let the chicken cook undisturbed for 4-5 minutes. I know it’s tempting to peek or move the pieces around, but resist! That golden-brown crust (what chefs call the Maillard reaction) only forms when the meat stays in contact with the hot surface. You’ll know it’s ready to flip when the chicken releases easily from the pan without sticking.
Flip each piece and cook for another 3-4 minutes on the second side. If you’re using a meat thermometer, you’re looking for an internal temperature of 165°F. Without a thermometer, cut into the thickest piece—the juices should run clear, and there should be no pink remaining.
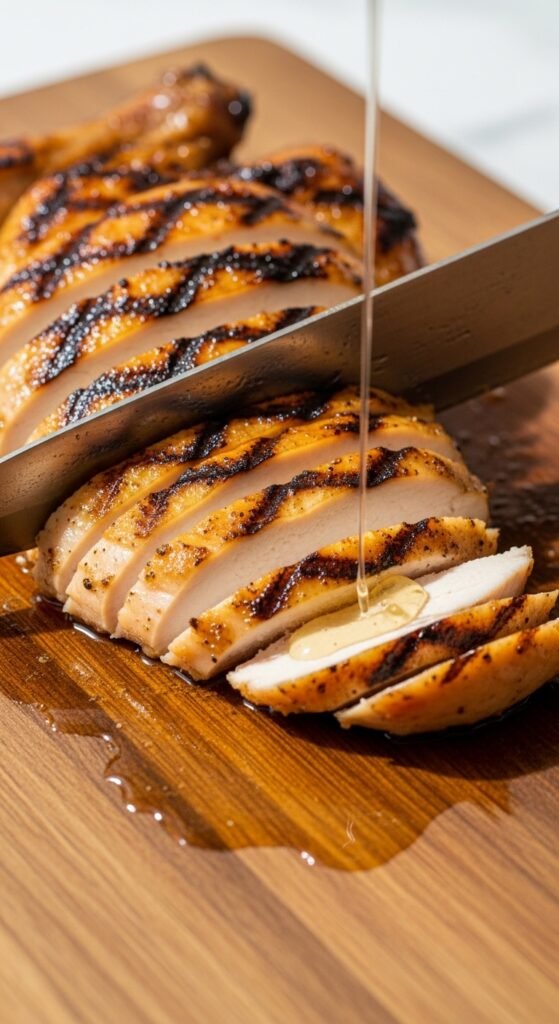
Transfer the cooked chicken to a cutting board and let it rest for 5 minutes. This resting period is non-negotiable because it allows the juices to redistribute throughout the meat. If you slice immediately, those precious juices will run out onto your cutting board, leaving you with dry chicken.
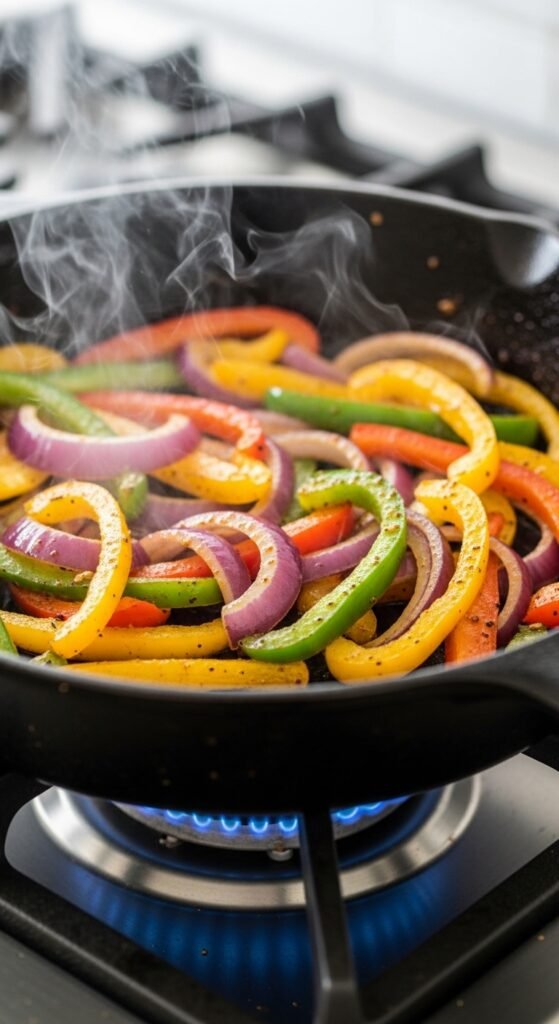
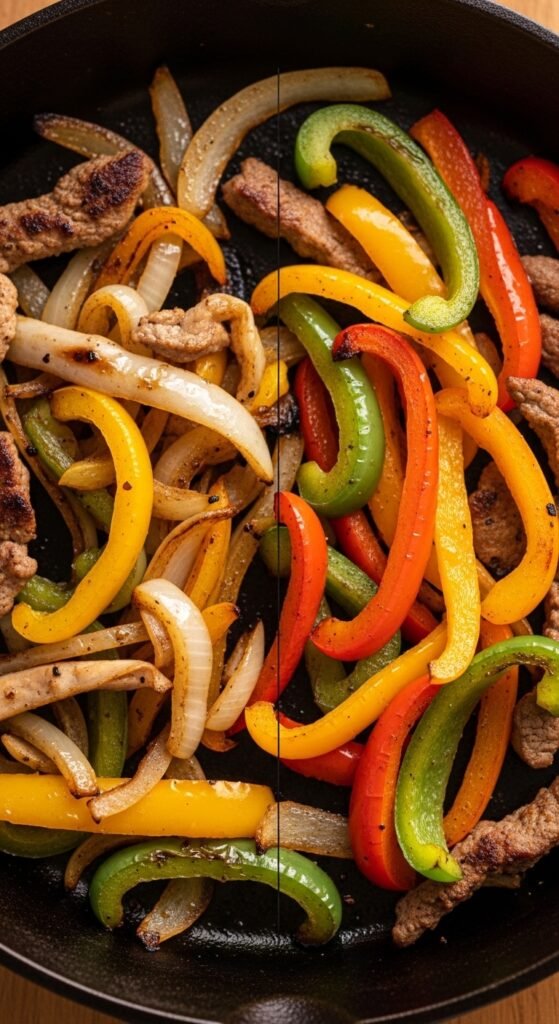
Step 6: The Sizzling Fajita Vegetables (5-7 minutes)
While your chicken rests, add the seasoned vegetables to the same hot skillet (no need to wash it—those browned bits from the chicken add incredible flavor). Spread them into an even layer and let them cook without stirring for 2 minutes to develop caramelized edges.
After 2 minutes, stir the vegetables and continue cooking for another 3-5 minutes, stirring occasionally. You’re looking for peppers that are tender-crisp with charred spots, not mushy and collapsed. Similarly, the onions should be translucent with brown edges—this sweetness balances the savory chicken beautifully.
For the most dramatic presentation (and honestly, for the fun factor), crank your oven’s broiler to high for the last minute of cooking. The intense overhead heat creates those crave-worthy blackened spots that scream “restaurant fajitas.”
Step 7: Slice Your Chicken Correctly (3 minutes)
Place your rested chicken on a clean cutting board. Using a sharp knife, slice across the grain (perpendicular to the natural muscle lines) into ½-inch strips. Cutting against the grain shortens the muscle fibers, making each bite more tender.
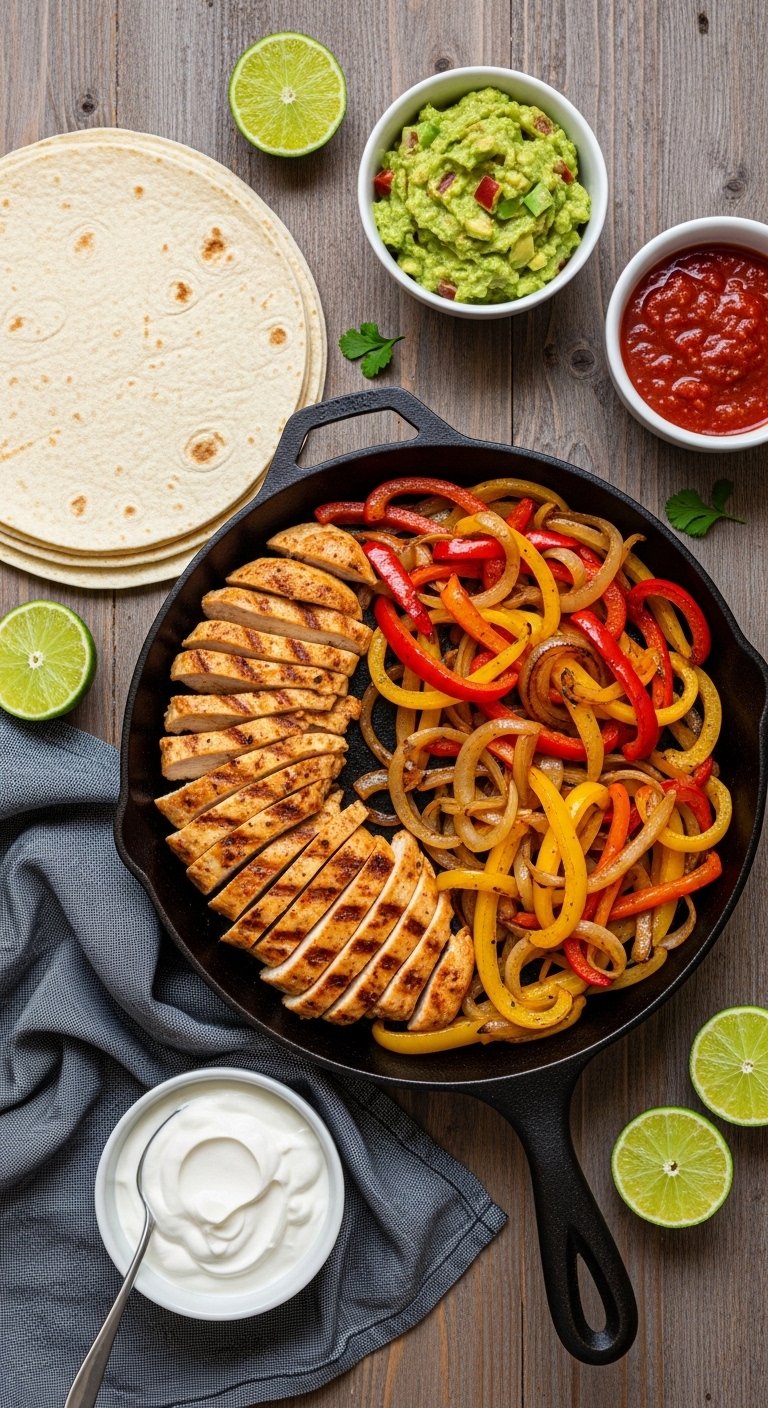
If you’re serving guests, arrange the sliced chicken on top of the sizzling vegetables in the skillet. Squeeze fresh lime juice over everything—this final acid bright lifts all the other flavors. The combination of sizzling sounds and citrus aroma will literally pull people into your kitchen.
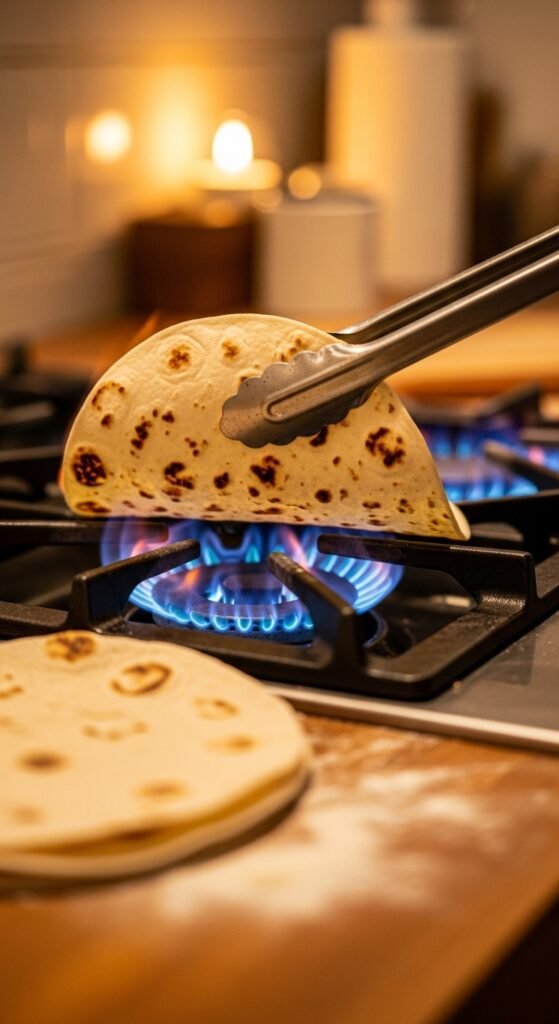
Step 8: Warm Your Tortillas Properly (This Matters More Than You Think)
Cold or stiff tortillas can ruin an otherwise perfect fajita. Here are three reliable warming methods:
- Gas stove method (my favorite): Turn a gas burner to medium-low. Using tongs, place a tortilla directly over the flame for 10-15 seconds per side until it puffs slightly and develops small charred spots.
- Skillet method: Heat a dry skillet over medium heat. Warm each tortilla for 20-30 seconds per side.
- Microwave method: Stack tortillas between two damp paper towels and microwave for 30-60 seconds. This is the fastest method but produces the least texture.
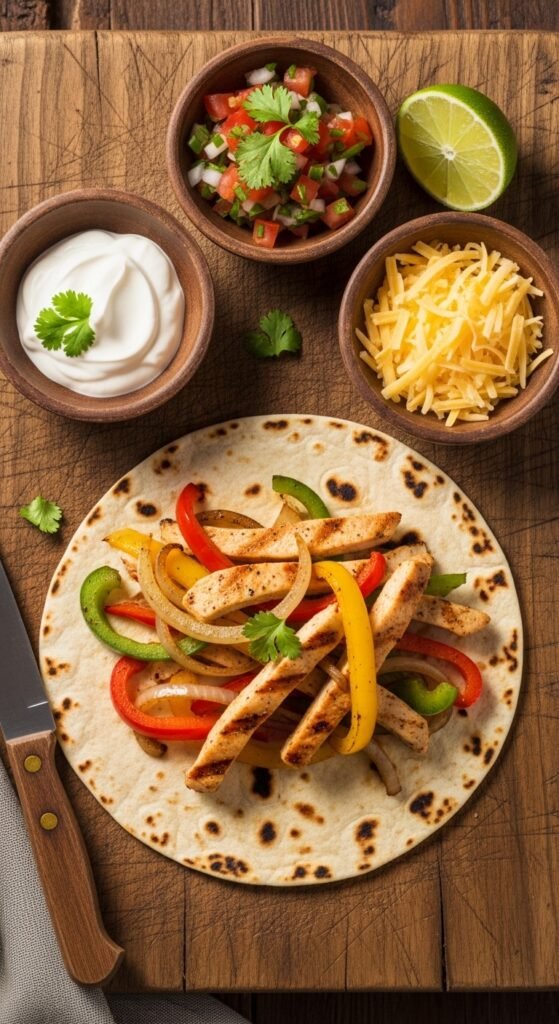
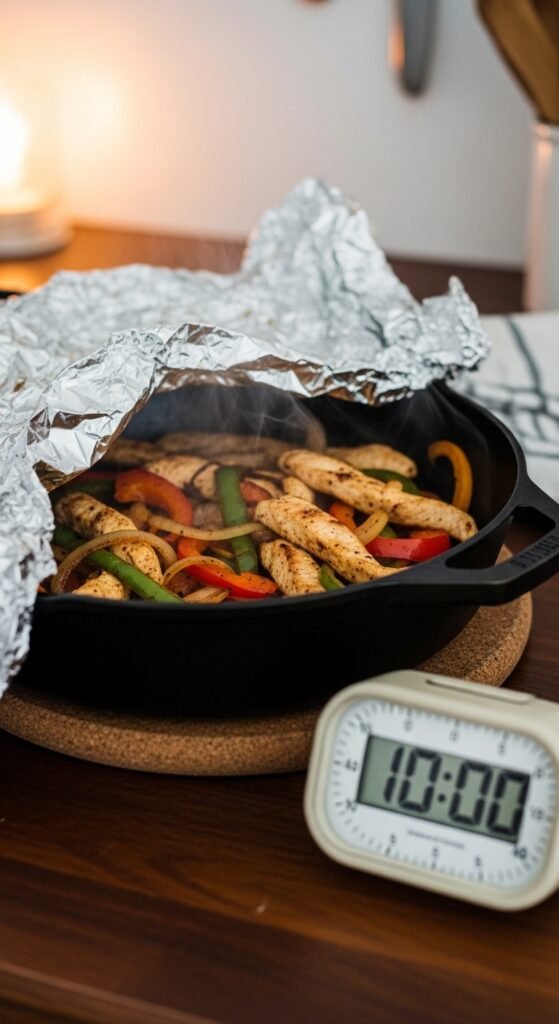
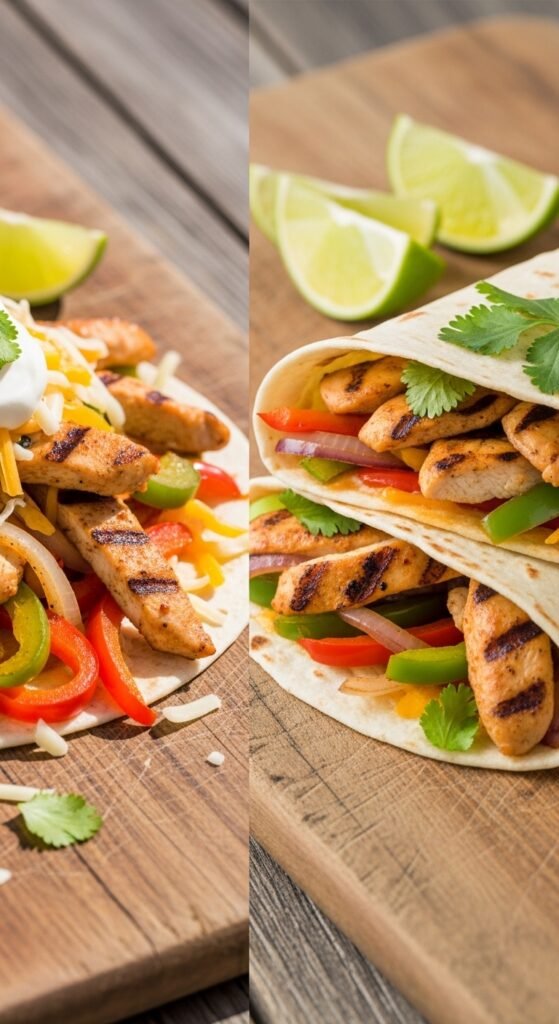
Step 9: Assemble Your Easy Chicken Fajitas (5 minutes)
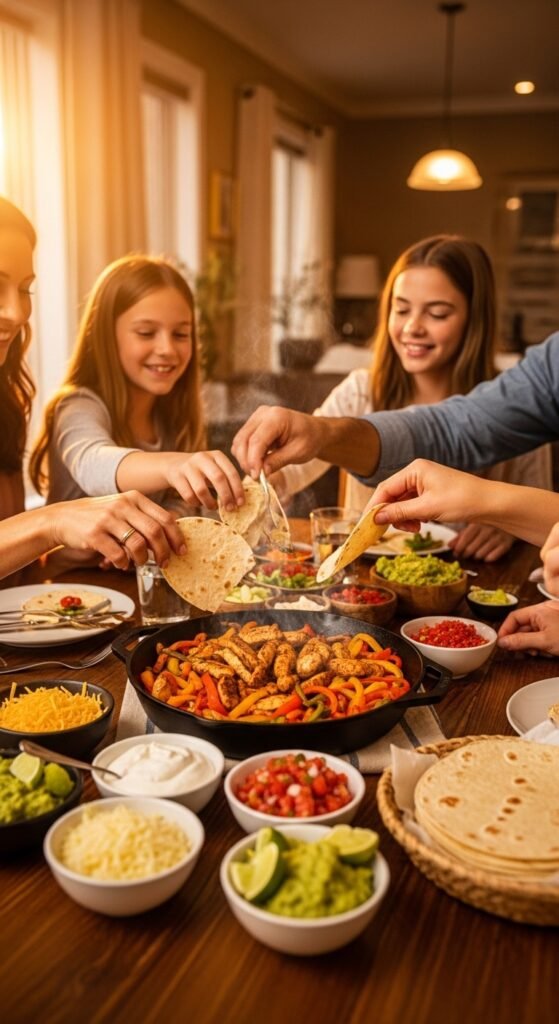
Set up your toppings bar near the table so everyone can customize their fajitas. Place your warm tortillas, the skillet of chicken and vegetables, and small bowls of each topping within easy reach.
To build the perfect fajita: Start with a tortilla, add a generous portion of chicken, top with peppers and onions, then add your chosen toppings. Fold one side over the filling, then fold up the bottom, and continue rolling. Alternatively, eat them “taco style” with just a simple fold.
Common Fajita Mistakes and How to Avoid Them
After teaching countless friends and family members this easy chicken fajita recipe, I’ve noticed the same issues popping up repeatedly. Let me save you the trouble by addressing these pitfalls upfront.
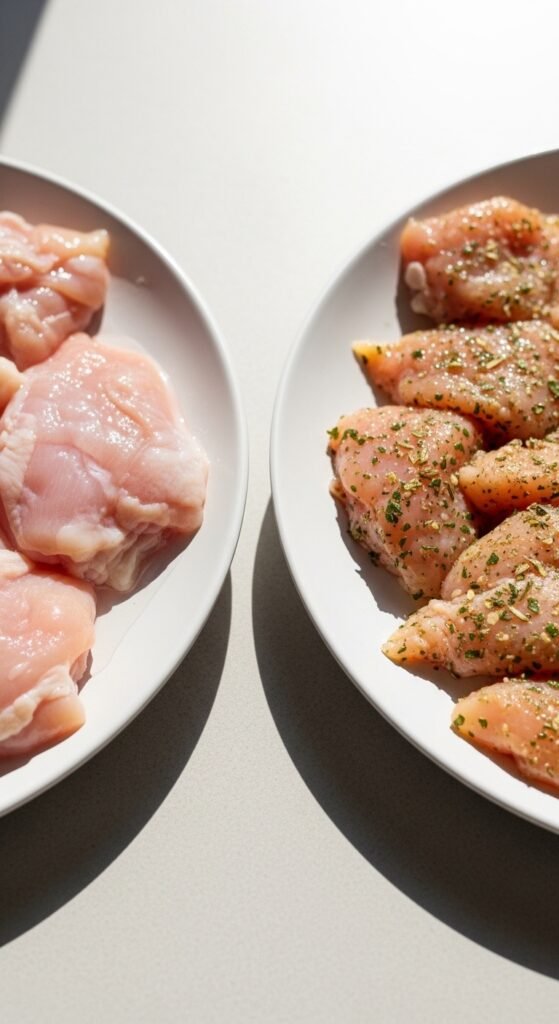
Mistake #1: Using Wet Chicken
I mentioned this earlier, but it bears repeating because it’s the single most common error. Patting your chicken dry takes ten seconds but makes the difference between browned, flavorful meat and sad, gray chicken. Consequently, don’t skip this step even if you’re in a hurry.
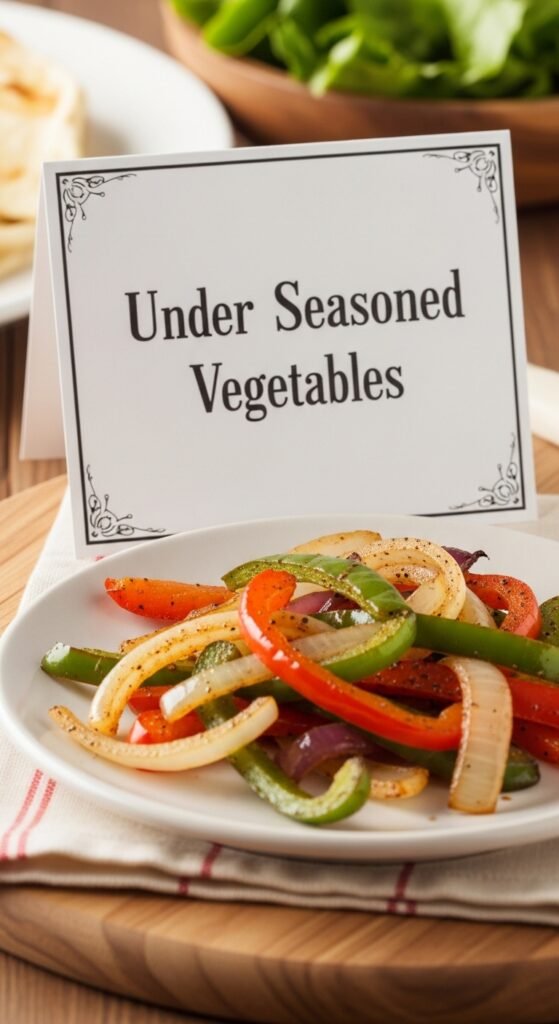
Mistake #2: Underseasoning Your Vegetables
Many people season the chicken thoroughly but forget about the peppers and onions. As a result, the vegetables taste bland and watery. Always toss your vegetables with oil and seasoning before cooking.
Mistake #3: Overcooking the Peppers
Mushy, limp peppers have no place in good fajitas. You want them to retain some crunch and structural integrity. Cook them just until they’re tender-crisp with charred edges—usually 5-7 minutes total.
Mistake #4: Skipping the Resting Period
I understand the impulse to slice into hot chicken immediately. However, patience here pays enormous dividends. Those five minutes of resting allow the juices to settle, meaning every bite stays moist and flavorful.
Mistake #5: Overfilling Your Tortillas
Less is genuinely more when it comes to fajita assembly. Overstuffed tortillas crack and spill everywhere, creating a messy eating experience. Aim for about ½ cup of filling per tortilla, then add more to subsequent tortillas if you’re still hungry.
Creative Variations on Your Easy Chicken Fajita Recipe
Once you’ve mastered the basic recipe, consider these delicious variations to keep things interesting:
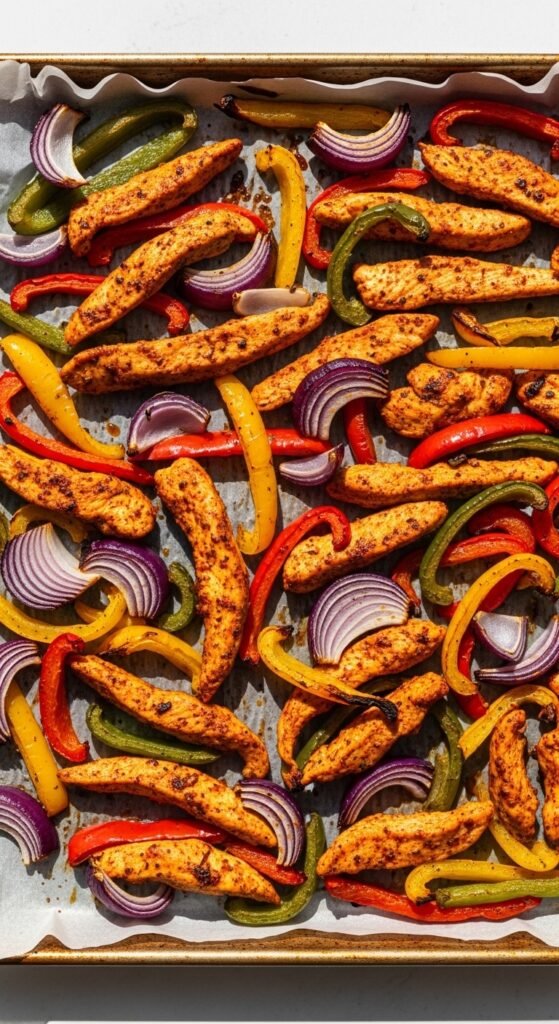
Sheet Pan Chicken Fajitas
For an even easier approach, toss your marinated chicken and seasoned vegetables on a large baking sheet. Roast at 425°F for 15-20 minutes, stirring halfway through. This method requires even less active cooking time and works beautifully for meal prep.
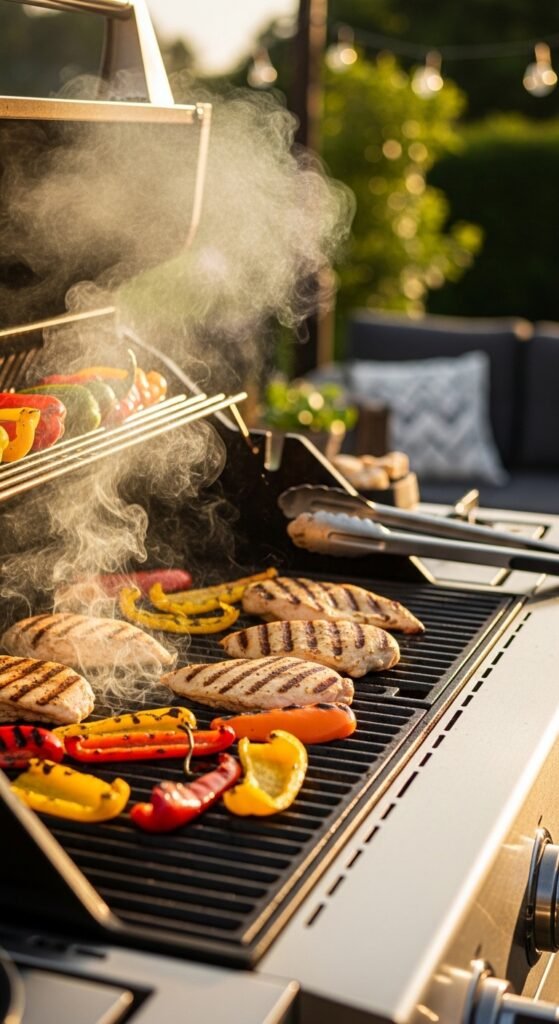
Grilled Chicken Fajitas
Fire up your outdoor grill for smoky, charred perfection. Cook the marinated chicken over medium-high direct heat for 5-7 minutes per side. Meanwhile, place your peppers and onions in a grill basket or on a piece of heavy-duty foil. The grill adds an authentic smokiness that’s impossible to replicate indoors.
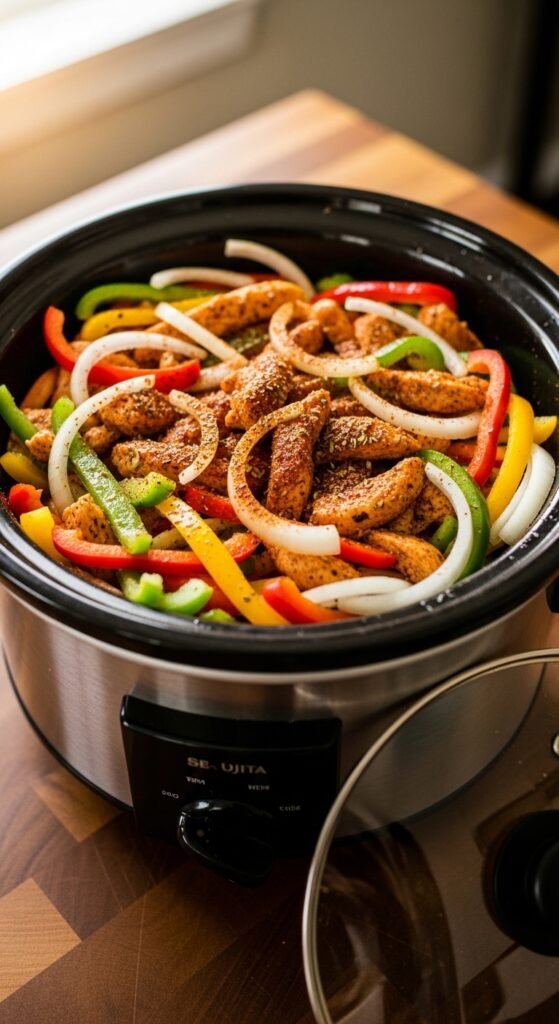
Slow Cooker Chicken Fajitas
When you need dinner to be ready exactly when you walk through the door, this method delivers. Place your marinated chicken in the slow cooker with sliced peppers and onions. Cook on low for 4-6 hours or high for 2-3 hours. The texture will be softer than stovetop fajitas, but the convenience is unbeatable.
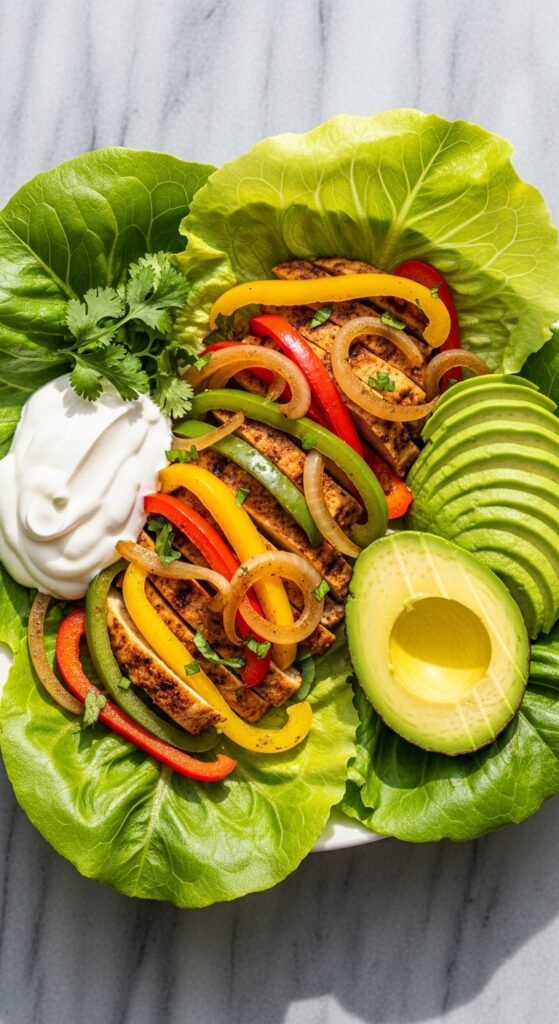
Low-Carb and Keto Chicken Fajitas
Skip the tortillas entirely and serve your chicken fajitas over cauliflower rice, inside lettuce wraps (butter lettuce or romaine leaves work perfectly), or simply eat them as a hearty bowl. The filling itself is naturally low in carbohydrates.
Spicy Mango Chicken Fajitas
Add ½ cup of diced fresh mango to your vegetable mixture during the last 2 minutes of cooking. The sweet heat combination is absolutely addictive. Additionally, consider adding a splash of orange juice to your marinade for extra fruity brightness.
Nutritional Information (Because Knowledge Is Power)
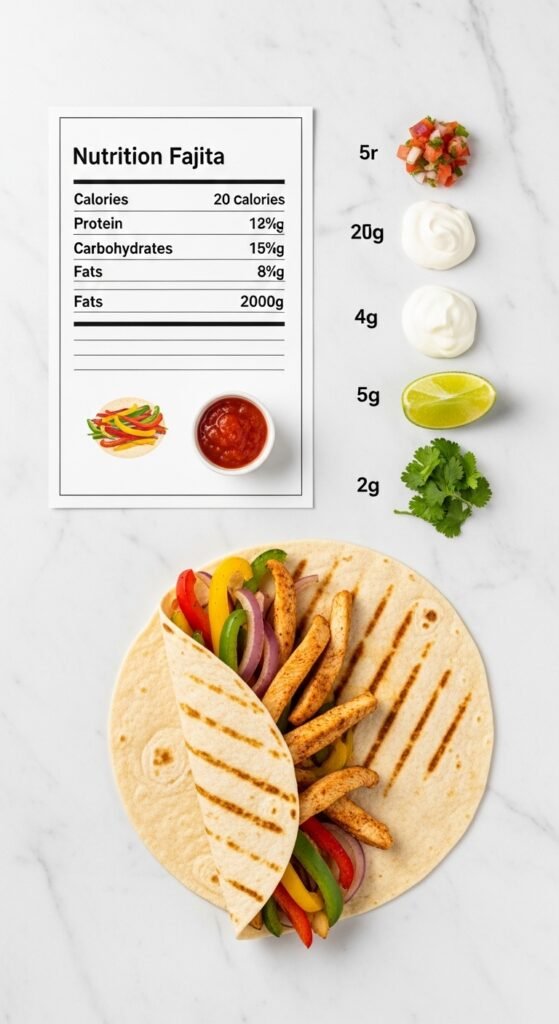
For those tracking their nutrition, here’s the breakdown for one serving of this easy chicken fajita recipe (approximately 2 filled tortillas with toppings):
- Calories: 480-550 (varies based on toppings and tortilla choice)
- Protein: 38-42 grams
- Fat: 22-28 grams (mostly from olive oil and chicken thighs)
- Carbohydrates: 35-40 grams
- Fiber: 5-7 grams
- Sugar: 6-8 grams (naturally occurring from vegetables)
- Sodium: 600-800 mg
This recipe provides an excellent balance of macronutrients, with lean protein supporting muscle health, colorful vegetables delivering antioxidants and vitamins, and healthy fats promoting satiety. To reduce calories, use chicken breasts instead of thighs, limit cheese and sour cream, and opt for corn tortillas.
Frequently Asked Questions About Chicken Fajitas
Can I use pre-made fajita seasoning from a packet?
You certainly can, though I strongly encourage you to try the homemade version at least once. Most commercial packets contain anti-caking agents, preservatives, and excessive sodium. Furthermore, they cost significantly more per ounce than making your own blend. That said, if you’re in a genuine pinch, a packet will work—just reduce the added salt accordingly.
How do I store and reheat leftover chicken fajitas?
Store the chicken, vegetables, and tortillas separately in airtight containers in the refrigerator. The filling keeps well for up to 4 days. To reheat, warm the chicken and vegetables in a hot skillet for 2-3 minutes until sizzling. Avoid microwaving the filling if possible, as it makes the peppers mushy and the chicken rubbery. For tortillas, rewrap them in slightly damp paper towels and microwave for 20-30 seconds.
Can I freeze this easy chicken fajita recipe?
Absolutely! Freeze the uncooked chicken in its marinade for up to 3 months. Thaw overnight in the refrigerator before cooking. The cooked filling also freezes well for up to 2 months, though the vegetable texture softens slightly upon reheating. I don’t recommend freezing assembled fajitas with tortillas.
What if I don’t have all the spices for the homemade seasoning?
The most critical spices are chili powder and cumin—these create the essential fajita flavor profile. If you’re missing smoked paprika, regular paprika or even a pinch of cayenne can substitute. Missing oregano? Skip it entirely; the dish will still taste great. The only spice I wouldn’t omit is cumin, as it provides that distinctive “fajita” aroma.
Why do restaurant fajitas taste better than mine?
Restaurant fajitas benefit from two advantages: incredibly high-heat cooking equipment (commercial burners reach much higher temperatures than home stoves) and generous amounts of butter and oil. To narrow the gap, preheat your pan longer than you think necessary, don’t crowd the meat, and don’t be shy with the oil. Additionally, many restaurants add a splash of beer or chicken broth to their vegetables for extra depth.
Why You Should Buy Quality Ingredients (And Where to Find Them)
Throughout this article, I’ve emphasized technique over expensive ingredients. However, I want to be honest with you about where spending a few extra dollars genuinely improves your easy chicken fajita recipe.
First, fresh, high-quality chicken makes a noticeable difference. Look for air-chilled chicken rather than water-chilled, which hasn’t been plumped with saline solution. Air-chilled chicken browns better and tastes more like actual chicken. Many grocery stores now offer this option.
Second, whole spices that you grind yourself deliver incomparable flavor. However, I recognize not everyone owns a spice grinder. Therefore, buy your ground spices from a store with high turnover—spices lose potency over time, and dusty jars from the back of the shelf won’t do your fajitas any favors.
Third, fresh produce quality directly impacts your results. Bell peppers should feel heavy for their size with tight, glossy skin. Onions should be firm with dry, papery skins and no soft spots. Limes should feel heavy (indicating juiciness) and have thin, fragrant skin.
You can find all these ingredients at any mainstream grocery store. However, I’ve had excellent results shopping at Trader Joe’s for affordable organic chicken, Costco for bulk bell peppers and limes, and local Mexican markets for authentic tortillas and crema.
My Final Thoughts and Encouragement
If you’ve read this entire guide, you now possess everything you need to create truly exceptional easy chicken fajitas in your own kitchen. More importantly, you understand the why behind each step—why we pat chicken dry, why we let meat rest, why we don’t crowd the pan. This knowledge transforms cooking from following instructions to truly understanding a dish.
Remember that disastrous first attempt I mentioned at the beginning? My family survived that meal (barely), and yours will too if things don’t go perfectly the first time. Cooking is a skill that improves with practice, and every expert home cook has a collection of hilarious failure stories.
Tonight, I encourage you to try this recipe exactly as written. Gather your ingredients, clear your counter space, and give yourself permission to focus entirely on the cooking process. Play some music, pour a glass of something refreshing, and enjoy the rhythmic work of slicing vegetables and stirring sizzling pans.
When you take that first bite—warm tortilla, juicy chicken, sweet caramelized peppers, cool sour cream, bright lime—you’ll understand why I’m so passionate about this dish. That combination of flavors and textures, achieved with simple ingredients and straightforward techniques, represents everything I love about home cooking.
So go ahead. Make these chicken fajitas. Feed the people you love. And please, leave a comment or send me a message about how they turned out. Nothing makes me happier than knowing another home cook has discovered the joy of creating something delicious from scratch.
Happy cooking, friends. Now go make some sizzle.