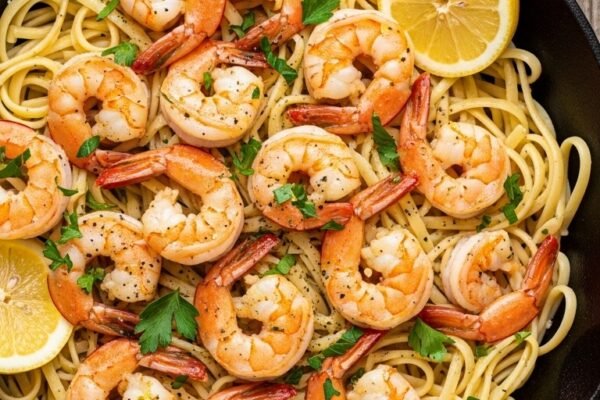
Let me start with a little story. Last Tuesday, around 12:47 PM, I found myself staring into my refrigerator for the third time in ten minutes. You know the drill—hungry, impatient, and utterly uninspired by the sad collection of half-empty condiment bottles and wilting vegetables. My stomach was growling loud enough to wake the neighbors, but nothing looked appealing. That’s when I spotted a leftover rotisserie chicken from Sunday’s dinner, a forgotten bag of romaine lettuce hiding behind the milk carton, and a jar of Caesar dressing that was dangerously close to its expiration date.
In that moment of desperation, something clicked. I grabbed a flour tortilla from the bread drawer, threw everything together, and took a bite. Pure magic. That accidental creation turned into an obsession, and after weeks of testing, tweaking, and taste-testing (tough job, but someone’s got to do it), I’ve perfected the art of making restaurant-quality chicken Caesar wraps right in your own kitchen.
Whether you’re a busy parent packing school lunches, a professional looking for a satisfying workday meal, or simply someone who appreciates good food without the fuss, this guide will walk you through everything you need to know. By the time you finish reading, you’ll be convinced that homemade chicken Caesar wraps are not just easy to make—they’re absolutely worth investing in the right ingredients and tools to make them spectacular.
Why Chicken Caesar Wraps Deserve a Permanent Spot in Your Meal Rotation
Before we dive into the nitty-gritty of recipes and techniques, let me paint you a picture of why these wraps have become my absolute go-to meal. First off, they’re incredibly versatile. I’ve made them for quick weekday lunches, casual dinner parties, picnic outings, and even post-workout refuels. They travel beautifully, which means you can say goodbye to sad, soggy sandwiches once and for all.
Secondly, chicken Caesar wraps hit every single flavor and texture note you could want. You’ve got the savory, juicy chicken, the crisp crunch of fresh romaine lettuce, the sharp saltiness of Parmesan cheese, the creamy tang of Caesar dressing, and that satisfying chew from a warm tortilla wrap. It’s a complete meal that doesn’t compromise on taste or convenience.
Here’s another truth bomb: making these wraps at home saves you a ridiculous amount of money. That chicken Caesar wrap you’re buying from the deli for $8.99? You can make four superior versions for the same price. Plus, you control exactly what goes into them—no mysterious preservatives, no excessive sodium, and you can customize every single component to your liking.
The Essential Components of Amazing Chicken Caesar Wraps Recipes
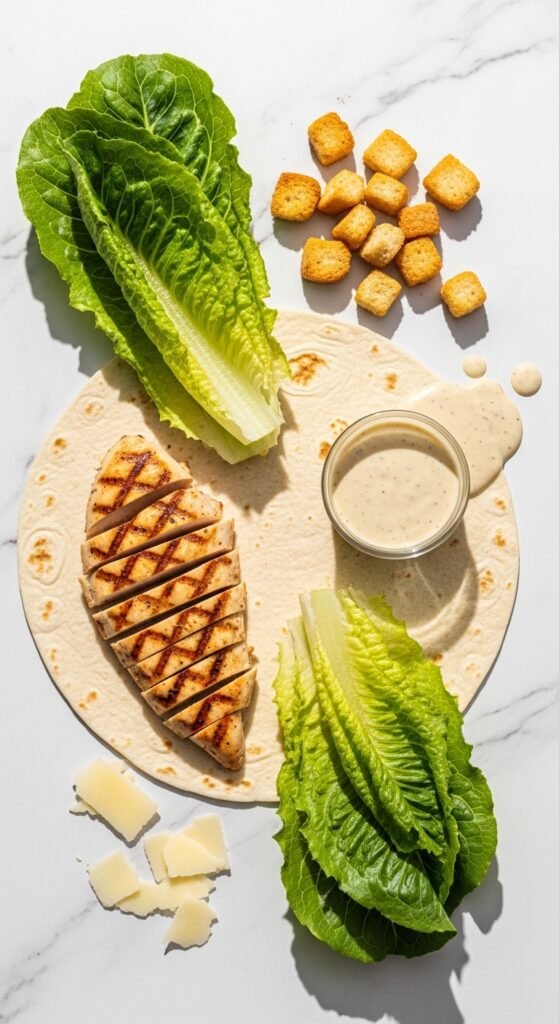
Let me break down each element that makes these wraps truly shine. Pay close attention here, because the quality of your ingredients directly impacts the final result.
The Chicken: Your Protein Powerhouse
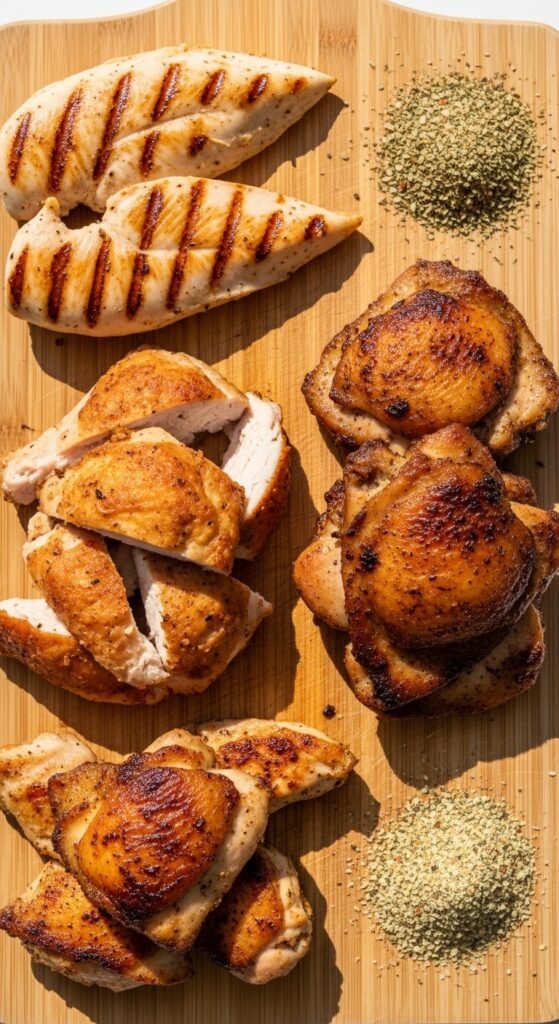
The star of any chicken Caesar wrap is, unsurprisingly, the chicken itself. Through extensive experimentation (my family happily volunteered as taste-testers), I’ve discovered several excellent options:
Option One: Rotisserie Chicken – This is my personal favorite for busy weeknights. A good quality rotisserie chicken from your local grocery store saves you at least 45 minutes of cooking time. Look for one that’s moist and well-seasoned. I typically buy mine fresh on the day I’m making wraps. Shred it while it’s still warm—cold chicken doesn’t shred nearly as easily. One medium rotisserie chicken yields about 3 to 4 cups of shredded meat, perfect for 6 to 8 wraps.
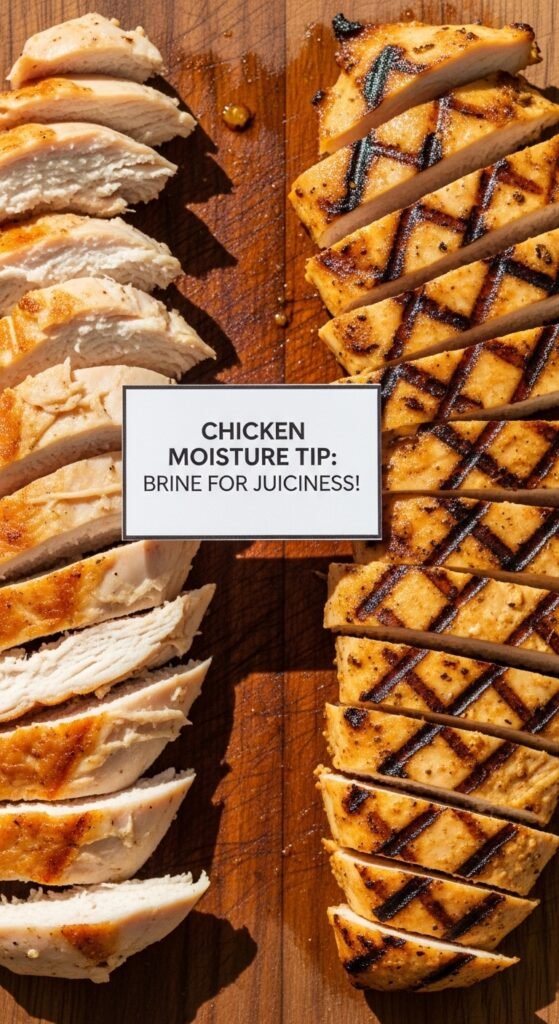
Option Two: Grilled Chicken Breast – If you prefer making everything from scratch, grilled chicken breast offers a wonderful smoky flavor. Season your chicken breasts simply with salt, pepper, garlic powder, and a squeeze of lemon before grilling. Cook until they reach an internal temperature of 165°F, then let them rest for five minutes before slicing. The resting period is crucial—it allows the juices to redistribute throughout the meat instead of ending up on your cutting board.
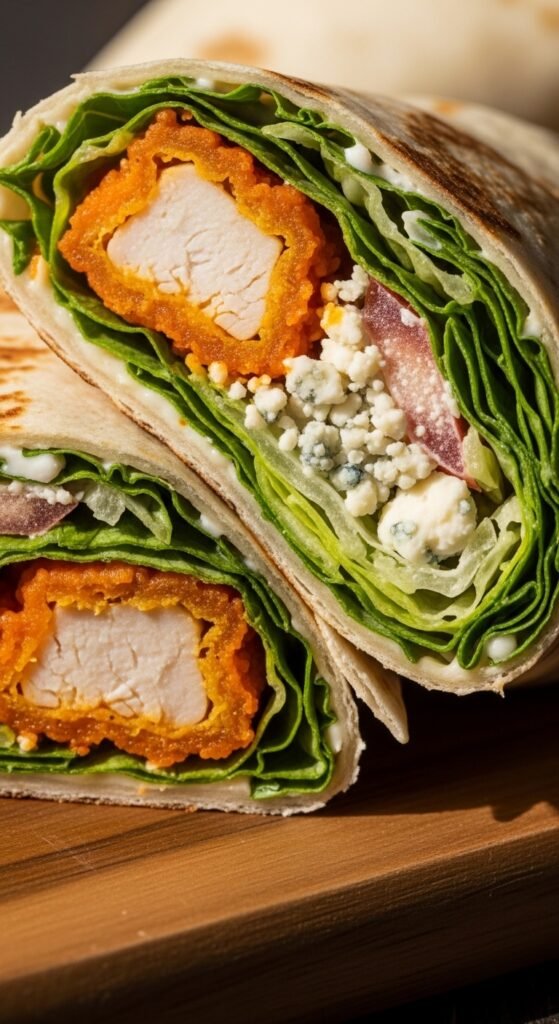
Option Three: Breaded Chicken Tenders – For those days when you’re craving extra crunch, breaded chicken tenders or strips add a delightful texture contrast. You can bake or air-fry them to keep things lighter than deep-frying. Just cut them into bite-sized pieces before adding to your wrap.
Let me share a quick anecdote here. Last month, I was hosting a last-minute book club meeting and had absolutely no time to cook chicken from scratch. I grabbed two rotisserie chickens from Costco, shredded them in under ten minutes, and assembled a platter of chicken Caesar wraps that disappeared within fifteen minutes of my guests arriving. Everyone asked for the recipe, and they couldn’t believe I hadn’t spent hours in the kitchen. That’s the beauty of working smarter, not harder.
Also Read: The Ultimate Guide to Keto Dinner Recipes: Delicious, Satisfying, and Life-Changing Meals
The Tortilla Wrap: Your Flavor Vessel
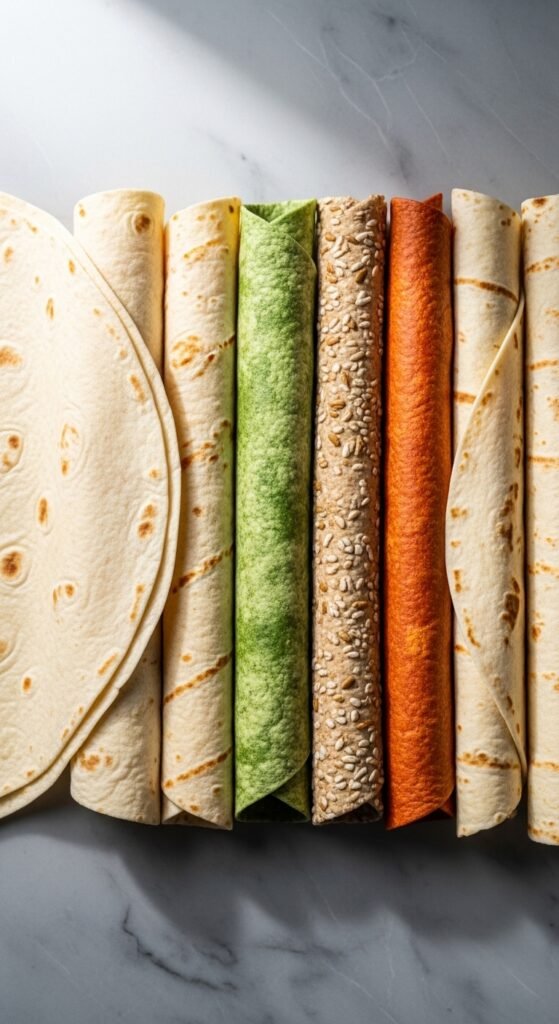
Don’t underestimate the importance of a good tortilla wrap. I’ve made the mistake of buying cheap, thin tortillas that crack and fall apart the moment you try to roll them, and let me tell you—there’s nothing sadder than a chicken Caesar wrap that’s disintegrated into a messy pile of ingredients.
Here’s what you should look for in a quality flour tortilla:
- Flexibility – A good wrap should bend without breaking. Check the expiration date; fresher tortillas are more pliable.
- Size – 10 to 12-inch tortillas work best. Anything smaller won’t hold enough filling, anything larger becomes unwieldy.
- Thickness – You want something substantial enough to hold up to the dressing without becoming soggy, but not so thick that it overpowers the other ingredients.
- Flavor – Plain flour tortillas are classic, but spinach, tomato basil, or whole wheat varieties add extra dimensions to your wrap.
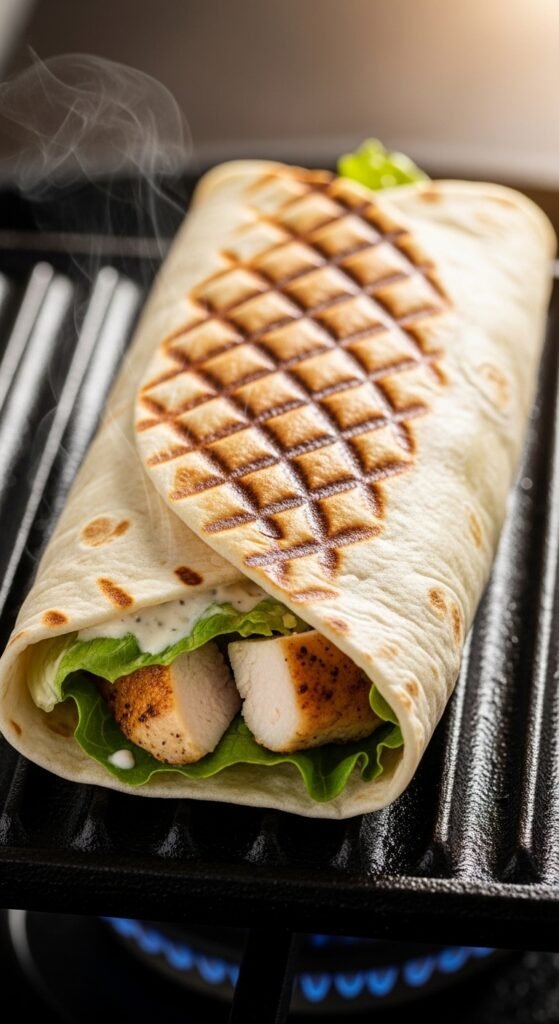
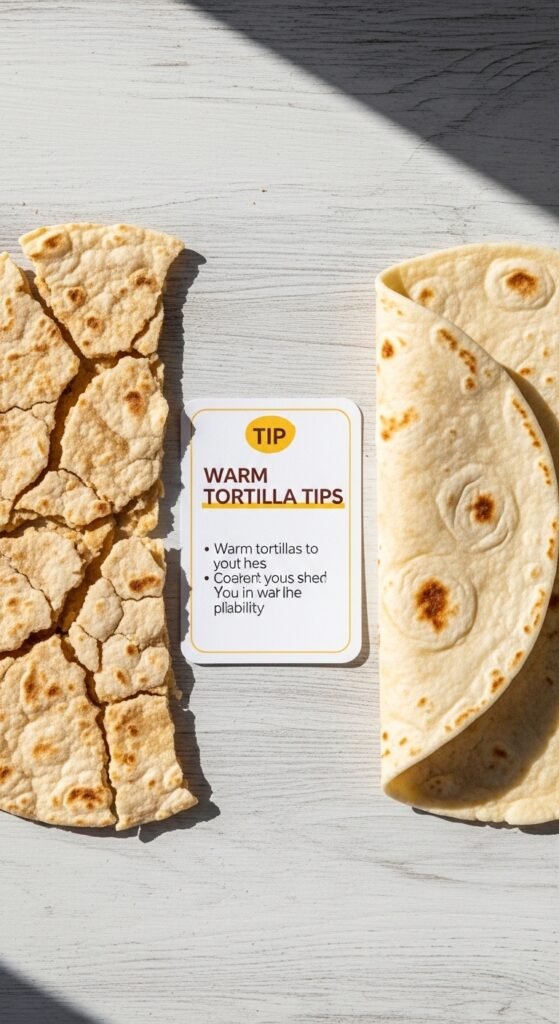
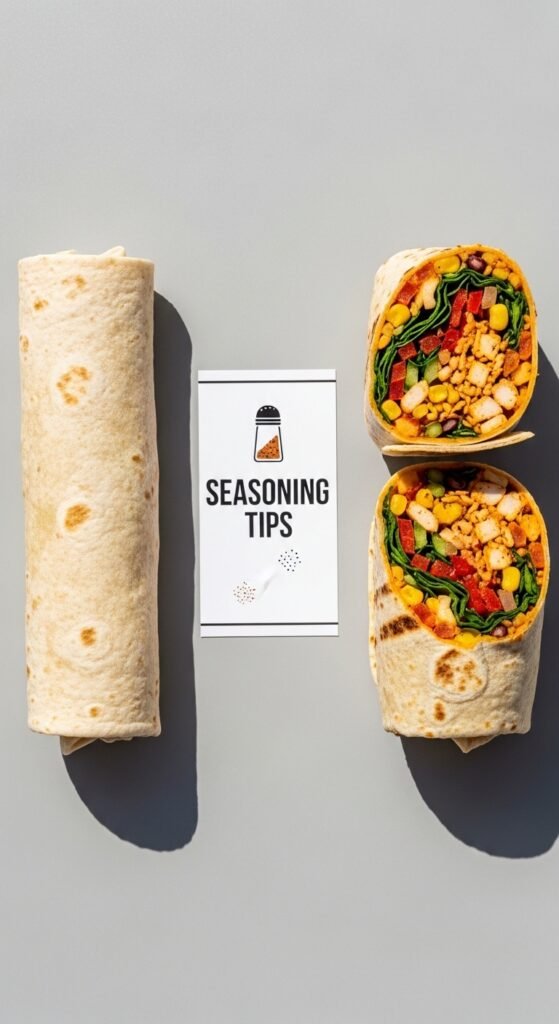
Pro tip that I learned from watching professional burrito rollers: warm your tortilla wraps before assembling. You can microwave them for 10 to 15 seconds, heat them in a dry skillet for about 20 seconds per side, or wrap them in foil and pop them in a 350°F oven for five minutes. Warm tortillas are significantly more flexible and much less likely to tear when you’re rolling.
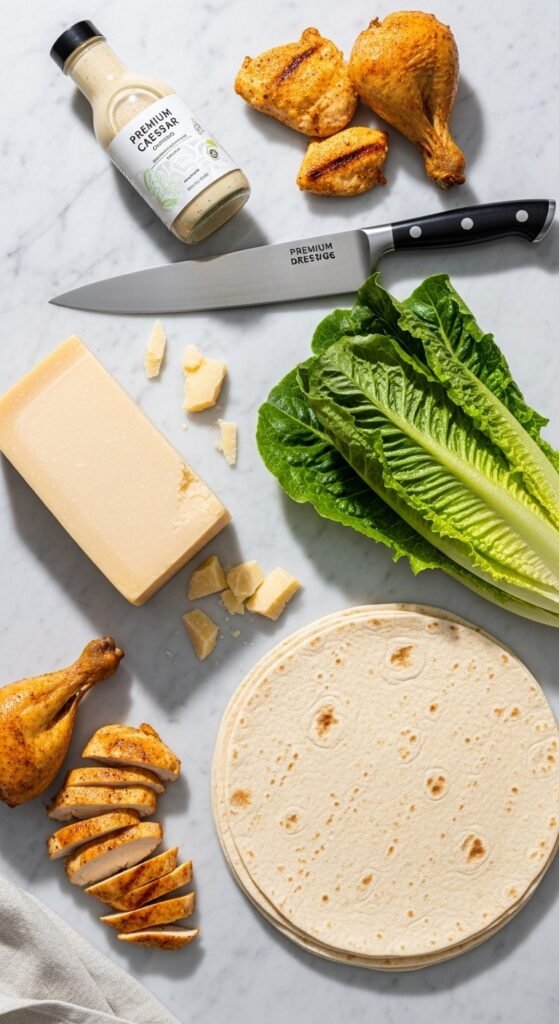
The Caesar Dressing: Liquid Gold
This is where many chicken Caesar wraps recipes go wrong. Using low-quality, overly processed Caesar dressing can ruin an otherwise perfect wrap. I’m not saying you need to make your own from scratch every time (though I’ll share an incredible homemade recipe below), but you should be selective about what you buy.
When shopping for store-bought Caesar dressing, flip the bottle around and read the ingredients. You want to see things like Parmesan cheese, anchovy paste (trust me on this—it adds essential umami), garlic, and egg yolks. Avoid dressings with long lists of unpronounceable chemicals and excessive sugar.
My top recommendations for Caesar dressing include:
- Renée’s Gourmet Caesar – Creamy, authentic flavor with real Parmesan.
- Kraft Caesar with Aged Parmesan – Readily available and consistently good.
- Cardini’s Original Caesar – This brand has history; Caesar Cardini supposedly invented the original Caesar salad in the 1920s.
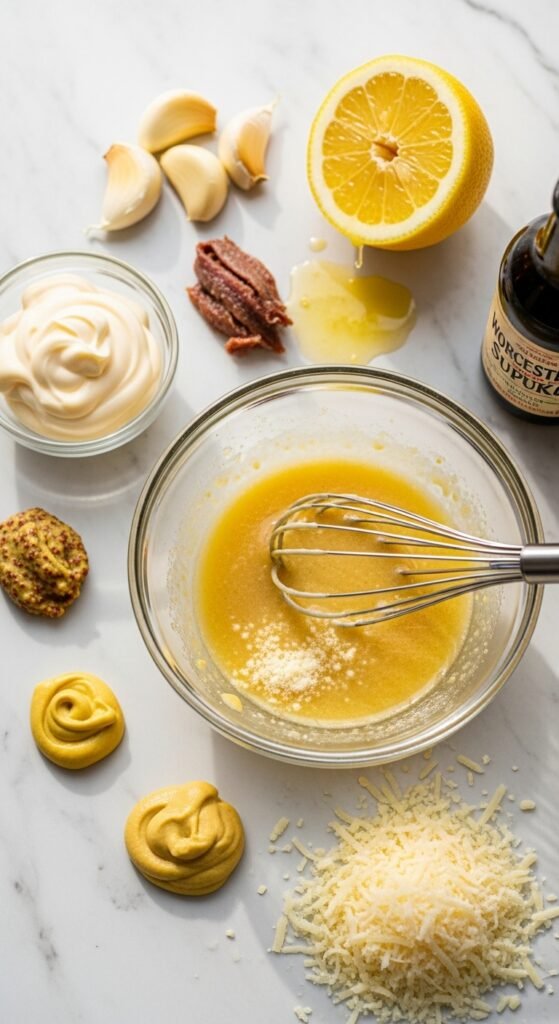
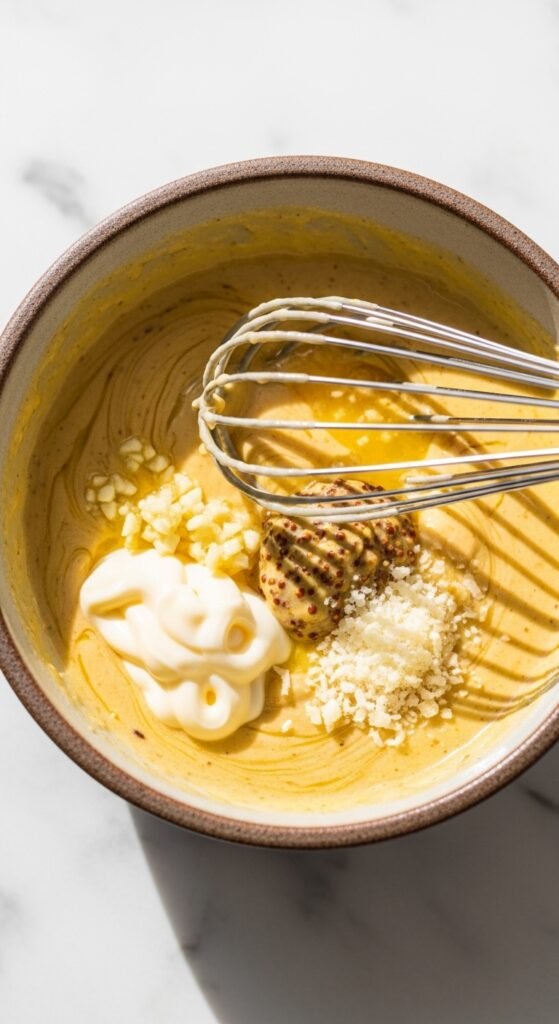
If you want to elevate your chicken Caesar wraps to extraordinary levels, try making this simple homemade dressing. I promise it takes less than five minutes and tastes infinitely better than anything from a bottle:
Quick Homemade Caesar Dressing
- 1/2 cup good mayonnaise
- 1/4 cup grated Parmesan cheese
- 2 tablespoons lemon juice (fresh is best)
- 1 tablespoon Dijon mustard
- 2 anchovy fillets, minced (or 1 teaspoon anchovy paste)
- 2 cloves garlic, minced
- 1 teaspoon Worcestershire sauce
- 1/4 teaspoon black pepper
- 2 to 3 tablespoons water to thin
Whisk everything together except the water, then add water gradually until you reach your desired consistency. That’s it. Store it in a jar in your refrigerator for up to one week.
The Romaine Lettuce: Crunch Factor

Romaine lettuce is non-negotiable in chicken Caesar wraps. Its sturdy ribs and crisp leaves hold up better than any other lettuce variety. Iceberg is too watery, spinach too delicate, and mixed greens just don’t provide that signature Caesar crunch.
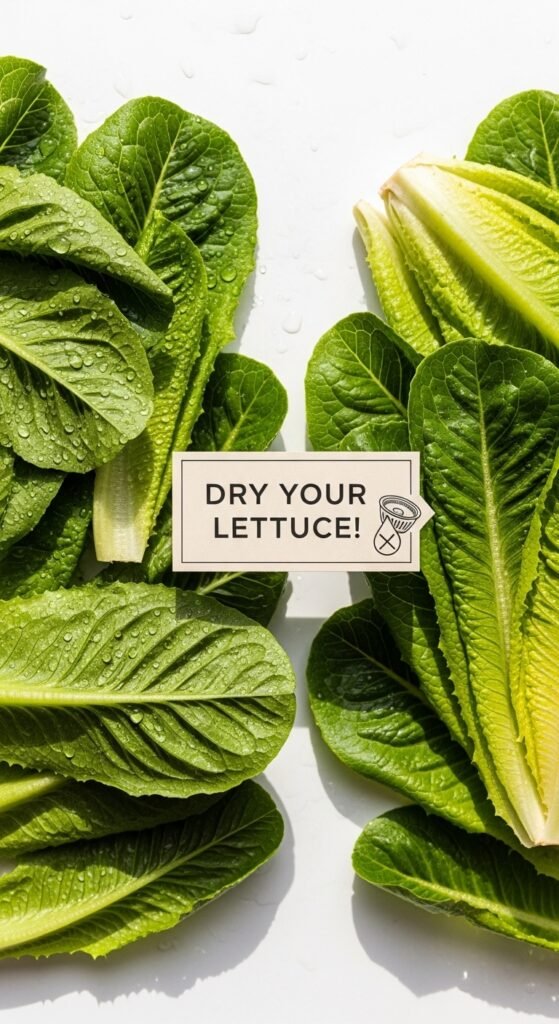
When preparing your romaine lettuce, wash it thoroughly and dry it completely. Any excess water will make your wrap soggy—and a soggy wrap is a tragedy. I use a salad spinner, but you can also pat the leaves dry with paper towels or a clean kitchen towel. Chop the romaine into thin ribbons rather than large chunks. This makes the wrap easier to eat and ensures you get lettuce in every single bite.
The Parmesan Cheese: Salty Perfection
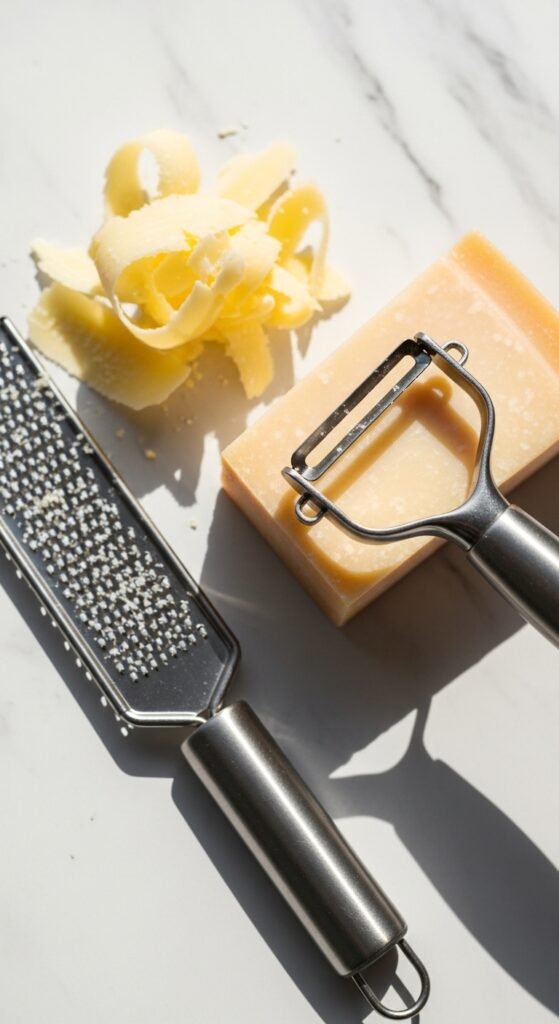
Freshly grated Parmesan cheese makes a world of difference. The pre-shredded stuff in bags contains anti-caking agents that prevent it from melting or integrating properly into your wrap. Spend the extra thirty seconds to grate your own Parmesan from a wedge. The flavor is sharper, nuttier, and infinitely more satisfying.
You can also use Parmesan shavings for a more elegant presentation, or mix in some Pecorino Romano for an even saltier, more intense cheese flavor.
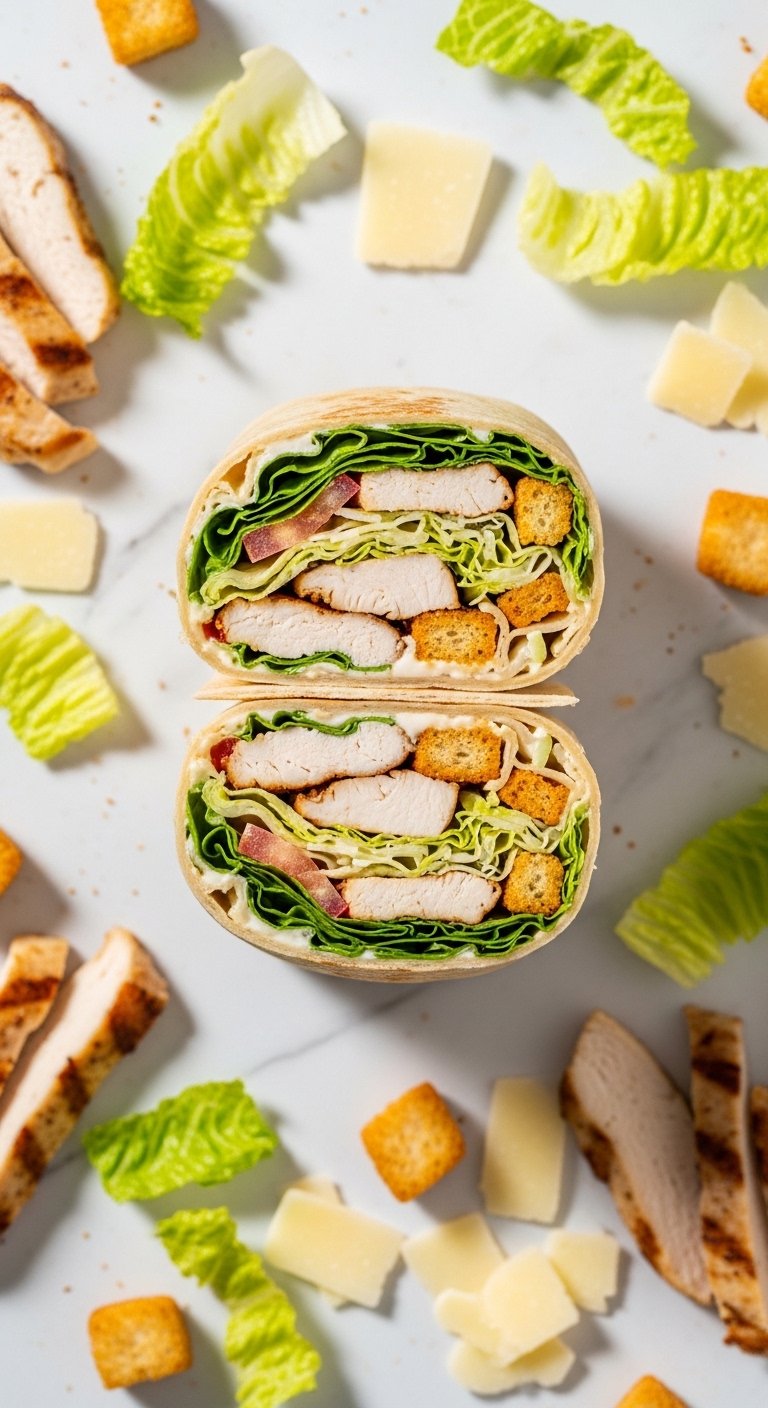
Step-by-Step Guide to Assembling the Perfect Chicken Caesar Wrap
Now that we’ve covered the components, let me walk you through the actual assembly process. Follow these steps carefully, and you’ll achieve wrap perfection every single time.
Step One: Prepare Your Ingredients
Before you even think about touching a tortilla, get all your ingredients ready. This is what professional chefs call “mise en place,” and it’s the secret to stress-free cooking.
- Shred or slice your chicken into bite-sized pieces. For rotisserie chicken, remove the skin and pull the meat off the bones with two forks.
- Wash, dry, and chop your romaine lettuce into thin strips.
- Grate your Parmesan cheese if you haven’t already.
- If using additional ingredients (more on those later), prep those as well.
- Warm your tortilla wraps using one of the methods I described earlier.
Step Two: Create Your Dressing Base
Here’s a trick that changed everything for me. Instead of just drizzling dressing over the filling, spread a thin layer of Caesar dressing directly onto the tortilla wrap. Use the back of a spoon to coat the entire surface, leaving about a half-inch border around the edges. This creates a moisture barrier that prevents the tortilla from getting soggy while also ensuring every bite has dressing.
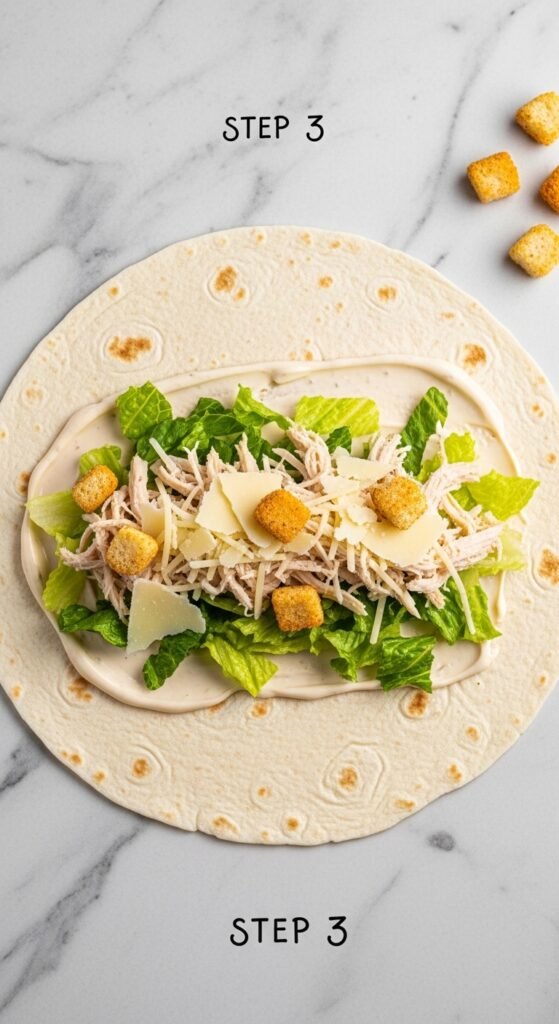
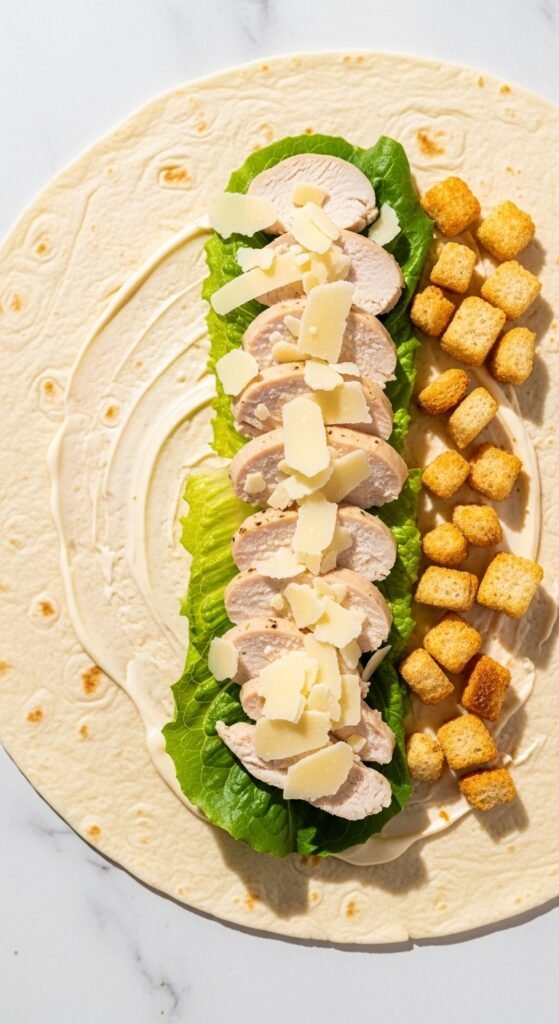
Step Three: Layer Your Ingredients Strategically
The order of your layers matters more than you might think. Start with the romaine lettuce directly on top of the dressing. The lettuce acts as another barrier between the dressing and other wet ingredients. Next, add your chicken in an even layer. Sprinkle generously with Parmesan cheese. If you’re adding any other ingredients, add them now.
Here’s a mistake I made for years: overfilling the wrap. Less is genuinely more. You want enough filling to be satisfying but not so much that you can’t close the wrap properly. As a general rule, use about 1/2 to 3/4 cup of total filling for a 10-inch tortilla.
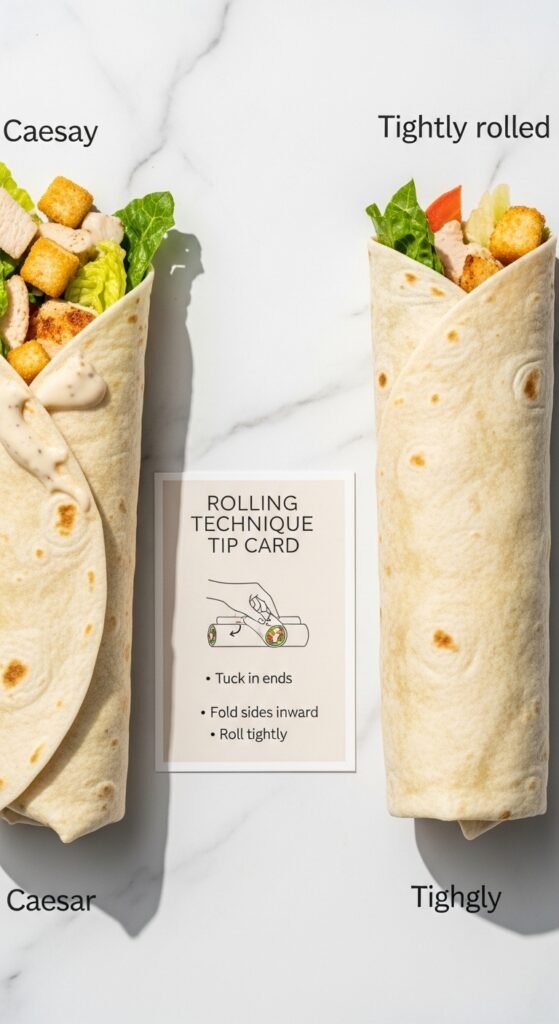
Step Four: The Rolling Technique
Place your filled tortilla on a clean surface. Fold the bottom edge up and over the filling, tucking it snugly against the ingredients. Fold in both sides, then continue rolling upward while keeping everything tight and compact. The final seam should be on the bottom.
If you’re planning to eat your chicken Caesar wrap later, wrap it tightly in parchment paper or foil. This helps it hold its shape and makes it portable.
Step Five: The Optional Toasting Step
For a warm, crispy exterior, place your assembled wrap seam-side down in a dry skillet over medium heat. Cook for about two minutes per side until golden brown and lightly crisped. This step transforms a good wrap into a great one, adding texture and warmth that takes the entire experience to another level.
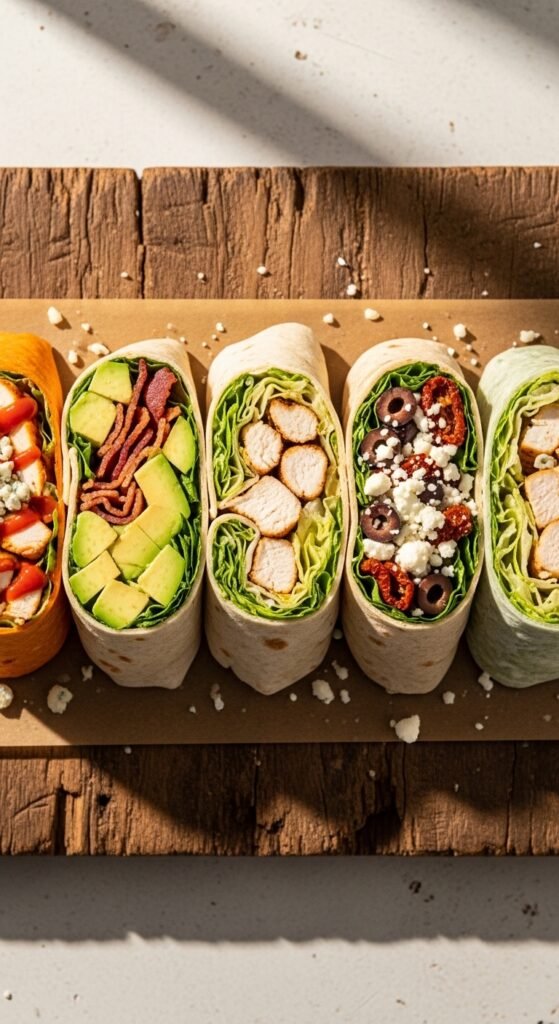
Delicious Variations on Classic Chicken Caesar Wraps Recipes
Once you’ve mastered the basic recipe, the possibilities are endless. Here are some of my favorite variations that I’ve developed over years of experimentation.
Spicy Buffalo Chicken Caesar Wrap
Combine two beloved flavors by tossing your shredded chicken in buffalo sauce before adding it to the wrap. Use blue cheese dressing instead of or in addition to Caesar dressing, and add some diced celery for extra crunch. The spicy, tangy, creamy combination is absolutely addictive.
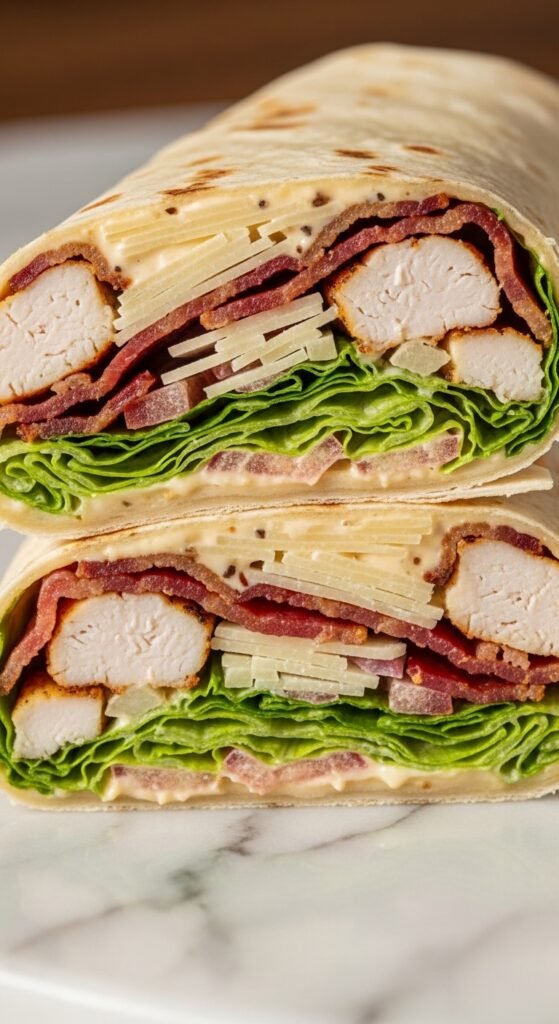
Bacon Chicken Caesar Wrap
Everything is better with bacon, and chicken Caesar wraps are no exception. Cook four to six strips of bacon until crispy, crumble them, and sprinkle over your other ingredients. The smoky, salty bacon pairs beautifully with the Caesar dressing and Parmesan cheese. I’ve served these at Super Bowl parties, and they disappear faster than anything else on the snack table.
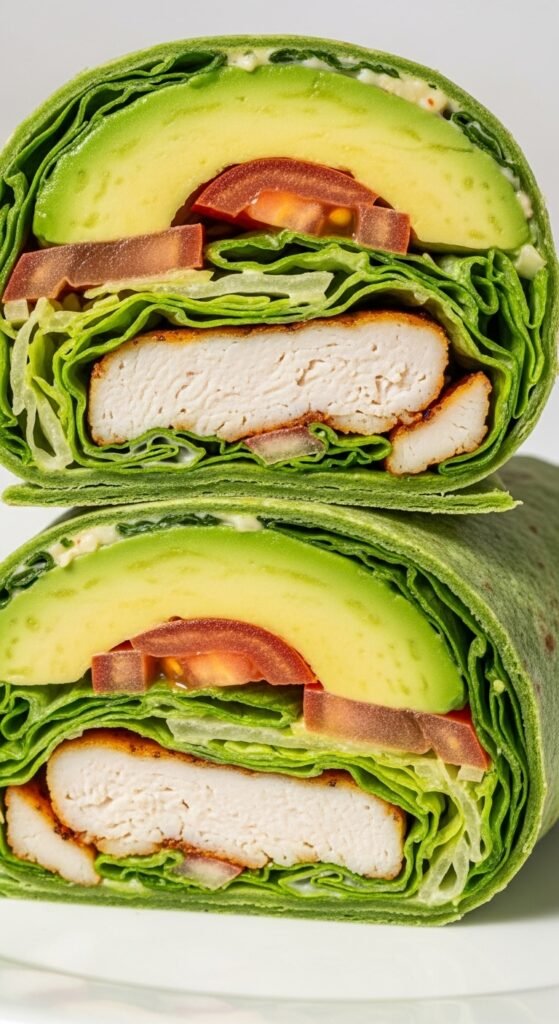
Avocado Chicken Caesar Wrap
Add sliced or mashed avocado to your wrap for creaminess and healthy fats. The avocado complements the Caesar dressing wonderfully while adding its own unique flavor. This version is particularly satisfying if you’re looking for a more substantial meal.
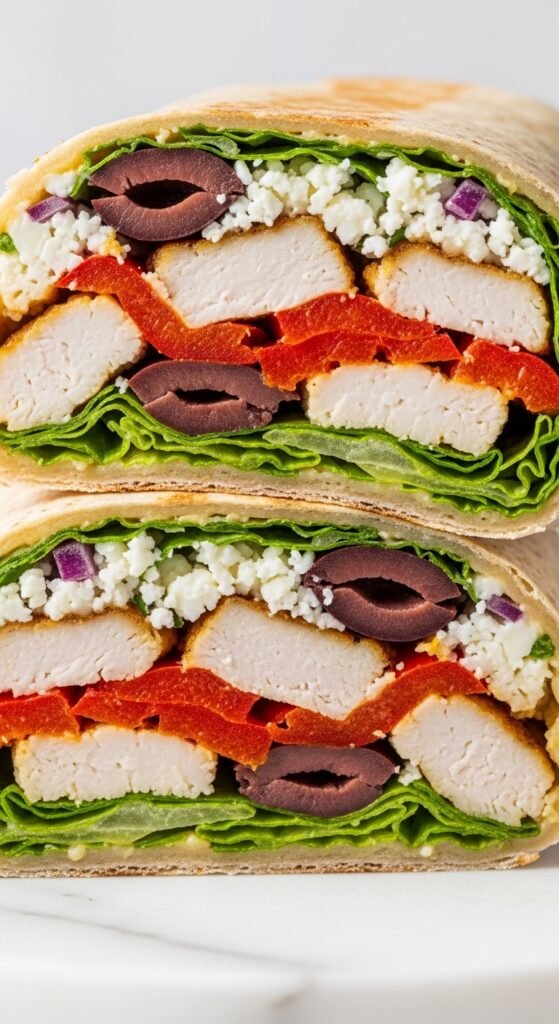
Mediterranean Chicken Caesar Wrap
Swap the romaine lettuce for mixed greens, add chopped kalamata olives, diced cucumber, cherry tomatoes, and crumbled feta cheese. Use a Greek yogurt-based dressing alongside your Caesar dressing for a lighter but still flavorful option.
Low-Carb Chicken Caesar Wrap
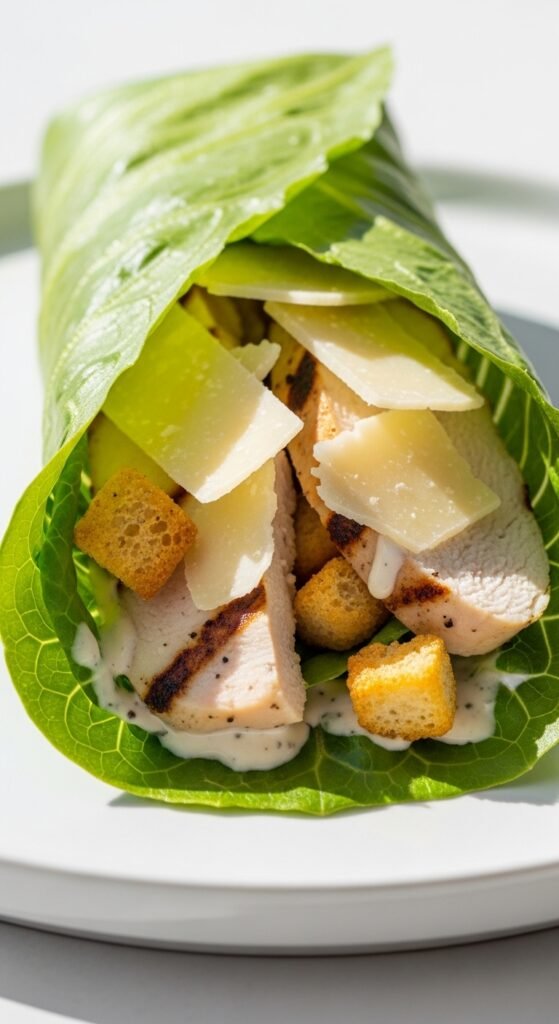
If you’re watching your carbohydrate intake, skip the tortilla wrap altogether and use large romaine lettuce leaves as your wrapper. Butter lettuce or collard greens also work well. You’ll get all the flavor with none of the carbs.
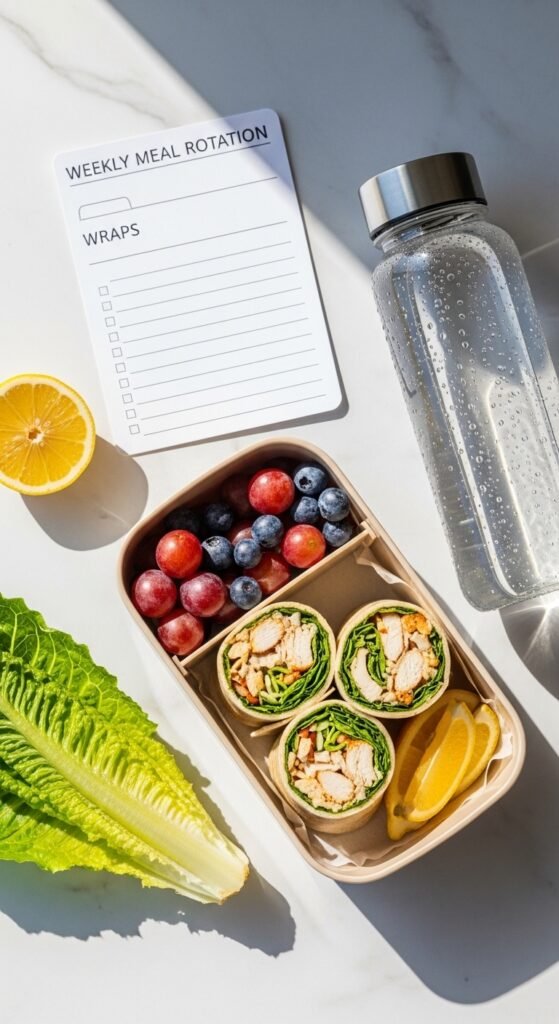
Meal Prep Strategies for Chicken Caesar Wraps
One of the questions I get asked most frequently is how to prepare chicken Caesar wraps ahead of time without them getting soggy. After extensive testing (and several disappointing lunches), I’ve figured out the best approaches.
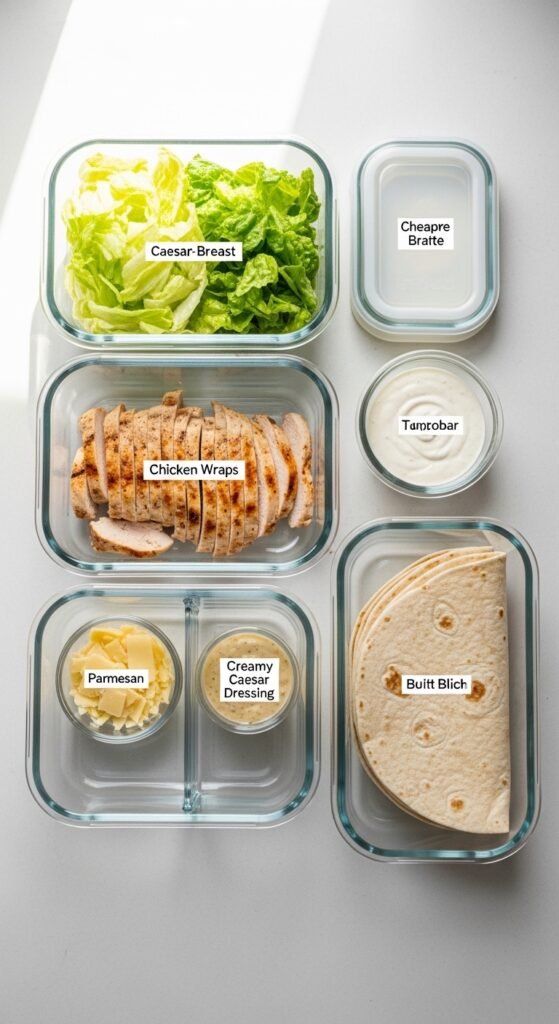
The Component Method
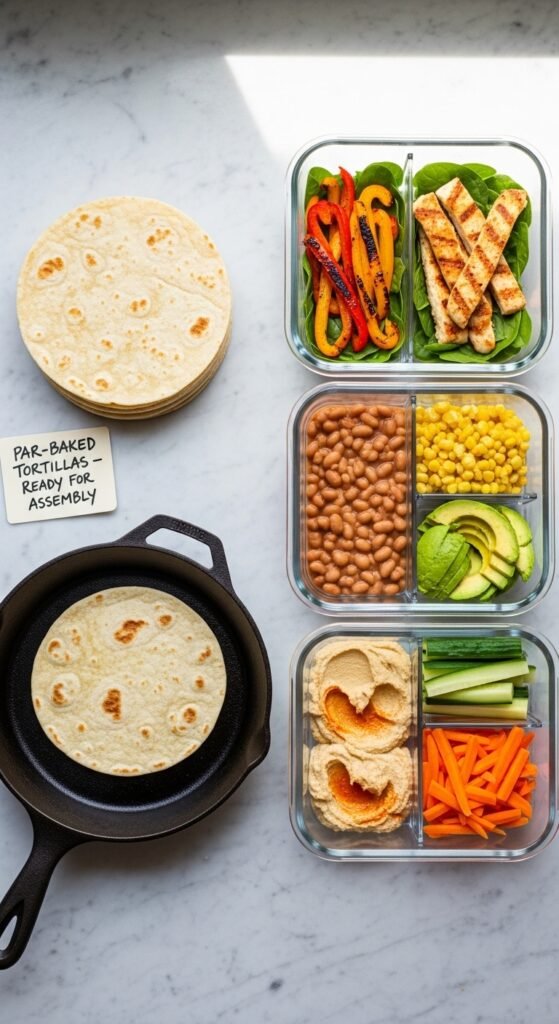
Store all your ingredients separately in the refrigerator. When you’re ready to eat, warm a tortilla wrap, spread on your Caesar dressing, and add your pre-prepped ingredients. This takes about two minutes and guarantees a fresh, non-soggy wrap every time.
Pre-shredded rotisserie chicken stays good in an airtight container for up to four days. Washed and dried romaine lettuce can be stored in a produce keeper for about the same time. I like to prep everything on Sunday evening so I have chicken Caesar wraps ready for Monday through Thursday lunches.
The Par-Baked Method
If you absolutely need fully assembled wraps ahead of time, here’s a workaround. Assemble the wraps without adding the Caesar dressing. Wrap them tightly in parchment paper, then in foil. Store them in the refrigerator for up to 24 hours. When you’re ready to eat, unwrap them, add the dressing, and either eat cold or toast them in a skillet. The dressing stays separate until the last minute, which prevents sogginess.
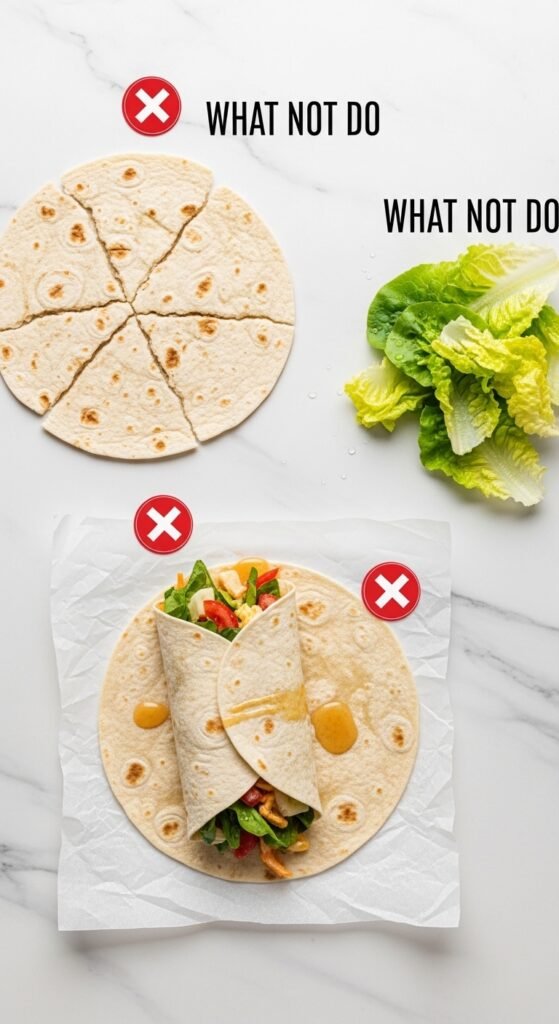
What Not to Do
Never, under any circumstances, assemble chicken Caesar wraps with dressing and expect them to stay fresh overnight. I learned this lesson the hard way when I made five wraps on a Sunday evening, excited for easy weekday lunches. By Monday at noon, the tortilla wraps had absorbed so much moisture that they resembled wet cardboard. The romaine lettuce had turned brown and limp. It was a complete disaster, and I ended up throwing all of them away.
Why You Should Buy Quality Ingredients and Tools with Confidence
Let me address something important. Throughout this guide, I’ve emphasized using quality ingredients—good Caesar dressing, fresh Parmesan cheese, sturdy tortilla wraps, and either rotisserie chicken or properly cooked chicken breast. You might be wondering if the extra expense is really worth it.
The answer is yes, and here’s why.
When you make chicken Caesar wraps at home using quality ingredients, you’re not just saving money compared to restaurant versions—you’re getting a superior product. That $8.99 wrap from the deli uses the cheapest possible ingredients to maximize their profit margins. The chicken is often mechanically separated and formed into uniform slabs. The dressing is loaded with preservatives and high-fructose corn syrup. The cheese is likely a Parmesan substitute made with cellulose powder.
By contrast, when you buy a rotisserie chicken from a reputable grocery store, you’re getting real chicken that was roasted that same day. When you purchase a wedge of authentic Parmesan cheese, you’re getting a product aged for at least 12 months with complex, nutty flavors. When you choose a quality Caesar dressing, you’re tasting anchovies, garlic, and real cheese instead of chemical stabilizers.
Think about the cost breakdown:
- Rotisserie chicken: $5 to $7 (yields 6 to 8 wraps)
- Flour tortillas (8-count): $3 to $4
- Romaine lettuce: $2 to $3
- Parmesan cheese wedge: $4 to $5 (lasts for multiple batches)
- Caesar dressing: $3 to $5
Total cost for 6 to 8 wraps: $17 to $24, or roughly $3 per wrap. Compare that to $9 at a restaurant or deli, and you’re saving 66% while eating better food. The tools you might want—a good chef’s knife, a cutting board, a salad spinner—are one-time investments that will serve you for years.
I remember hesitating to buy a $20 salad spinner, thinking it was an unnecessary gadget. After my third batch of soggy lettuce ruined my wraps, I finally made the purchase. That was four years ago, and I’ve used it at least twice a week ever since. The cost per use is now pennies, and my romaine lettuce has never been crisper.
Common Problems and Solutions When Making Chicken Caesar Wraps
Even with the best instructions, things can go wrong. Let me troubleshoot some common issues so you can avoid the mistakes I’ve made.
Problem: My tortilla keeps cracking when I roll it.
Solution: Your tortilla wrap is either too cold or too old. Warm it thoroughly before assembling. If warming doesn’t help, your tortillas might be past their prime. Fresh tortillas have more moisture and flexibility.
Problem: My wrap falls apart when I eat it.
Solution: You’re either overfilling or not rolling tightly enough. Use less filling, and really tuck that first fold in snugly. Wrapping the finished wrap in parchment paper or foil for five to ten minutes before eating helps it hold its shape.
Problem: The romaine lettuce makes everything watery.
Solution: Your romaine lettuce wasn’t dried properly after washing. Use a salad spinner or pat each leaf dry with paper towels. Also, avoid chopping your lettuce too far in advance—cut lettuce releases more moisture over time.
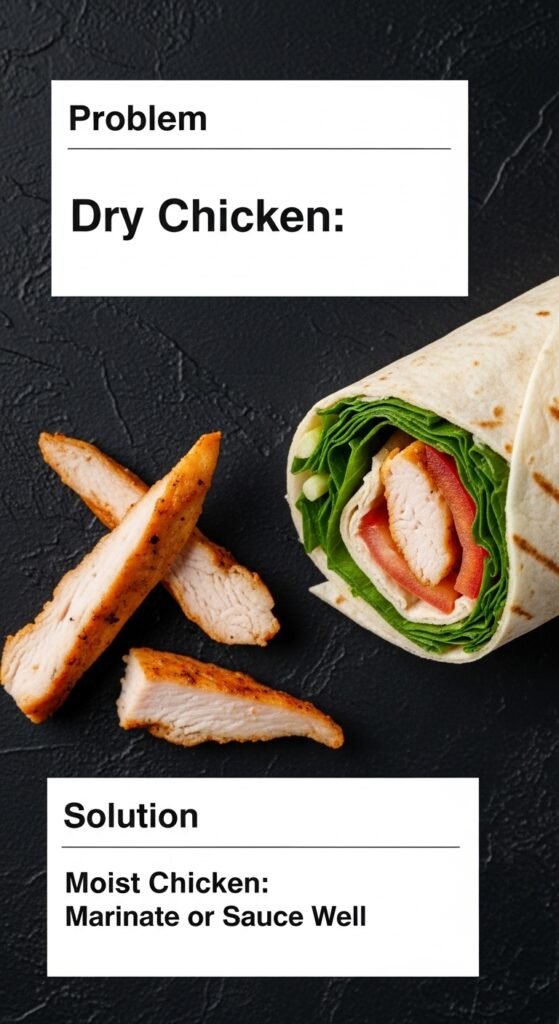
Problem: The chicken tastes dry.
Solution: If you’re using grilled chicken breast, you likely overcooked it. Chicken breast dries out quickly when it exceeds 165°F. Use a meat thermometer and pull it off the heat at exactly 165°F. For rotisserie chicken, add a tablespoon of the Caesar dressing directly to the shredded chicken before adding it to your wrap.
Problem: My wrap is bland.
Solution: You’re probably being too shy with the Parmesan cheese and Caesar dressing. These are bold, assertive ingredients—don’t be afraid to use them generously. Also, consider adding a pinch of black pepper or a squeeze of fresh lemon juice to brighten everything up.
Nutritional Information and Dietary Adjustments
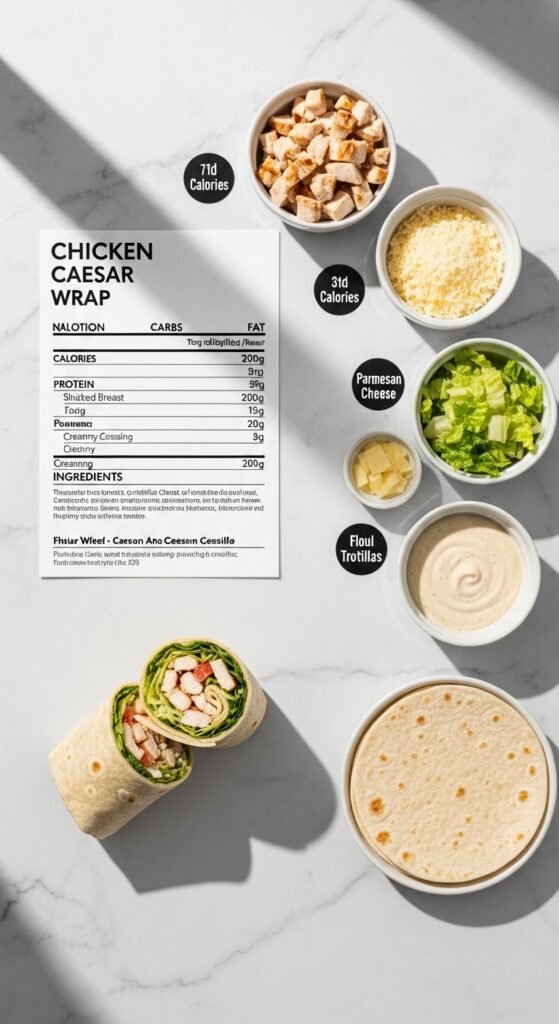
A standard chicken Caesar wrap made with a 10-inch flour tortilla, 4 ounces of chicken, 1 cup of romaine, 2 tablespoons of dressing, and 2 tablespoons of Parmesan contains approximately:
- Calories: 550 to 650
- Protein: 35 to 40 grams
- Carbohydrates: 35 to 45 grams
- Fat: 28 to 35 grams
- Fiber: 3 to 5 grams
- Sodium: 800 to 1,000 milligrams
These numbers vary significantly based on your specific ingredients and portion sizes. If you’re tracking macros, I recommend weighing your ingredients and calculating based on the exact products you use.
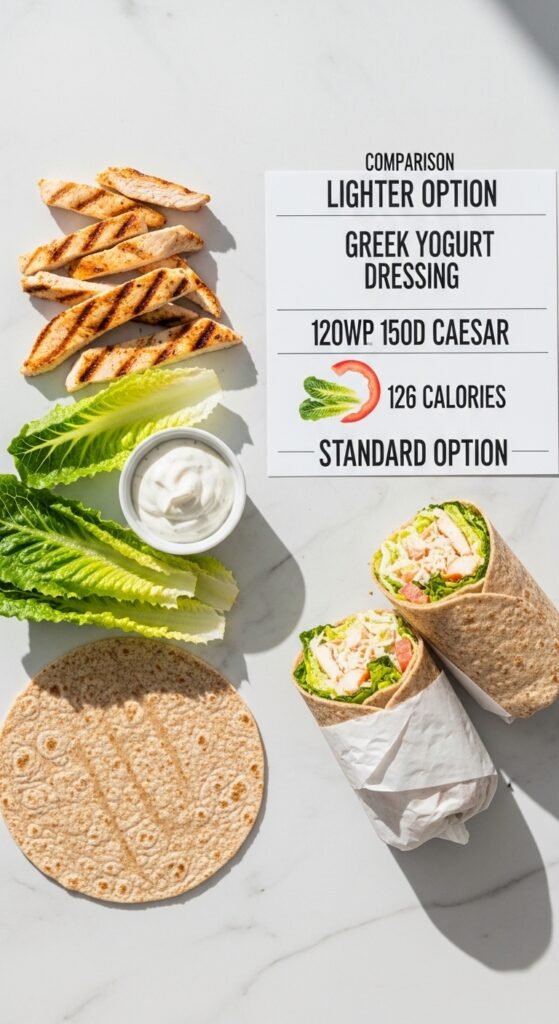
Making Lighter Chicken Caesar Wraps
Want to reduce the calorie count? Try these swaps:
- Use a low-carb or whole wheat tortilla wrap (saves 50 to 100 calories)
- Use Greek yogurt-based Caesar dressing or half the amount of regular dressing (saves 100 to 150 calories)
- Use grilled chicken breast instead of dark meat (saves 30 to 50 calories)
- Skip the cheese or use a reduced-fat version (saves 50 to 80 calories)
- Load up on extra romaine lettuce to increase volume without many calories
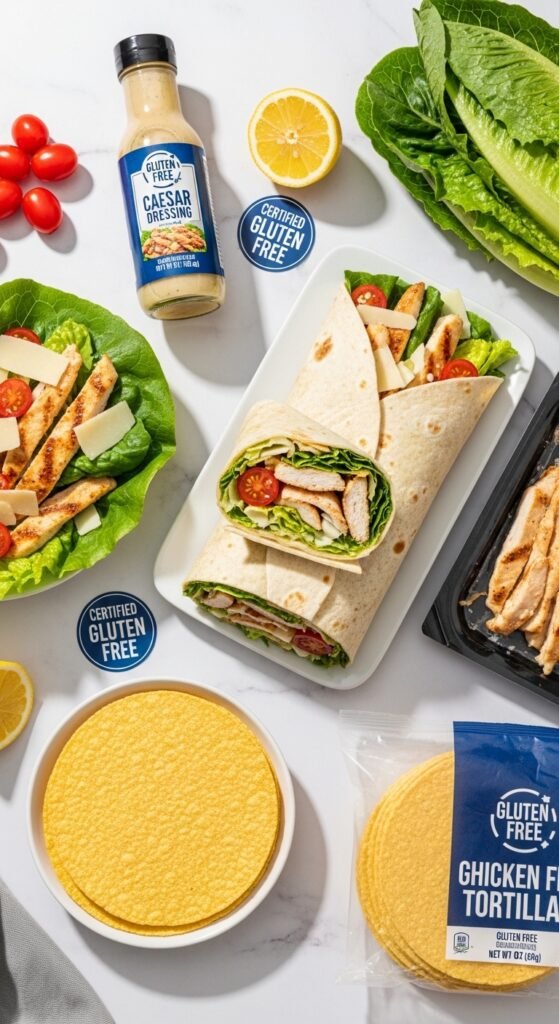
Making Gluten-Free Chicken Caesar Wraps
Gluten-free tortilla wraps are widely available now. Look for brands made with cassava flour, almond flour, or brown rice flour. Corn tortillas are also gluten-free but tend to be smaller and more fragile. If you go the corn tortilla route, use two stacked together for stability.
Always check your Caesar dressing label—some brands use malt vinegar or other gluten-containing ingredients. Most are gluten-free, but it’s worth verifying.
Serving Suggestions and Pairings
While chicken Caesar wraps are satisfying on their own, they also pair beautifully with various sides. Here are some of my favorite combinations:
For a light lunch: Serve your wrap with a small cup of tomato soup or a side of fresh fruit. The sweetness of the fruit balances the savory, tangy wrap perfectly.
For a heartier meal: Add a side of sweet potato fries, regular french fries, or a small pasta salad. I particularly love chicken Caesar wraps with crispy onion rings—the textures and flavors complement each other wonderfully.
For entertaining: Slice each wrap diagonally into pinwheels and arrange them on a platter with toothpicks. Add bowls of extra Caesar dressing for dipping, some celery sticks, and olives. This presentation looks impressive but takes almost no extra effort.
For a picnic or packed lunch: Keep your wrap wrapped tightly in parchment paper. Pack it in an insulated lunch bag with an ice pack if it will be more than two hours before eating. Add some grapes, a handful of nuts, and a sparkling water for a complete portable meal.
Frequently Asked Questions About Chicken Caesar Wraps Recipes
Can I use Greek yogurt instead of mayonnaise in homemade Caesar dressing?
Absolutely. Substitute Greek yogurt for half or all of the mayonnaise. The dressing will be tangier and lighter. You may need to adjust the seasonings slightly, as Greek yogurt doesn’t have the same richness as mayonnaise.
How long do leftover chicken Caesar wraps last in the refrigerator?
If you’ve followed the component method and kept ingredients separate, the prepped components last three to four days. Fully assembled wraps with dressing should be eaten within four to six hours for best quality.
Can I freeze chicken Caesar wraps?
I don’t recommend it. The romaine lettuce becomes mushy when thawed, and the tortilla wrap texture suffers significantly. The Caesar dressing can also separate. If you want to meal prep for longer storage, freeze just the cooked chicken and assemble fresh wraps when needed.
What’s the best way to reheat a chicken Caesar wrap?
If you want it warm, skip the microwave—it makes tortillas rubbery and lettuce limp. Instead, heat a skillet over medium heat and toast the wrap for two to three minutes per side. The exterior gets crispy while the interior warms through.
Can I make these wraps dairy-free?
Yes, with modifications. Use dairy-free Parmesan cheese (many brands make convincing vegan versions), dairy-free Caesar dressing (look for vegan options or make your own with cashews), and ensure your tortilla wraps don’t contain milk products.
Conclusion: Your Journey to Chicken Caesar Wrap Mastery
We’ve covered an enormous amount of ground together. From selecting the perfect rotisserie chicken to mastering the rolling technique, from troubleshooting common problems to exploring delicious variations—you now have everything you need to create chicken Caesar wraps that rival any restaurant version.
Remember that story I told at the beginning, about the desperate refrigerator raid that led to my wrap obsession? That moment of culinary serendipity taught me something important. Great food doesn’t have to be complicated. Sometimes the best meals come from using what you have, paying attention to quality ingredients, and giving yourself permission to experiment.
My challenge to you is this: make chicken Caesar wraps for dinner this week. Not as a rushed afterthought, but as the main event. Take the time to source good ingredients. Warm your tortilla wraps properly. Grate your Parmesan cheese fresh. Roll with intention. Then sit down and enjoy every single bite.
I promise you’ll taste the difference that care and quality make. And once you’ve experienced a truly great chicken Caesar wrap, made with your own hands and the best ingredients you can find, you’ll never look at those sad deli versions the same way again.
Now go forth and wrap with confidence. Your perfect lunch awaits.