Let me tell you a quick story. Last spring, my neighbor, a retired schoolteacher named Margaret, decided she was fed up with looking at her sad, patchy lawn. You know the type—half mud, half crabgrass, with one lonely bush that looked like it had given up on life. She didn’t have a massive budget or a team of gardeners. She just had a Saturday, a cup of coffee, and a stubborn desire for change.
Over the next few weeks, she planted a few front yard landscaping features: a curved flower bed, some solar lights, and a small flagstone path. The transformation was shocking. Not just because it looked beautiful, but because suddenly, the whole neighborhood changed. People slowed down to wave. A young couple stopped their car to ask who did her design. She told me, laughing, “I finally feel like I live in my own home again, not just rent the dirt in front of it.”
That’s the magic we’re chasing today. You don’t need a mansion or a landscape architect to create a front yard makeover that feels personal, welcoming, and smart. Over the next few thousand words, I’m going to walk you through 16 front yard landscaping ideas that are practical, beautiful, and easy to implement. By the end, you won’t just be inspired—you’ll have a clear, step-by-step plan to transform your own space. Let’s dig in.
Why Your Front Yard Matters More Than You Think
Before we jump into the ideas, let’s get one thing straight: your front yard is not just “the space before your front door.” It’s the first impression your home makes on the world. In fact, real estate experts agree that curb appeal landscaping can increase your property value by as much as 15%. Moreover, a well-designed front yard reduces stress, encourages neighborly chats, and even lowers your cooling bill if you add the right trees.
Consequently, investing time here pays off in spades. So, whether you have a sprawling suburban lot or a tiny city patch, these front yard landscaping ideas will work for you.
Idea #1: The “Welcome Home” Walkway

Your front path is like a handshake. If it’s cracked, narrow, or boring, that handshake feels weak. Instead, create a front yard walkway that invites people in.
Step-by-Step Guide:
- Measure your path: A good walkway should be at least 3-4 feet wide for two people to walk side by side.
- Choose your material: Flagstone offers a natural look. Brick feels classic. Gravel is budget-friendly.
- Curve it: Straight lines are efficient, but curves are friendly. A gentle S-curve slows people down and makes the garden feel larger.
- Edge it: Use steel or plastic edging to keep gravel in place and grass out.
Anecdote: My cousin used plain concrete pavers but spaced them apart, planting creeping thyme in the gaps. Now, every time she walks to her car, she releases a fresh, herbal scent. Visitors always ask, “What is that amazing smell?” It’s a conversation starter every single time.
Also Read:The Ultimate Coconut Rice Recipe: A Creamy, Aromatic Journey to Perfect Rice Every Time
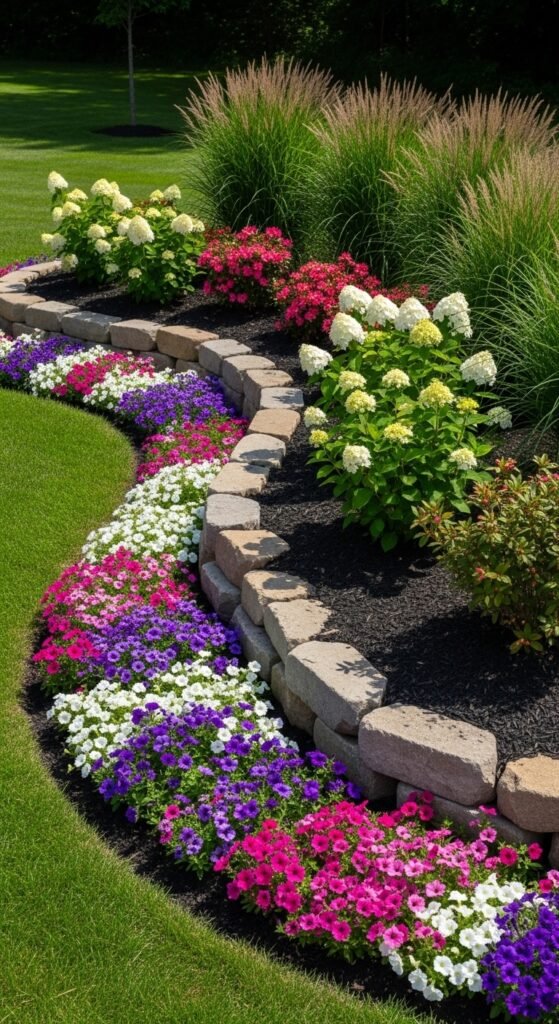
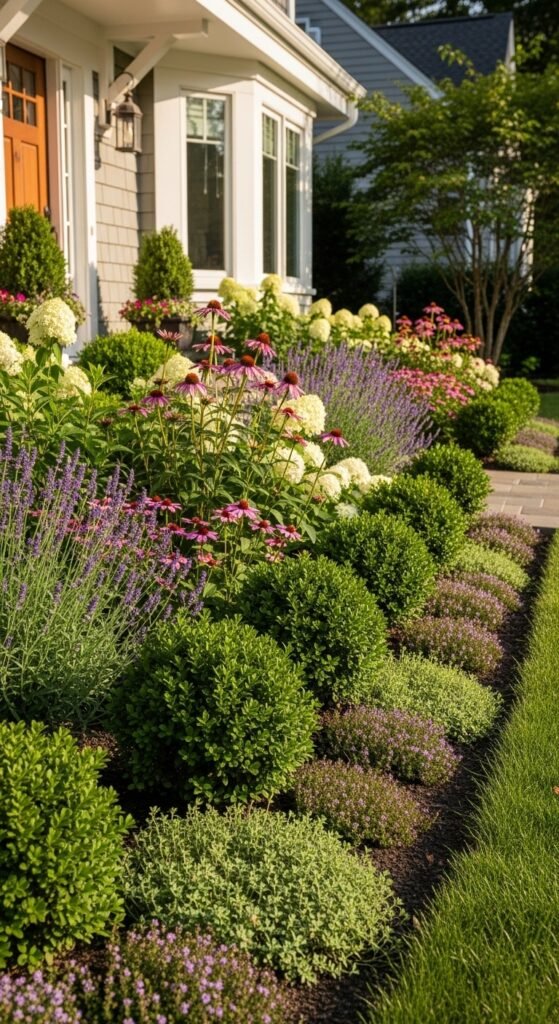
Idea #2: Layer Your Flower Beds Like a Pro

The number one mistake homeowners make is planting flowers in a single, straight row. That looks like a cemetery. Instead, use the “thriller, filler, spiller” method for flower bed landscaping.
- Thriller: A tall, dramatic plant (like a canna lily or ornamental grass) in the back or center.
- Filler: Medium, mounding plants (like geraniums or hostas) around it.
- Spiller: Trailing plants (like ivy or calibrachoa) that spill over the edge of the bed or container.
Pro Tip: Repeat the same plant three times throughout the bed. This repetition creates rhythm, which is visually pleasing. For instance, put a white hydrangea at both ends and one in the middle. Your brain will thank you for the pattern.
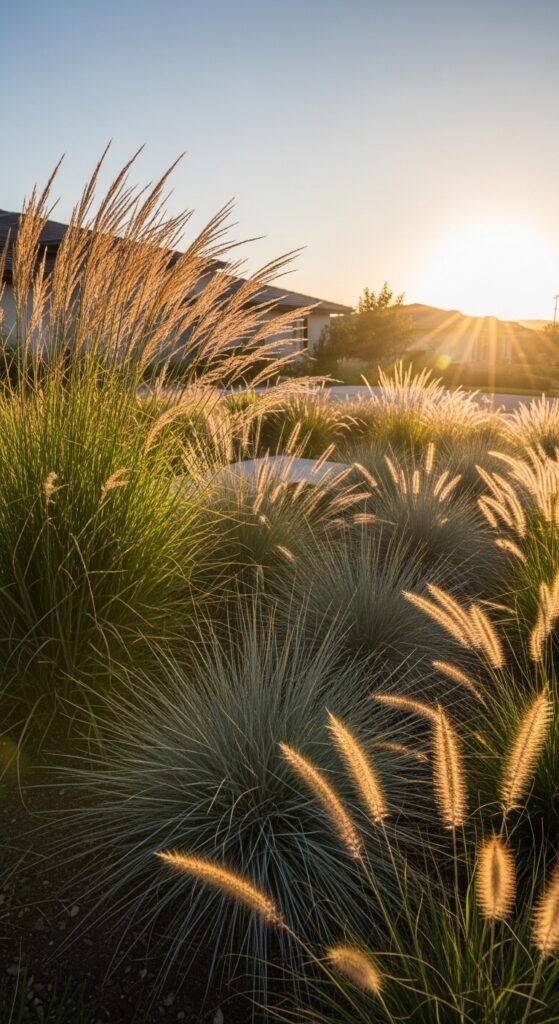
Idea #3: Low-Maintenance Front Yard Landscaping with Ornamental Grasses

Let’s be honest—not everyone has a green thumb. If you’ve killed a cactus (no judgment, I’ve done it), then you need low-maintenance front yard landscaping. Ornamental grasses are your new best friend.
Why they work: They grow almost anywhere, need little water, and look good year-round. In summer, they sway gracefully in the wind. In winter, they catch frost and snow like diamond necklaces.
Best Varieties:
- Pink Muhly Grass: Produces a cloud of cotton-candy pink in fall.
- Blue Fescue: A small, blue-tinted ball that works great in rock gardens.
- Feather Reed Grass: Tall, upright, and perfect for privacy.
Step-by-Step: Dig a hole twice as wide as the root ball. Place the grass in, backfill with soil, and water deeply once. After that, only water during droughts. Seriously. That’s it.
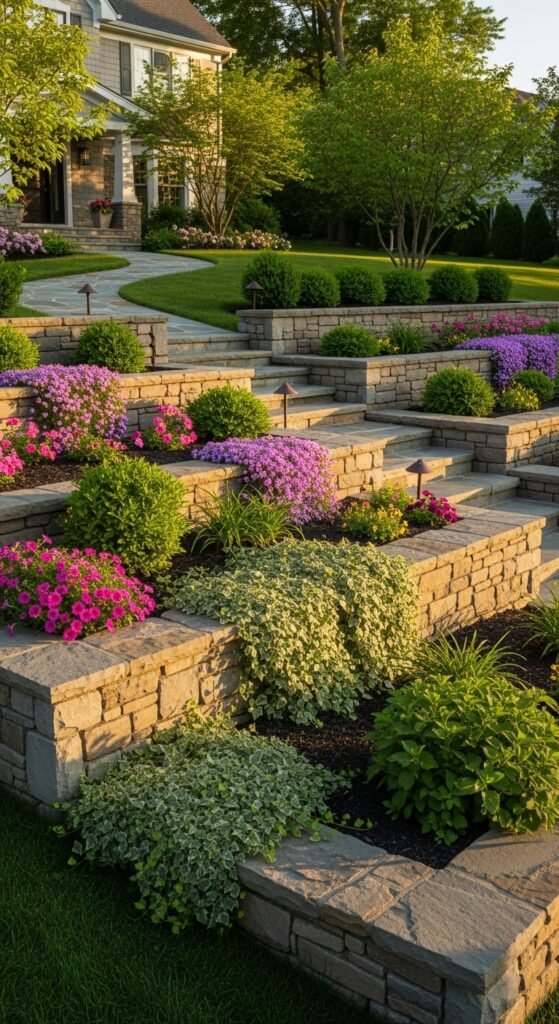
Idea #4: Define Your Domain with Low Garden Walls
A low garden wall does more than just look pretty. It separates your space from the sidewalk, reduces noise pollution, and creates a psychological “room” outside. You don’t need a mason, either. Today’s DIY retaining wall blocks snap together like Lego bricks.
How to Choose: For a cottage look, use natural fieldstone. For modern homes, use smooth concrete blocks in gray or white. For rustic charm, try railroad ties (though they require sealing).
My Mistake: I once built a wall too low—only 6 inches. It did nothing. Aim for at least 12-18 inches to actually feel the boundary. Also, always bury the first row of blocks slightly underground for stability.
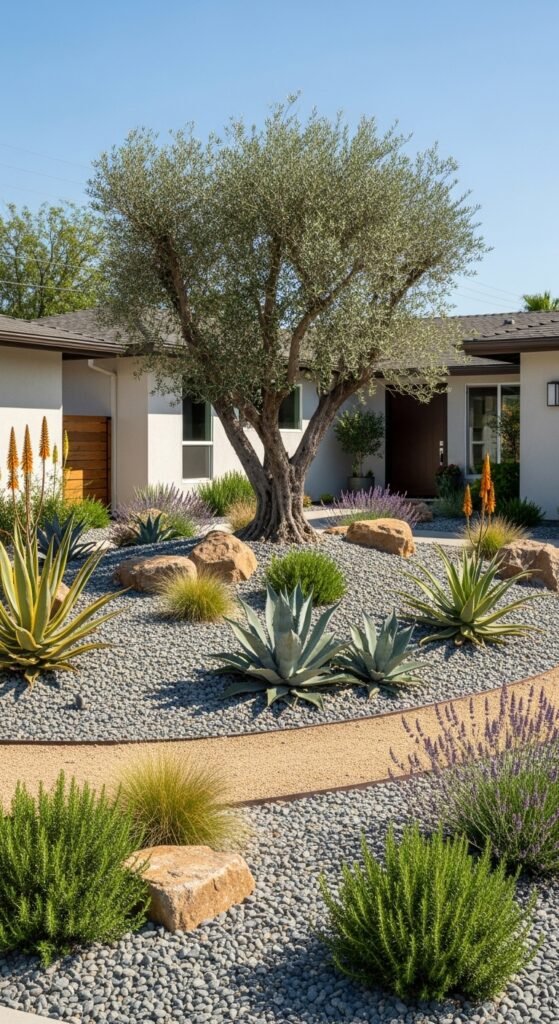
Idea #5: Rock Gardens for Dry Climates
Do you live somewhere where rain is a rumor? Then a rock garden is your hero. It’s a drought-tolerant front yard solution that looks intentional, not abandoned.
The Secret to a Good Rock Garden: Variety of sizes. Use large boulders (the size of a microwave), medium stones (football-sized), and small pebbles (like marbles). Scatter them so they look natural—as if a glacier dropped them there.
Plants to Pair: Sedum, sempervivum (hens and chicks), lavender, and yarrow. These plants thrive on neglect. In fact, watering them too much will kill them.
Step-by-Step:
- Lay down landscape fabric to block weeds.
- Place your largest boulders first, burying one-third of them into the ground.
- Add medium stones around the boulders.
- Scoop out planting pockets and add your succulents.
- Cover the rest with small pebbles.
Idea #6: The Cottage Garden Explosion
If rock gardens are minimalism, cottage garden landscaping is joyful maximalism. Think flowers spilling over paths, vegetables mixed with roses, and a charmingly “messy” look. The trick is that it’s not actually messy—it’s carefully curated chaos.
Core Plants: Foxglove (tall spikes), lupine (colorful pea-like flowers), poppies (papery blooms), and climbing roses (for vertical interest).
Anecdote: My aunt’s cottage garden is so famous in her town that people take wedding photos in front of it. Her secret? She throws a handful of wildflower seeds into any bare spot she sees. If something doesn’t grow, she says, “It wasn’t meant to be.” That attitude takes all the pressure off.
Pro Tip: Use a picket fence, even a short 2-foot one. It defines the chaos and makes it look deliberate.
Idea #7: Xeriscaping – The Smart Water Saver

Let’s get technical for a moment without being boring. Xeriscaping is just a fancy word for landscaping that needs almost no water. It’s ideal for the American West, but honestly, anyone who pays a water bill should consider it.
The 3-Zone Method for Xeriscaping:
- Zone 1 (Near the house): Use a little water here for things like a small lawn or potted plants.
- Zone 2 (Middle area): Use drought-tolerant shrubs like sage, bottlebrush, or oleander.
- Zone 3 (Far edges): No water at all. Just rocks, mulch, and hardy succulents like agave or yucca.
Result: You cut your outdoor water use by 50-75%. Plus, many cities offer rebates for converting to xeriscaping. That’s money back in your pocket.
Idea #8: Front Yard Edible Landscaping

Who says a front yard can’t feed you? Edible landscaping is growing fast because it’s beautiful and practical. Imagine walking past a bed of rainbow chard (which looks like pink, yellow, and red celery) or a blueberry bush that turns crimson in fall.
What Works in the Front:
- Kale: The ‘Red Russian’ variety is stunning.
- Dwarf fruit trees: A ‘Honeycrisp’ apple tree on dwarf rootstock stays under 8 feet.
- Herbs: Rosemary, thyme, and oregano are evergreen in many climates.
- Strawberries: Use them as a ground cover.
But won’t people steal my food? Surprisingly, research shows that front yard food gardens are rarely stolen from. In fact, they start conversations. One woman told me her neighbors knock on her door to ask if they can help harvest. Community happens when you grow food.
Idea #9: Modern Minimalist Front Yard
On the opposite end of the cottage garden is modern front yard landscaping. This is clean lines, hardscapes, and a limited color palette. Think gray, white, green, and maybe one punch of color (like a red Japanese maple).
Key Elements:
- Concrete pavers in large, rectangular shapes.
- Decomposed granite (looks like fine gravel but packs down hard).
- Single specimen trees (one perfect tree is better than ten okay ones).
- No flowers – use boxwoods, spiral evergreens, or bamboo in pots.
Why You Might Love It: It takes 30 minutes a month to maintain. No deadheading flowers. No mowing. Just sweep the walkway and trim one bush. For busy professionals, this is heaven.
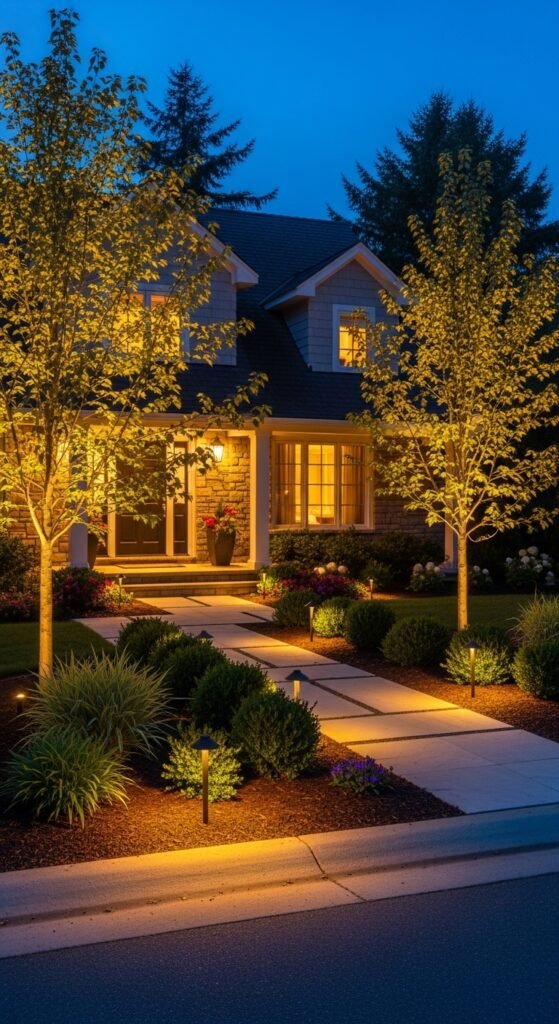
Idea #10: Nightscaping – Lighting Your Front Yard

Most people only see their front yard in daylight. That’s a shame because front yard lighting turns your home into a magical wonderland after dark. Moreover, lights improve safety and deter crime.
The Three Types of Outdoor Lights:
- Path lights: Small mushroom-shaped lights along the walkway.
- Uplights: Placed at the base of a tree, shining up into the branches.
- Downlights: Hidden in a tree, shining down like moonlight.
Step-by-Step Installation:
- Solar lights are easiest: just stick them in the ground. But they’re dim.
- Low-voltage LED lights are better. You’ll need a transformer (plugs into an outdoor outlet) and wire. Bury the wire 1 inch deep under mulch.
- Pro Tip: Aim lights away from your windows. Otherwise, you’ll feel like you’re in an interrogation room.
Anecdote: A client of mine installed six uplights on her three front oak trees. The first night, a family of deer stood in her yard, just staring at the lights. She watched them from her window for an hour. She said, “I’ve lived here 20 years, and I’ve never seen them like this.” Light changes everything.
Idea #11: The Rain Garden – Beautiful and Functional

Does a section of your front yard turn into a swamp every time it rains? Don’t fight it—embrace it. A rain garden is a shallow depression planted with water-loving plants. It catches runoff from your roof and driveway, filters pollutants, and recharges groundwater.
Where to Put It: At least 10 feet from your house foundation. Look for where water naturally pools.
Best Plants for Rain Gardens:
- Swamp milkweed (pink flowers, attracts monarch butterflies).
- Joe-Pye weed (tall, purple, smells like vanilla).
- Iris versicolor (blue flag iris).
- Cardinal flower (intense red, hummingbirds adore it).
Step-by-Step:
- Dig a bowl-shaped hole about 6 inches deep.
- Use the dirt to build a small berm (mound) on the downhill side.
- Plant your water-lovers in the bottom.
- Mulch with shredded hardwood (not bark chips, which float away).
The Result: No more muddy boots, plus a front yard that actively helps your local river or stream. You become an environmental hero.
Idea #12: Add a Focal Point (Not Just a Birdbath)
Every great room has a focal point—a fireplace, a large painting, a view. Your front yard needs one, too. A front yard focal point draws the eye and makes the space feel designed.
Good Focal Points:
- A small water feature (a bubbling urn or a ceramic pot with a solar pump).
- A large piece of pottery (glazed blue or terracotta).
- A specimen tree (like a weeping cherry or a Japanese maple).
- A bench (a simple wooden bench says, “Stay a while.”).
Bad Focal Points: A plastic flamingo. A rusty wheelbarrow. A satellite dish. Please, avoid those.
Pro Tip: The focal point should be off-center. If you put it dead-center, the yard looks like a target. Move it to about one-third of the way in from the edge.
Idea #13: Foundation Planting That Doesn’t Suck

You know those sad, overgrown juniper bushes that cover every old house? That’s bad foundation planting. Good foundation planting hides the ugly concrete of your house’s base while not blocking windows or inviting bugs.
The Rules:
- Rule 1: Don’t plant anything that will grow taller than your window sill. If it does, you’ll be pruning constantly.
- Rule 2: Leave 12-18 inches of air gap between plants and your siding. This prevents moisture damage and gives bugs nowhere to hide.
- Rule 3: Use evergreen shrubs as the backbone (like boxwood or yew), then add seasonal color in front (like annuals or small perennials).
Step-by-Step Removal: If you currently have giant junipers, don’t just cut them at the ground. Dig out the stump, or they will resprout. Rent a stump grinder or hire a pro. Then amend the soil with compost before planting new, smaller shrubs.
Idea #14: Create “Rooms” in Your Front Yard

This is an advanced idea, but it’s so cool. Use hedges, low walls, or even rows of tall grasses to divide your front yard into outdoor rooms. For example:
- Room 1 (Near the street): A pollinator garden with a small sign. Public-facing.
- Room 2 (Middle): A seating area with two chairs and a tiny table. Semi-private.
- Room 3 (By the front door): A container garden with your favorite herbs and flowers. Private.
Why This Works: It makes a small yard feel huge because you can’t see everything at once. Plus, it gives you different “moods” to experience.
Anecdote: A father of three built a 3-foot tall hedge maze in his front yard—just a simple zigzag. His kids now play hide-and-seek in it every evening. The neighbors’ kids join in. His front yard has become the block’s gathering spot.
Idea #15: Mulch, But Do It Right
Mulch is not just decoration. It suppresses weeds, retains moisture, and regulates soil temperature. But landscaping mulch can also kill your plants if you do it wrong.
The Volcano Mistake: Never pile mulch against the trunk of a tree. It looks like a volcano, but it traps moisture and rots the bark. The trunk should be as dry as a bone.
The Right Way:
- Use natural hardwood mulch (dyed mulch often contains toxic chemicals).
- Apply 2-3 inches deep, no more.
- Keep it 3 inches away from all stems and trunks.
- Replenish once a year in spring.
The Cost: A cubic yard of mulch (enough for a 300-square-foot bed) costs about $30-$50. That’s cheaper than a single dinner out, and it makes your whole yard look freshly manicured.
Idea #16: The Living Fence (Privacy with Plants)

Do you hate your neighbor’s RV? Is the street too noisy? Instead of a wooden fence (which rots and needs painting), grow a living fence using evergreen shrubs or trees. This is privacy landscaping that breathes, changes with the seasons, and adds oxygen to the air.
Best Plants for a Living Fence:
- Arborvitae ‘Emerald Green’: Grows 12 feet tall but only 3 feet wide. Perfect for narrow spaces.
- Holly: Has spiky leaves (security feature!) and red berries.
- Lilac: Deciduous (loses leaves in winter), but the spring smell is worth it.
- Bamboo: Only if you use a root barrier. Otherwise, it will take over your whole yard and the next three counties.
Step-by-Step for Planting a Hedge:
- Dig a trench, not individual holes. A trench encourages roots to intertwine, making a stronger wall.
- Space plants according to the label (usually 2-4 feet apart).
- Water deeply every week for the first year.
- Prune the top slightly narrower than the bottom (like an A-shape) so sunlight reaches the lower branches.
The Wait: A living fence takes 3-5 years to fully close. But during that time, you get to watch it grow. There’s deep satisfaction in that.
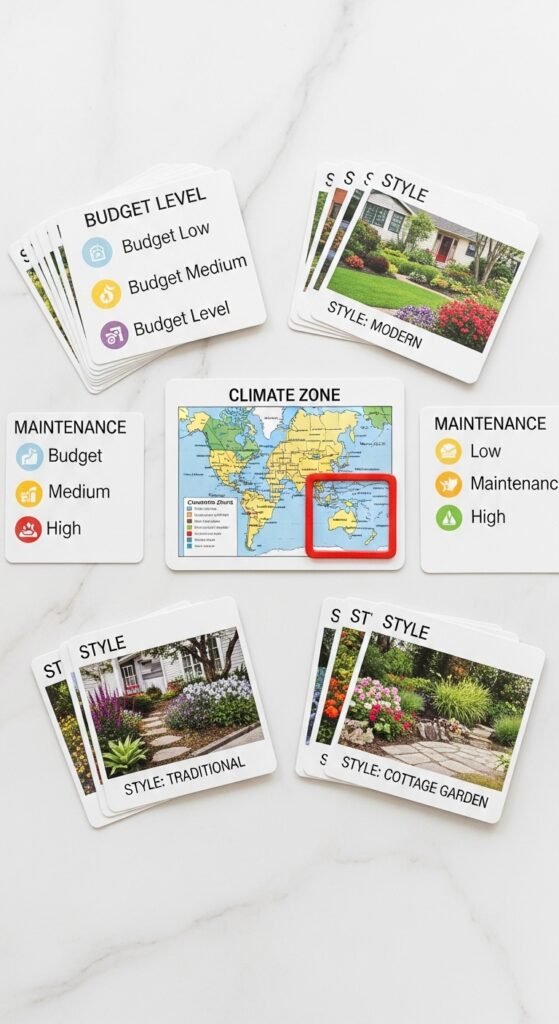
How to Choose Which Ideas Are Right for You

By now, your head might be spinning with front yard landscaping ideas. That’s normal. Here’s a simple decision matrix:
1. How much time do you have?
- Less than 1 hour/week: Choose Idea #3 (grasses), #5 (rock garden), or #7 (xeriscaping).
- 2-4 hours/week: Choose #2 (layered beds), #8 (edible), or #11 (rain garden).
- Unlimited time: Go for #6 (cottage garden).
2. What’s your climate?
- Dry: #5, #7, #4 (walls help retain soil moisture).
- Wet: #11 (rain garden), #12 (focal point that drains well).
- Cold winters: #1 (path that can be shoveled), #3 (grasses for winter interest).
3. What’s your budget?
- Under $200: #10 (solar lights), #15 (mulch), #2 (buy a few perennials).
- $500-$1,000: #1 (flagstone path), #4 (DIY wall), #16 (baby hedge plants).
- Over $1,000: #12 (water feature), #9 (modern hardscape), professional install.
Your 7-Day Front Yard Transformation Plan

You don’t have to do everything at once. In fact, trying to do all 16 ideas will overwhelm you. Instead, follow this week-long action plan:
- Day 1 (Saturday morning): Walk your yard with a notebook. Mark where water pools, where the sun hits, and what’s dead. Take before photos (you’ll want these later).
- Day 2 (Saturday afternoon): Go to a local nursery. Not a big-box store—a real nursery. Ask for plants native to your area. Native plants are 10x easier to grow. Buy 3-5 of them.
- Day 3 (Sunday): Remove the worst offenders. That dead bush. The broken edging. The weeds that are two feet tall. Just clear one section—maybe 10 feet by 10 feet.
- Day 4 (Monday after work): Lay down cardboard (yes, cardboard) over the cleared area to smother remaining weeds. Wet it. Cover with 2 inches of mulch.
- Day 5 (Tuesday): Plant your new native plants in that cleared area. Water them in.
- Day 6 (Wednesday): Add one focal point. A $30 ceramic pot from HomeGoods works great.
- Day 7 (Thursday): Stand back. Admire. You have begun your front yard transformation. Next week, do another 10×10 area. In two months, you’ll have a new front yard.
The Final Push: Why You Should Buy Quality Products Now
Look, I’ve given you a lot of free advice. But advice doesn’t build a walkway—pavers do. Advice doesn’t light your yard—LED lights do. And advice doesn’t grow plants—soil and seeds do.
Here’s the truth: Cheap landscaping products fail. That $10 solar light from the discount store? It will be dim and broken in six months. That bargain-bin mulch? It’s often shredded construction waste dyed black, and it will stain your sidewalk and poison your petunias.
What to Buy Instead:
- For lights: Buy copper or brass fixtures with replaceable LED bulbs. Yes, they cost $40 each instead of $10. But they will last 20 years.
- For tools: Buy a stainless steel shovel and a Japanese hori-hori knife. You’ll use them every weekend for decades.
- For plants: Buy one-gallon pots instead of four-inch “starter” plants. The larger plants establish faster, need less water, and won’t get eaten by birds. You’ll spend more upfront but succeed on the first try.
- For soil: Buy bagged compost from a reputable brand. Do not buy “topsoil” from a bulk place—it’s often just clay and sand.
Our Recommendation: We have curated a Front Yard Landscaping Starter Kit that includes:
- 10 copper path lights with warm-white LEDs.
- 50 square feet of commercial-grade landscape fabric.
- A hori-hori knife with a sharpened edge and depth markings.
- A digital guide to native plants for your specific zip code.
When you buy the kit, you’re not just buying products. You’re buying confidence. You’re buying the certainty that your front yard landscaping won’t fail. You’re buying Saturday mornings that feel like a creative hobby, not a chore. And you’re buying the smile on your face when the neighbors slow down to stare—just like they did at Margaret’s house.
Consider the Front Yard Landscaping Starter Kit. It comes with a 100% satisfaction guarantee. If you’re not thrilled with the transformation in 90 days, return it for a full refund. No questions. No hassle.
Conclusion: Your Front Yard Is Waiting

We’ve covered 16 ideas, from simple mulching to complex rain gardens. We’ve laughed at my cousin’s thyme path and marveled at my aunt’s cottage garden. We’ve made a 7-day plan and learned why cheap tools are a trap.
Now, the only thing left is action. You don’t need perfect conditions. You don’t need a degree in horticulture. You just need to start.
Pick one idea from this list. Just one. Buy the materials this weekend. Spend two hours on Saturday morning. Then, take an after photo. I promise you—the difference will shock you. And that shock? That’s the feeling of your house becoming a home.
So, what are you waiting for? Your front yard is calling. Let’s go make it beautiful. 🌱